Building Connected Devices
This guide goes through the steps of connecting a IoT device to Exosite's platform and using it with the ExoSense application. Weaved in with these steps is an overview of the device interface, data scheme, and terminology.
More advanced topics such as remote control/configuration, custom edge protocol configuration, in-field update (OTAU), custom IoT Connectors, and Cloud integrations for device data may be mentioned but are not covered for purpose of simplification of the most basic steps of getting your own device connected that does not already support Exosite.
Off-the-Shelf Hardware and Existing Cloud Connected Devices
For setting up and using hardware already supported with an off-the-shelf connector, please see the information under the **Hardware / Edge Integrations*' section of the documentation.
For connecting devices already connected to another device cloud, please see the guide on Device Cloud integrations.
Requirements
| Requirement | Notes |
|---|---|
| Device has an Internet Connection (IP) | The device must have a public internet connection for use with Exosite's standard Murano platform. For use cases where wireless sensors go to a gateway or there is no direct internet connection, please contact our support team |
| Device supports MQTT or HTTP protocol | Exosite's native Device protocol APIs are a standard RESTful HTTP and standard MQTT (Note: This is not a MQTT broker) |
| Device supports TLS Security | The TLS encryption requirement can be turned off for development, but not to be used for production use cases. |
| An Exosite Platform Account | To create IoT Connectors, an Exosite Account is required with ExoSense deployed. |
Types of Edge Hardware / IoT Devices
Typically devices are one of the following:
- An industrial computer (typically an industrial Linux computer / gateway) that allows running custom application code
- An embedded microcontroller based device running C, C++, and/or an embedded OS
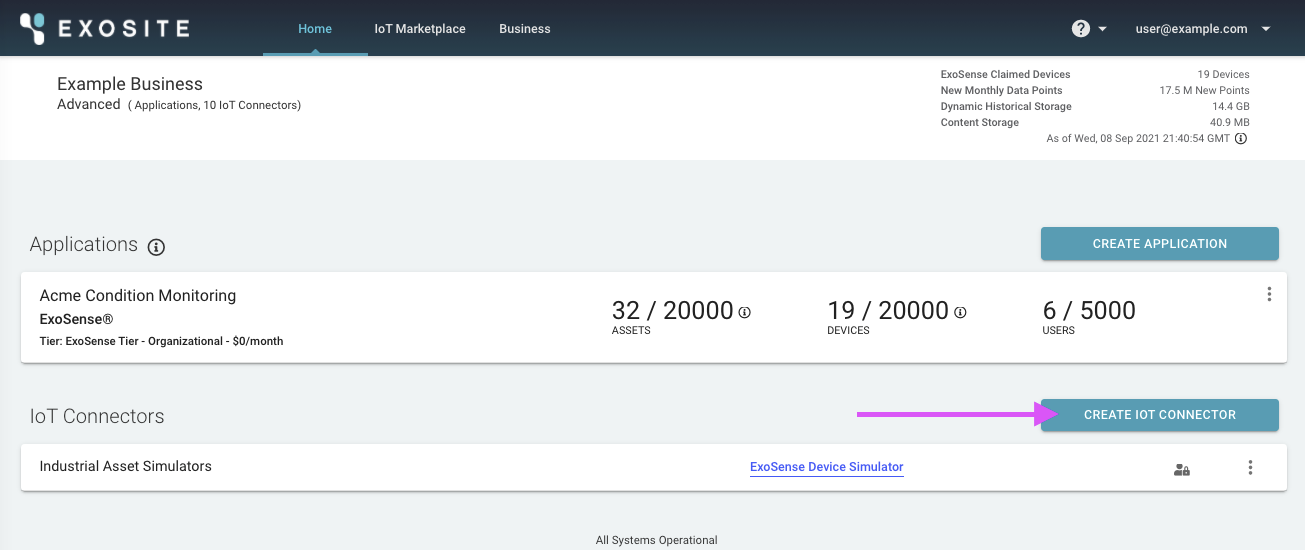
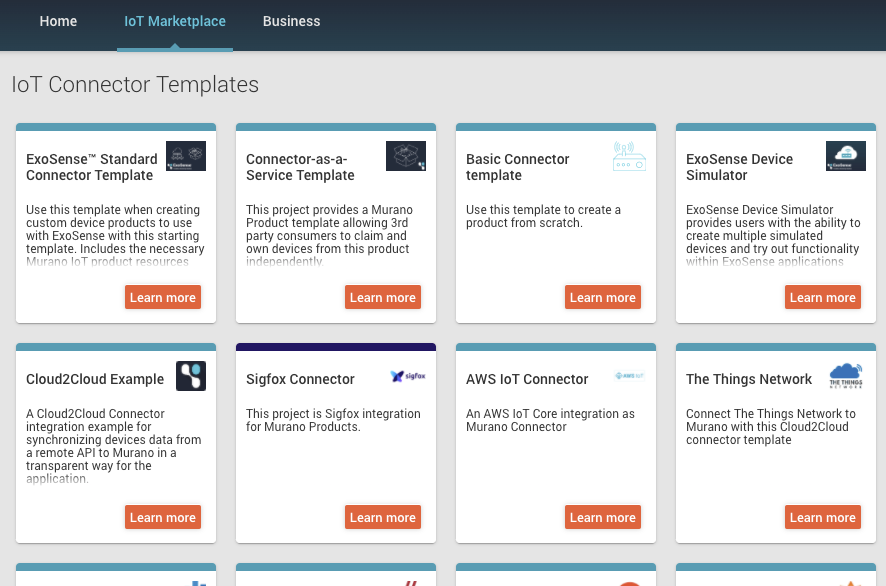
Create an IoT Connector
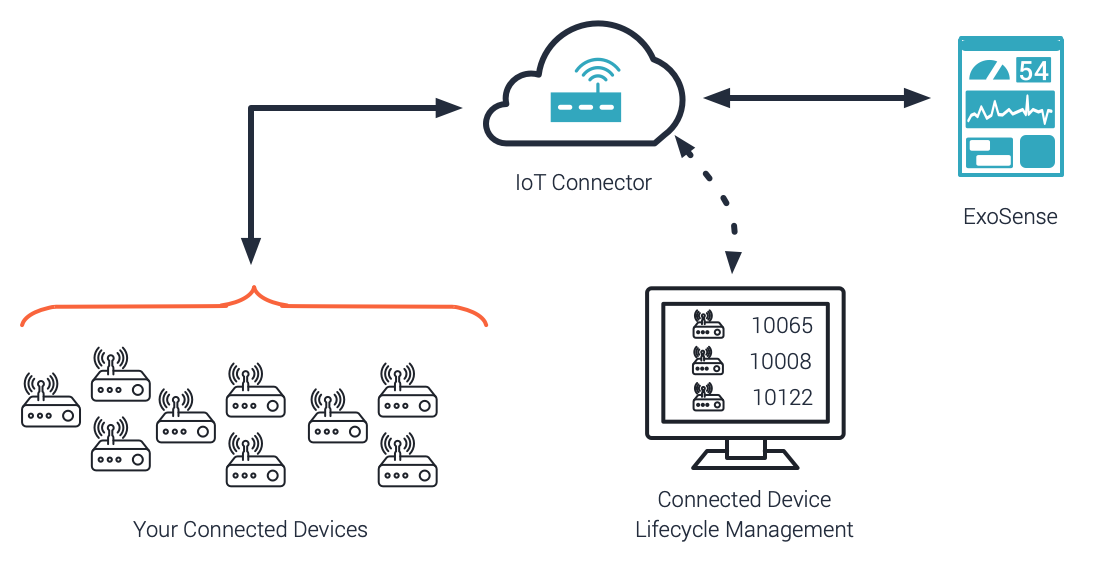
To build direct connected products for ExoSense use, the device firmware or application needs to communicate over one of Exosite's device API protocols to an IoT Connector that you manage.
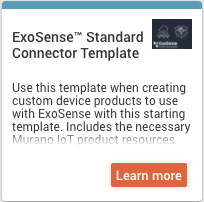
Deploy a new IoT Connector using one of the Templates found in the Exchange IoT Marketplace. For the purposes of this guide, we will use the ExoSense Standard Connector Template. This template includes the required API Resources needed for the ExoSense Device Interface.
IoT Connector Terminology
Device Identifiers
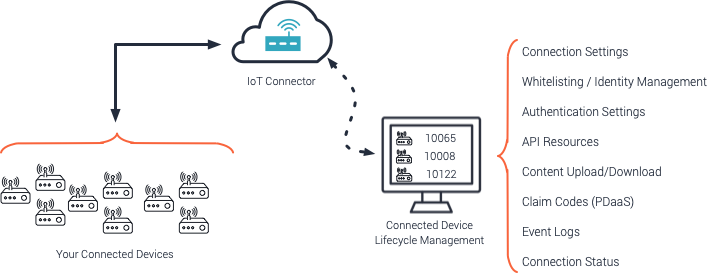
All connected devices have a unique identifier in the specific IoT Connector which allows all data events through the IoT Connector to and from ExoSense to be associated to that specific device. Devices are authenticated against their identity. More information can be found in Managing IoT Connectors
Often a device identifier is a serial number or MAC address - something that is software readable that is unique so that the device can provision itself.
Protocol
Natively, Exosite's Murano Platform supports two device protocols MQTT and HTTP. This guide focuses on these two native protocols, but Cloud to Cloud integrations can be used also.
Resources
All devices in a IoT Connector share a set of resources, which can be thought of like variable or url parameters. These resources are specified by the IoT Connector, but each device reads and writes to their own set. ExoSense has a specific set of resources that must be used. IoT Connector Management - Resources
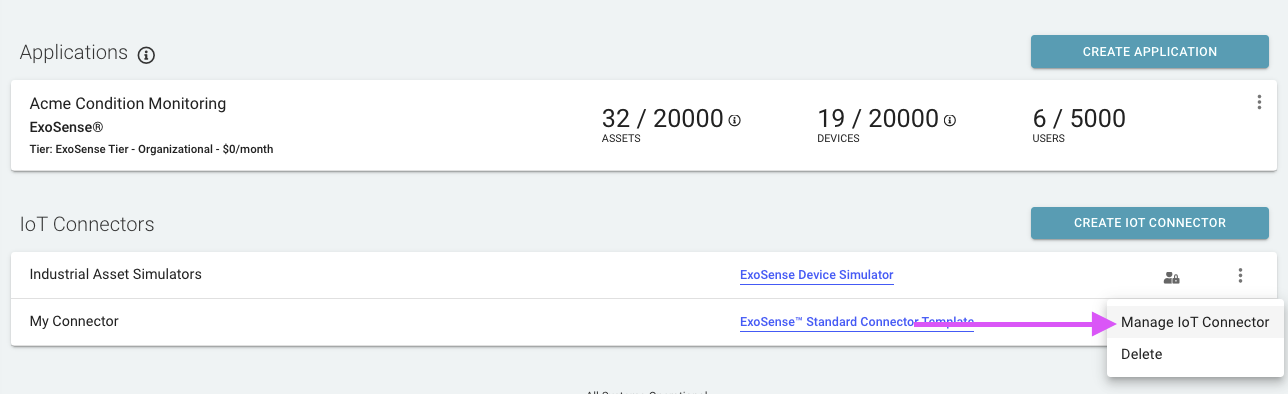
Once created, you can manage your connector by clicking on it.
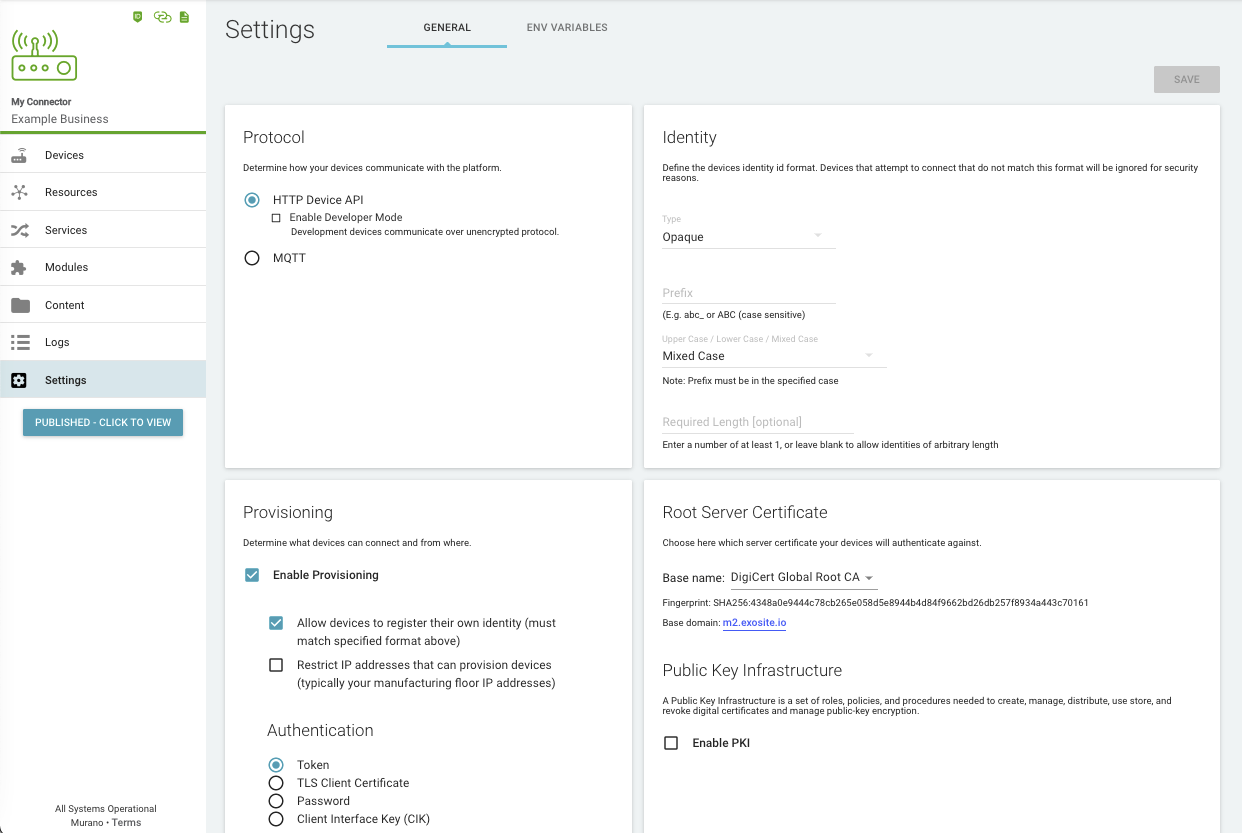
Protocol Settings and Provisioning
Using the IoT Connector Management area, set the required API protocol (HTTP or MQTT), the authentication settings, and get the unique connector API Endpoint.
For the purposes of this guide and the tutorial steps, we will be using HTTP with Token provisioning, but similar steps are followed for MQTT.
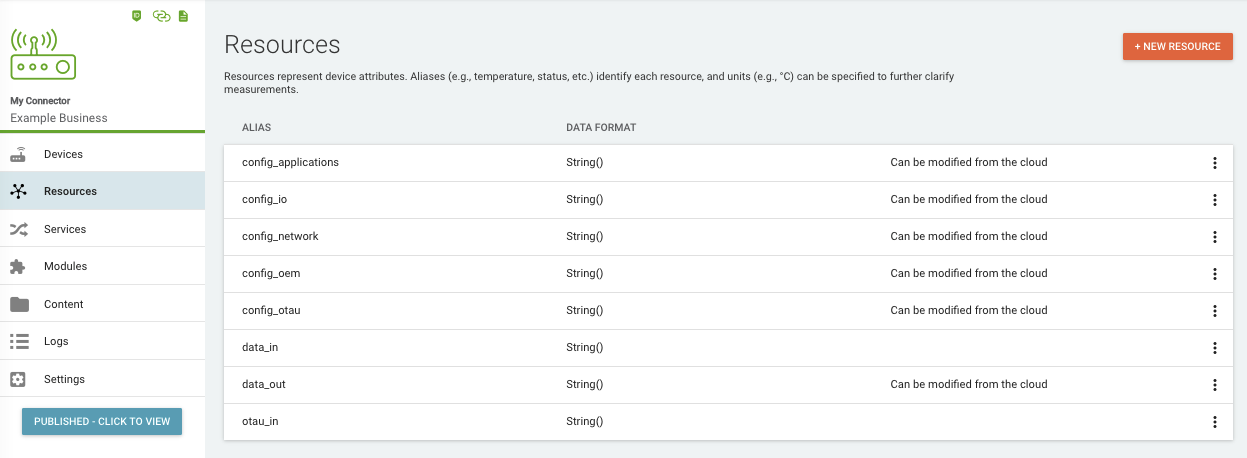
Check Resources Setup
ExoSense requires and uses the following resources. Having used the Standard ExoSense Connector Template, these should already be set up.
| Resource Name | Writer | Description |
|---|---|---|
data_in | Device | Used to send data from device to cloud in the format defined in Section 4 |
config_io | Device / App | Used to share the complete configuration for a channels in the product. This should be a 2-way synchronization meaning in the case of a self-configuring gateway, this would be written to by the gateway. In a gateway that requires manual configuration from the application, this would be read by the gateway and cached locally. |
data_out | App | Optional Used for Device Control |
config_applications | Device / App | Optional Specifies configuration for the interfaces used by gateway protocol/fieldbus applications (i.e. “interface = /dev/tty0”) |
config_otau | Device / App | Optional Used for In-field updates / Over-the-Air updates. See OTAU Schema |
otau_in | Device | Optional Used for In-field updates / Over-the-Air updates. See OTAU Schema |
config_oem | TBD | Reserved for future use |
config_network | TBD | Reserved for future use |
The full specification can be found here Exosite Schema
Add a Device Identity
All connected IoT devices are represented by a unique ID in an IoT Connector. All data events include this identifier so the data can be mapped properly. Since all identities must be provisioned and require authorization to use the API, the data remains securely associated to that device through the system.
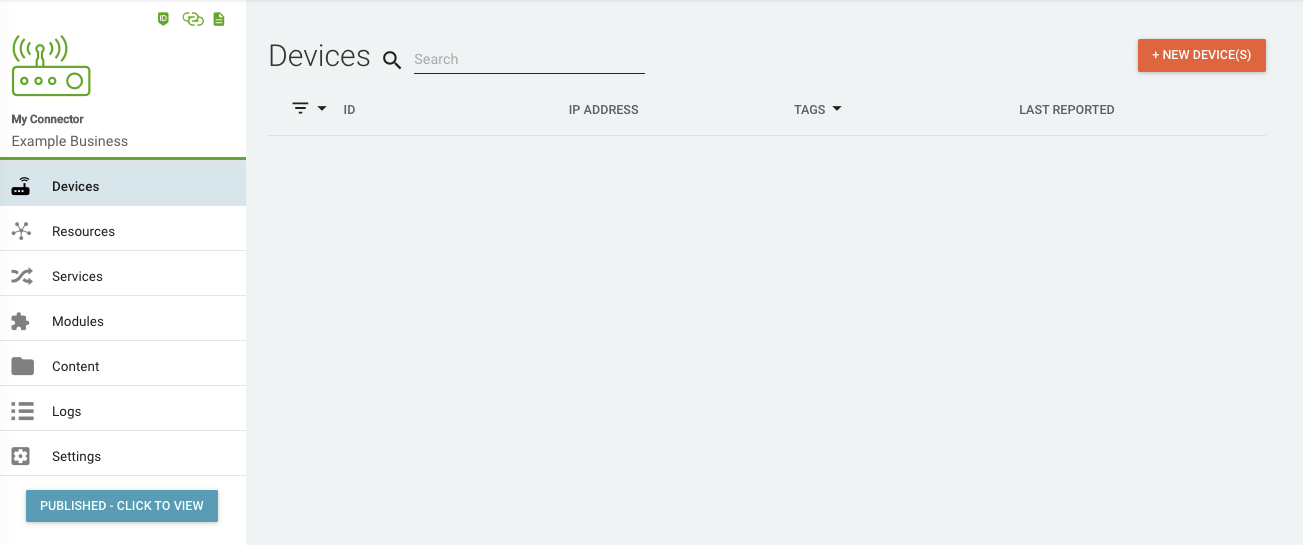
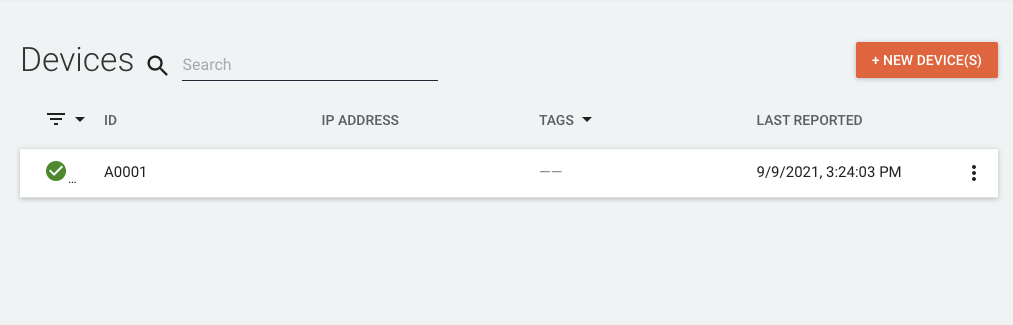
Add your first device identity by using the + New Device(s) button. (Depending on your settings, devices may also register their identity when they provision).
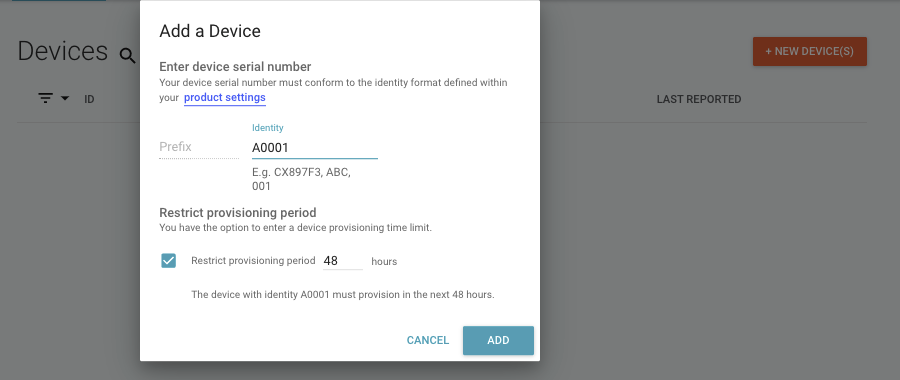
For this guide, we are going to add identity A0001. Note that when you add the identity, it will show that it has not yet authenticated yet.
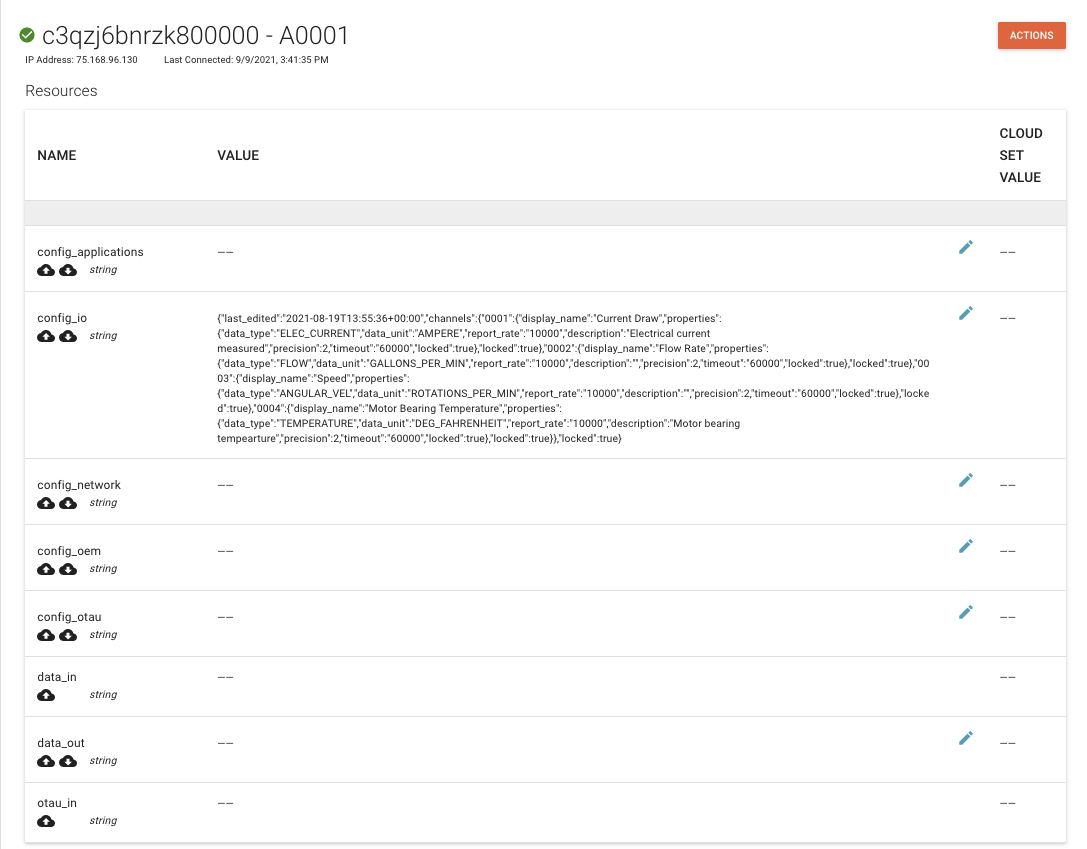
After adding, you can click on the device to see the state of it's resources.
![]()
Can this be automated?
Yes, bulk device identities along with certificates and tags can be uploaded using a .csv file. An administrative API is also available - contact support for more details. Devices can also self register, if enabled in your IoT Connector settings.
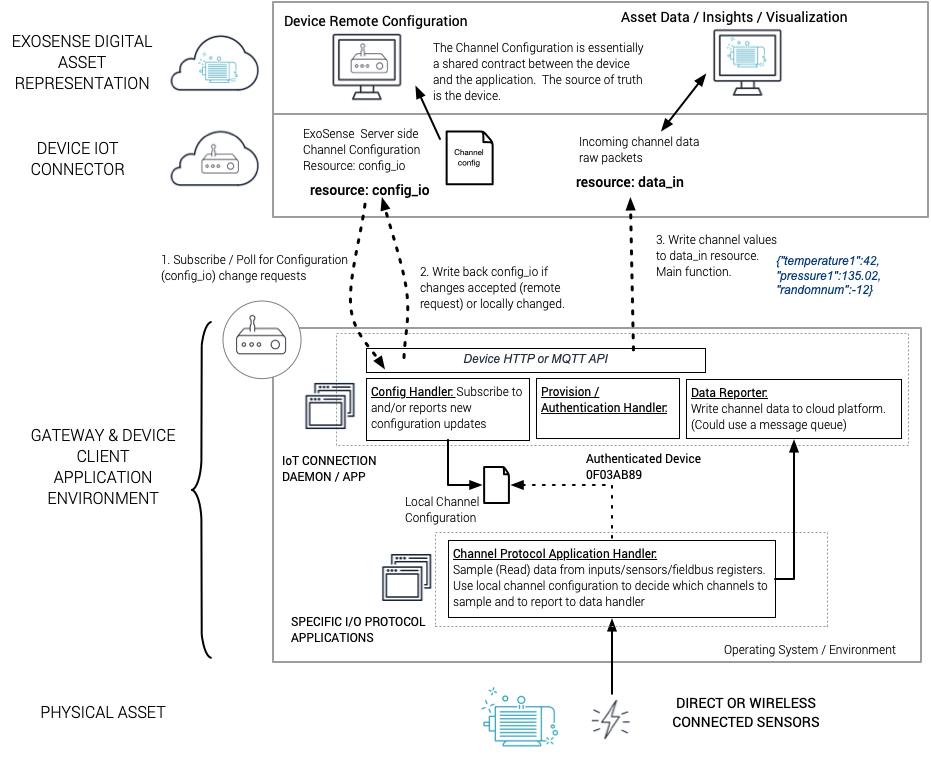
Data Interface
The most important resources to understand are data_in and config_io. Devices may not need to use other resources as they are optional based on functionality such as remote control, custom device application protocol configuration, and in-field software updates (software packages / OTA Updates).
Device data such as sensor values, is sent to the platform using the data_in resource. config_io is used to describe the data being sent. Details for this interface are as follows.
Device Channel Data (data_in)
ExoSense uses a concept of channels for the flow of data from a connected device. Channels typically are specific sensors (e.g. temperature, humidity) but may also be status information. Formats include numeric, string, JSON, and boolean. Channels can also be used for sending requests down to the device, known as control channels. These channels in ExoSense can be then be subscribed to as the source for an Asset Signal.
Channel data is written to the data_in API resource.
data_in Payload Format
Data Format Sent by Device
{
  "${device_channel_id_1}" : "${current_channel_1_value}",
  "${device_channel_id_2}" : "${current_channel_2_value}"
}
Example Data Packet sent by Device
{
  "temperature1":42,
  "pressure1":135.02,
  "randomnum":-12
}
$ curl -i 'https://<IOT_CONNECTOR_FQDN>/onep:v1/stack/alias' \
    -H 'X-Exosite-CIK: 22596363b3de40b06f981fb85d82312e8c0ed511' \
    -d 'data_in={"temperature1":42,"pressure1":135.02,"randomnum":-12}'
note payload is urlencoded.
POST /onep:v1/stack/alias HTTP/1.1
Host: <IOT_CONNECTOR_FQDN>
{X-Exosite-TOKEN: <token>}
{Authorization: Basic <base64-encoding of identity:password>}
Content-Type: application/x-www-form-urlencoded; charset=utf-8
Content-Length: 80

data_in=%7B%22temperature1%22%3A42%2C%22pressure1%22%3A135.02%2C%22randomnum%22%3A-12%7D
Channel Configuration (config_io)
In order to have an agreement or 'contract' between ExoSense and the device, a channel configuration is shared between the device and ExoSense. This configuration agreement keeps parameters like type, units and other information consistent and known throughout the full application end to end, like a source of truth.
The configuration is stored in the config_io resource.
The channel configuration uses JSON format and is stored in the config_io resource in the IoT Connector to allow the both the application side and the device to read and write to it.
Note that the device must always acknowledge a change to the configuration, meaning the device is the source of truth for what it is sending.
Here is an example of a very simple configuration value with minimum of properties set.
Basic example config_io with minimum properties
{
  "last_edited": "2018-03-28T13:27:39+00:00",
  "last_editor": "user",
  "meta": {
    "description": "example config for my device"
  },
  "channels": {
         "randomnum" : {
      "display_name" : "Random Number",
      "description" : "random generated number",
      "properties" : {
        "data_type" : "NUMBER",
        "min": -100,
        "max": 100,
        "precision" : 2
      }
    },
    "pressure1" : {
      "display_name" : "Pressure 1",
      "description" : "input pressure for filter",
      "properties" : {
        "data_type" : "PRESSURE",
        "data_unit" : "PSI",
        "min": 16,
        "max": 35,
        "precision" : 2
      }
    },
    "temperature1": {
      "display_name" : "Temperature 1",
      "description" : "fluid temperature",
      "properties" : {
        "data_type" : "TEMPERATURE",
        "data_unit" : "DEG_CELSIUS",
        "min" : 0,
        "max" : 300,
        "precision" : 2
      }
    }
  }
}
When a device writes channel data based on this configuration, it will send values for 'temperature1', 'pressure1', and 'randomnum'. The device and the application have the channel configuration defined above as a 'contract' between the two.
The full specification for the channel configuration and for data types / units can be found here: Exosite Industrial IoT Schema repository
Recommendations for Device Interface Developers
- Channel IDs should never be changed. Delete, create new if a channel is needed that is a different type / unit.
- Channel type and units should never be changed for a given Channel. The channel is the source of truth. If a signal was created mapped to a pressure type and the channel was changed to temperature type, the signal would still be pressure but have temperature values.
- Users should be aware that if changes are made to device channel properties such as timeout, report_rate, and precision - these changes are not automatically updated by any signals mapped to the channel and will need to be updated at the signal level.
Additional Channel Definition Information
Each of the unique channels that a device plans to send to the application must be defined in the config_io configuration. In addition to the absolute requirements (display_name, data_type, data_unit, min, max, and precision) additional properties can be defined which are used by the device application for remote configuration.
Channel Identifiers
Channel identifiers must be unique to the device context, in the device's config_io and recommend using no special characters or spaces, but must be a valid string. ExoSense uses a "###" scheme starting at "001". For devices that hard code their configuration and are not remotely configurable, any string can be used and can be more descriptive (e.g. "humidity"). Identifiers are not made viewable by users of the application, the display name is what users will see.
Data types / units
The data type definitions are detailed below. Each channel has a unique type and unit tied to the channel identifier that can not be changed after set. The ExoSense application UI will not allow this. Technically a device could overwrite a channel type, but this will have unknown consequences and will likely result in signals not functioning properly. Information about primitive types is also in the Data Types Definition section.
Data types and units for channels and signals are defined in the ExoSense™️ Channel and Signal Data Types document.
Display Name and Description
Used by the application to show the user a friendly name and description (optional) of the channel, which will provide them with better context to help map to asset signals.
Locked channels
The 'locked' property is not required and is optional for use. The entire configuration can be locked or channels can individually be locked. If not set, defaults to 'false'. A locked channel means that it is read-only on the application side. Assumes the configuration (config_io) has been set by the device and the device has no ability to take action based on changes on the application / cloud side.
Locked channels and full configurations generally are used by devices that have a hard coded configuration, the channels are all defined and the config_io is uploaded by the device. Devices can use a combination of locked and configurable channels, thus why the locked field can be found at both the full config level and per channel.
Report Rate
The interval for the device to report values to the cloud (ExoSense). May be used in the application to determine gaps in data.
Timeout
The interval that is considered a timeout for a channel. Can be the same as report rate but typically set at a larger interval to provide room for network slowness and reconnections. Typically not used by the device but used by an Asset signal in the application to generate timeout events for the asset / device UI's, timeout events in the asset logs, and future possibilities. E.g. The device reports a channel every 1 minute but if it hasn't reported for 5 minutes, this is an event that may need to have a call to action for.
Control Channels
Channels can also be used to 'control' a device. A simple example of this is to turn on/off a valve. By default channels are not enabled to be controlled, but by setting the control property to true, ExoSense and the device will allow for sending commands from the application to the device.
A control channel uses all of the same schema in this document and devices must write the last state to the data_in resource, but the use of control channels requires the additional use of data_out resource.
Protocol configuration
Optionally used by the device to determine what application (protocol / interface) will be used and the specific details to get / set the information for the channel. Used for fieldbus protocols (e.g. Modbus RTU) or custom applications such as a custom wireless handler or one that gathers data from local I/O on the hardware. The protocol configuration parameters are optional to use, devices that are not configurable may not use this at all and therefore would not be specified.
Devices that are configurable should use the protocol configuration properties to get / set data, convert it, and determine how often to sample (read locally) and report (to cloud).
Channel Data Types and Units
Each channel requires to be set as a specific type which should be the source of truth and therefore allows for allowing down-stream support for conversions, visualizations, etc that can be trusted. In the ExoSense application, Asset Signals inherit type/unit from the channel. Type and units must not be changed for a channel/signal (based on channel id) once created, instead a new channel or signal should be created to handle the change. Each of these types stem from one of the four primitive types.
ExoSense Data Types Specification - Complete List of Data Types
Additional Channel Type Details
Primitive Types
A primitive type describes the actual underlying encoding / format used for values. Declaring the primitive type in a channel is optional as the primitive type can be derived from the data type. There are four primitive types: NUMERIC, STRING, JSON, BOOLEAN. Primitive Types are used to describe the format of the data type and allows visualizations, transforms, and rules to accept multiple types based on the format.
Units
Generic Data Types For data that may not have units, anything that is dimensionless, or no supported unit types exist. Includes numeric, string, boolean, and JSON structured data generic types. Generic types do not support a measurable unit but does allow developers to add one in the config_io for the channel. Standard unit conversions are not supported in the application for generic data types whether or not a unit is provided - they are marked as 'custom' using an asterisk in the ExoSense UI.
Unit Originated Data Types Physically measurable types of data that include a unit of measure (UOM). Examples include temperature, electrical current, memory, etc.
Many of these types will represent base physical measurements (temperature, length, etc), or derived measurements (velocity), as noted in this Wikipedia article. The list is assumed to never be complete and future types / units could be added. Some physical quantities have simply been left off the list for simplicity and assumed lack of need for Industrial IoT applications.
Remote Configuration Support
The config_io can be updated from ExoSense. In this use case, the device firmware must support long-polling (http) or subscribing (mqtt) to the config_io resource. For the purposes of this tutorial, this will not be shown as it assumes the device is hard-coded (or configured on device) with the channels it sends for simplicity purposes.
Application Protocol Interfaces
ExoSense supports configuration information for each channel on what protocol and application interface is used. Out of the box, Modbus TCP, Modbus RTU, and CANopen are included in the schema definition. Custom protocols and interfaces can be defined. Please see the interface schema for more information. This allows support for users to add channels, such as to read a Modbus RTU register.
Device Application Interaction
Your device will need to talk to the Exosite Device API using your specific IoT Connector endpoint. Examples and references are provided and are a good place to start.
Warning
Developing device firmware, finding libraries for protocols, and managing internet connections on embedded devices can be complex and require troubleshooting. Please contact support if you run into issues, noting a support contract may be required in some instances.
Linux based Edge devices
If you are using a device that runs Linux, we recommend looking at ExoEdge, a python client application that is set up to work with ExoSense and talk over the Exosite Device API protocols.
Developer notes
Suggest reviewing the Provisioning Tutorial which goes in depth on this topic when you are building your device application firmware. Also review Security / Encryption for the API to ensure you are building a secure conencted device.
Activation
Earlier in this guide, a new device identity (A0001) was created in the IoT Connector. This device will need to provision, receive it's authentication token, and store this token for all further communication.
HTTP Request for Activation
POST /provision/activate HTTP/1.1
Host: c3qzj6bnrzk800000.m2.exosite.io
Content-Type: application/x-www-form-urlencoded;charset=utf-8
Accept: */*
Content-Length: 8

id=A0001
Response:
HTTP/1.1 200 OK
content-length: 40
date: Thu, 09 Sep 2021 20:24:03 GMT
server: Murano

2RfG0aak2KQFQVAsM5D737VguXkZH2GIf9f2YcAl
The response value of 2RfG0aak2KQFQVAsM5D737VguXkZH2GIf9f2YcAl is my token that is required for all further device communication and must be stored safely in non-volatile memory on the device.
We can see in the IoT Connector that the device shows as activated.
Send configuration via config_io
Now the device can send it's configuration information via the config_io resource. In this example, the device has the following channels to send: Bearing Temperature, Electrical Current, Flow Rate, Rotation Speed.
The configuration may look like this:
{
  "last_edited": "2021-08-19T13:55:36+00:00",
  "channels": {
    "0001": {
      "display_name": "Current Draw",
      "properties": {
        "data_type": "ELEC_CURRENT",
        "data_unit": "AMPERE",
        "report_rate": "10000",
        "description": "Electrical current measured",
        "precision": 2,
        "timeout": "60000",
        "locked": true
      },
      "locked": true
    },
    "0002": {
      "display_name": "Flow Rate",
      "properties": {
        "data_type": "FLOW",
        "data_unit": "GALLONS_PER_MIN",
        "report_rate": "10000",
        "description": "",
        "precision": 2,
        "timeout": "60000",
        "locked": true
      },
      "locked": true
    },
    "0003": {
      "display_name": "Speed",
      "properties": {
        "data_type": "ANGULAR_VEL",
        "data_unit": "ROTATIONS_PER_MIN",
        "report_rate": "10000",
        "description": "",
        "precision": 2,
        "timeout": "60000",
        "locked": true
      },
      "locked": true
    },
    "0004": {
      "display_name": "Motor Bearing Temperature",
      "properties": {
        "data_type": "TEMPERATURE",
        "data_unit": "DEG_FAHRENHEIT",
        "report_rate": "10000",
        "description": "Motor bearing tempearture",
        "precision": 2,
        "timeout": "60000",
        "locked": true
      },
      "locked": true
    }
  },
  "locked": true
}
The HTTP Request to post this to the config_io resource
POST /onep:v1/stack/alias HTTP/1.1
Host: c3qzj6bnrzk800000.m2.exosite.io
Content-Type: application/x-www-form-urlencoded
X-Exosite-CIK: 2RfG0aak2KQFQVAsM5D737VguXkZH2GIf9f2YcAl
Accept: */*
Content-Length: 1403

config_io=%7B%22last_edited%22%3A%222021-08-19T13%3A55%3A36%2B00%3A00%22,%22channels%22%3A%7B%220001%22%3A%7B%22display_name%22%3A%22Current%20Draw%22,%22properties%22%3A%7B%22data_type%22%3A%22ELEC_CURRENT%22,%22data_unit%22%3A%22AMPERE%22,%22report_rate%22%3A%2210000%22,%22description%22%3A%22Electrical%20current%20measured%22,%22precision%22%3A2,%22timeout%22%3A%2260000%22,%22locked%22%3Atrue%7D,%22locked%22%3Atrue%7D,%220002%22%3A%7B%22display_name%22%3A%22Flow%20Rate%22,%22properties%22%3A%7B%22data_type%22%3A%22FLOW%22,%22data_unit%22%3A%22GALLONS_PER_MIN%22,%22report_rate%22%3A%2210000%22,%22description%22%3A%22%22,%22precision%22%3A2,%22timeout%22%3A%2260000%22,%22locked%22%3Atrue%7D,%22locked%22%3Atrue%7D,%220003%22%3A%7B%22display_name%22%3A%22Speed%22,%22properties%22%3A%7B%22data_type%22%3A%22ANGULAR_VEL%22,%22data_unit%22%3A%22ROTATIONS_PER_MIN%22,%22report_rate%22%3A%2210000%22,%22description%22%3A%22%22,%22precision%22%3A2,%22timeout%22%3A%2260000%22,%22locked%22%3Atrue%7D,%22locked%22%3Atrue%7D,%220004%22%3A%7B%22display_name%22%3A%22Motor%20Bearing%20Temperature%22,%22properties%22%3A%7B%22data_type%22%3A%22TEMPERATURE%22,%22data_unit%22%3A%22DEG_FAHRENHEIT%22,%22report_rate%22%3A%2210000%22,%22description%22%3A%22Motor%20bearing%20tempearture%22,%22precision%22%3A2,%22timeout%22%3A%2260000%22,%22locked%22%3Atrue%7D,%22locked%22%3Atrue%7D%7D,%22locked%22%3Atrue%7D
HTTP/1.1 204 No Content
date: Thu, 09 Sep 2021 20:41:34 GMT
server: Murano
Looking at the device resources now in the IoT Connector will show this updated config_io.
Send channel data via data_in
At this point, the device application may begin sending data using data_in.
Why are there all of these % characters in the value?
Although JSON data is used, it is sent as a JSON formatted String using URL Encoded format. All of the {,}, and : characters are URL encoded. This is similar to what you may see in your web browser URL with parameters in the address bar.
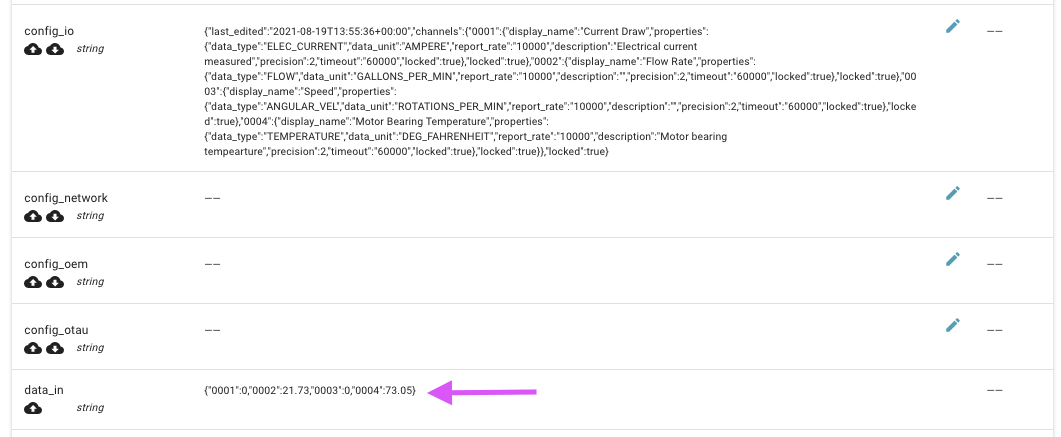
The value being sent looks like this before the encoding:
{"0001":0,"0002":21.73,"0003":0,"0004":73.05}
The HTTP Request to send channel data
POST /onep:v1/stack/alias HTTP/1.1
Host: c3qzj6bnrzk800000.m2.exosite.io
Content-Type: application/x-www-form-urlencoded
X-Exosite-CIK: 2RfG0aak2KQFQVAsM5D737VguXkZH2GIf9f2YcAl
Accept: */*
Content-Length: 101

data_in=%7B%220001%22%3A0,%220002%22%3A21.73,%220003%22%3A0,%220004%22%3A73.05%7D
Response:
HTTP/1.1 204 No Content
date: Thu, 09 Sep 2021 20:48:11 GMT
server: Murano
In the IoT Connector, we can see data_in with the channel data.
Using in ExoSense
Now that the device is connected and sending data, it's time to use it with ExoSense. The data_in messages sent up to this point are not stored. An event is generated but if no application solution (such as ExoSense) is subscribed to the connector, they go un used.
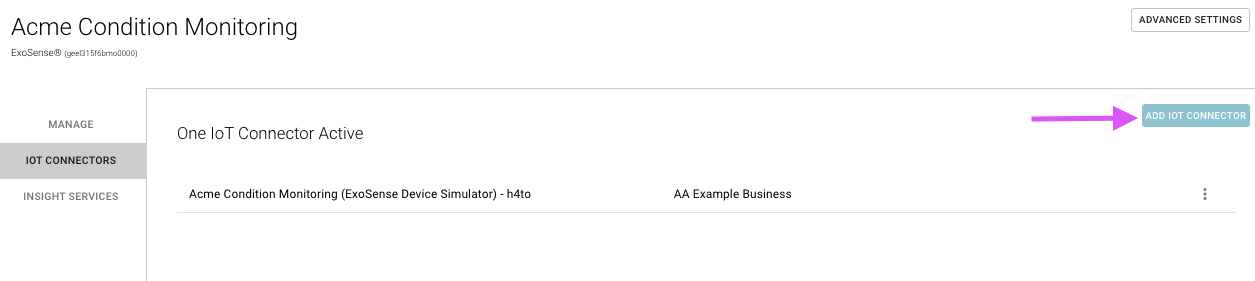
Add the IoT Connector to ExoSense
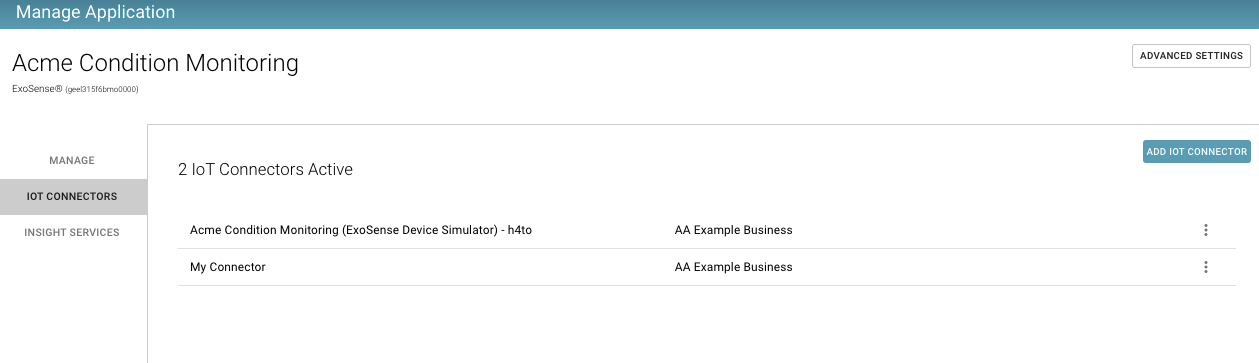
Your IoT Connector was automatically published private as a service in your business account marketplace. It can now be used with ExoSense by managing your ExoSense instance and clicking on Add IoT Connector.

Find your new connector service.
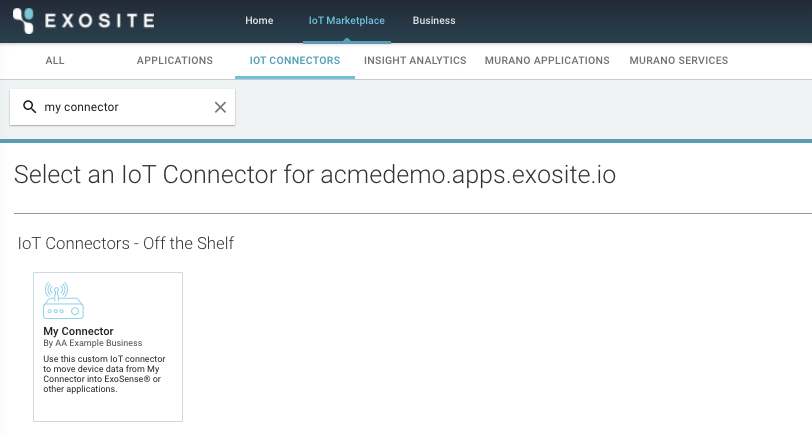
Add this IoT Connector service element to your ExoSense instance.
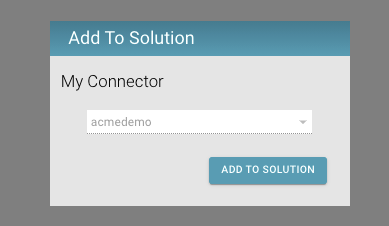
The connector will now be shown in the list of enabled IoT Connectors for your ExoSense instance.
Assign the Device
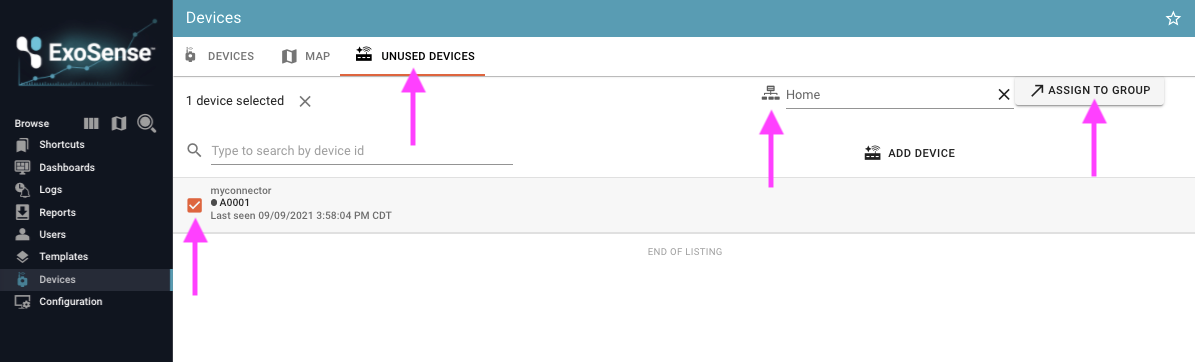
Log in to your ExoSense instance and go to the Devices page.
![]()
Click on the 'Unused Devices' tab. These are devices that have not been assigned ownership. Your device identity should be shown here.
Select it and pick the group where it will be assigned to for ownership. Then click the ASSIGN TO GROUP button.
What about the 'ADD DEVICE' button?
ExoSense also supports device claiming using a claim code or QR scan. The IoT Connector must include this functionality Please see contact Exosite support for more information for this advanced functionality.
End-users claiming their physical IoT device can use this button if the connector supports this feature.
Click back to the Devices tab, the device will be listed here with it's owner group.
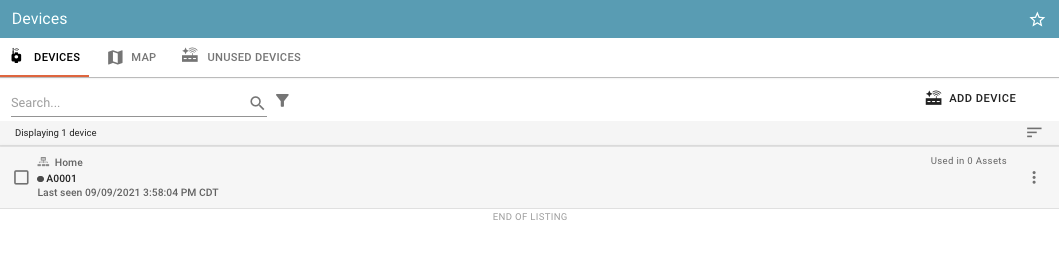
Click on the device to see it's overview. The channels that were previously configured with config_io along with the last values and timestamps will be shown for each channel.
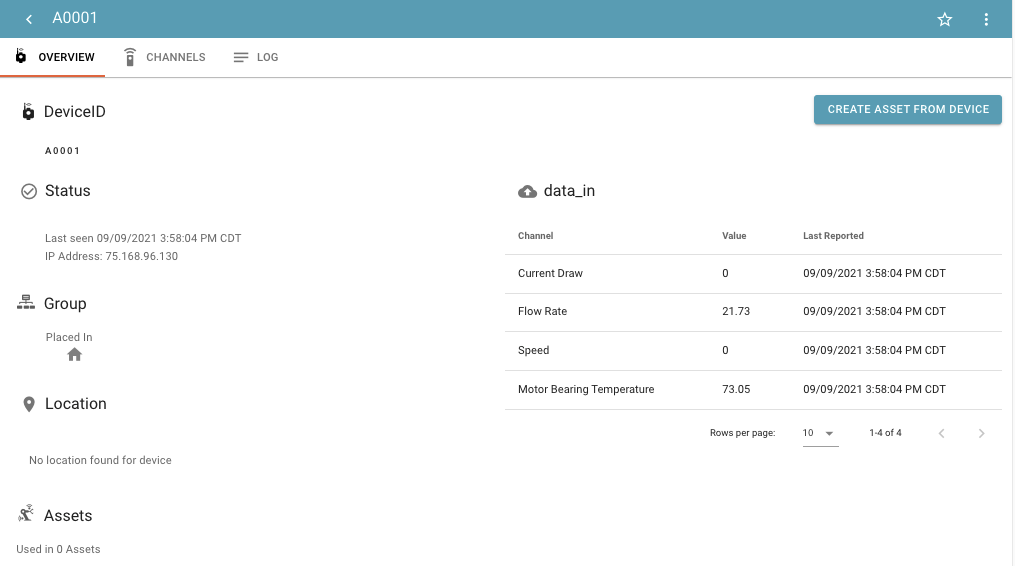
The LOG tab will show the last ~100 data_in and config_io messages.
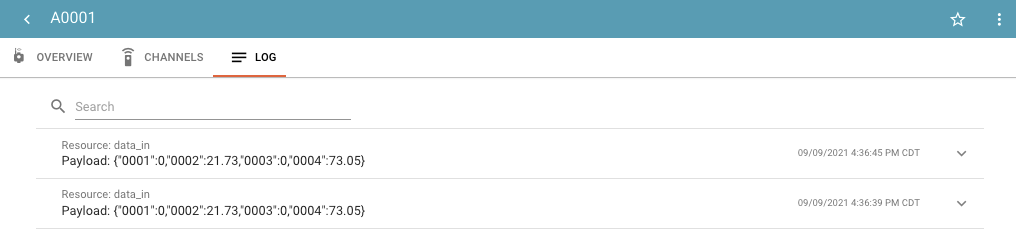
Data is now flowing into the ExoSense pipeline from your device.
Create an Asset from the Device
The last step is to create an asset that uses the device's channel data. Channels are assigned to Asset Signals, which then store the data historically and can be used with analytics, transformations, rules, and actions in the ExoSense pipeline along with visualizations.
Channel to Asset Signal Relationship
Device channels are mapped as the source of Asset signals. When signals are created, they inherit the properties from the channels such as data_type, data_unit, precision, report_rate, and timeout. After creation, signal properties other than data_type and data_unit can be edited, but there is no synchronization back to the source channel. The same is true for channels, if they are edited on the device side (which is the source of truth), the signals do not synchronize.
On the Device Overview tab, use the 'CREATE ASSET FROM DEVICE' button.
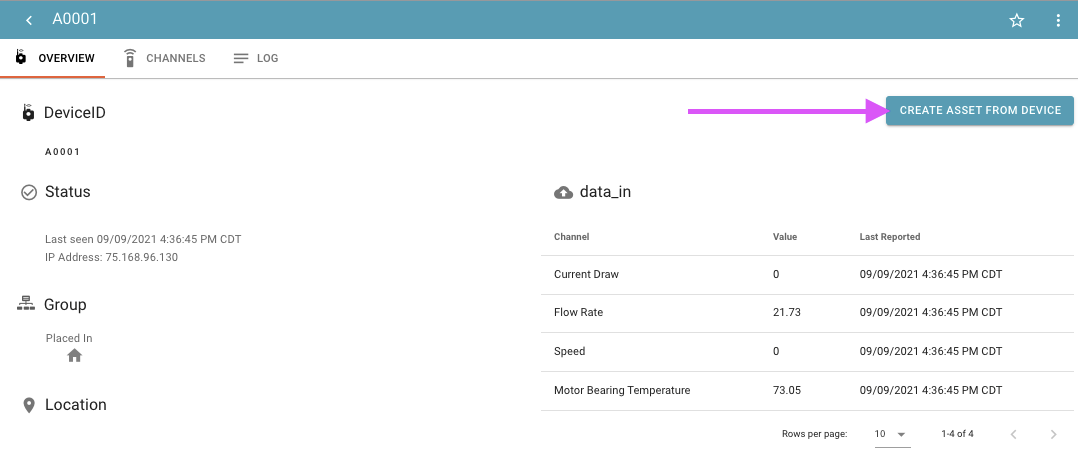
The default settings can be used, customize your Asset name, description, and icon. Assuming no Asset templates have been created yet, these steps will create a new Asset directly from the device's existing channels. Click the 'CREATE ASSET' button.
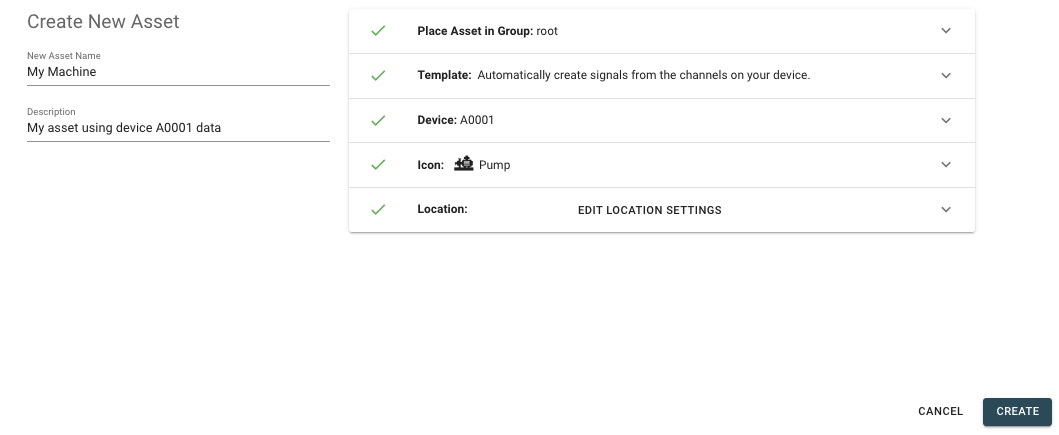
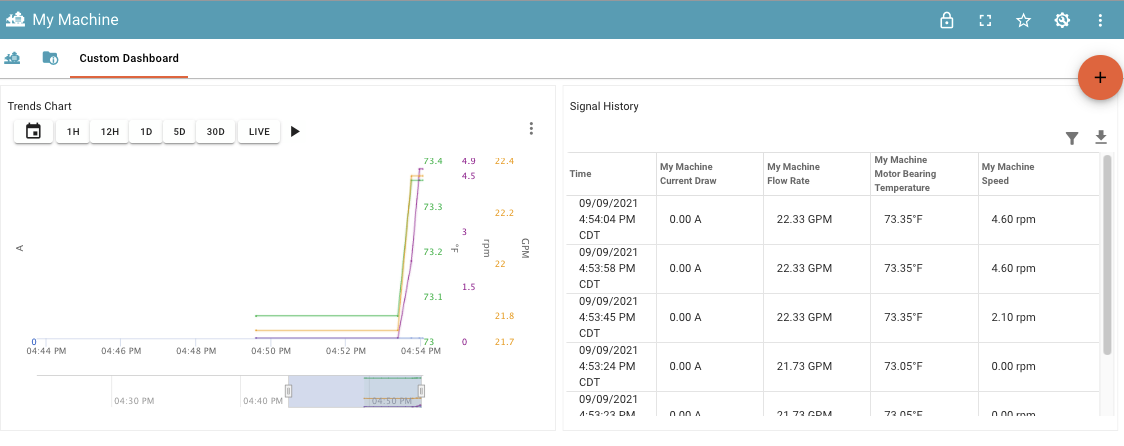
Your new asset has been created with signals mapped to the device's channels.
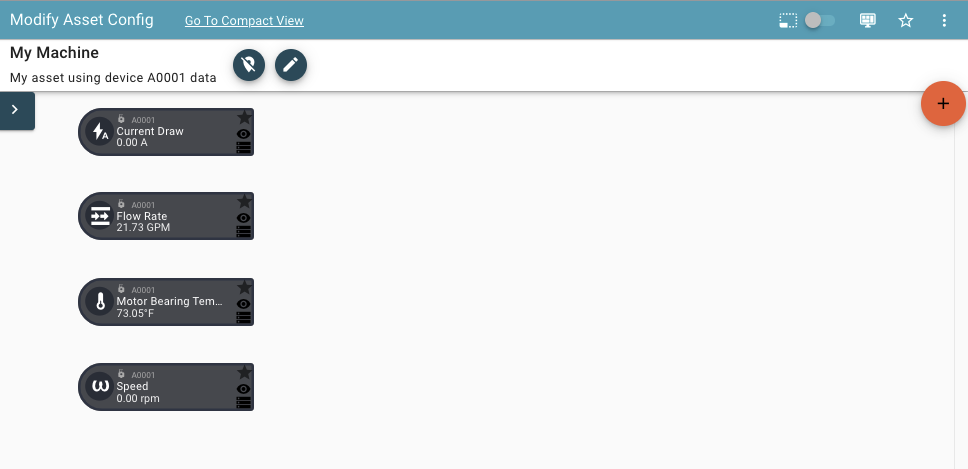
When will I see data?
Data will be flowing to signals immediately, as long as the device is sending new data. If making manual API calls or a slow report rate, the signals may not have values yet.
The signals can now be used in Asset dashboards, rules can be added, data transformed, and Insight analytic functions can be used.