The Things Network Federation
Introduction
The Exosite support for The Things Network (powered by The Things Stack) provides an authenticated interface for the third-party cloud platform, allowing federation of LoRaWAN device IoT data with Murano. This document provides information about this federation protocol, which uses a HTTP Webhook to interface with the third party platform.
What is The Things Network / Things Stack?
The Things Industries (TTI):
Operates The Things Network community and offers private enterprise LoRaWAN network and support. https://www.thethingsindustries.com/
The Things Network (TTN):
Global community of crowd sourced LoRa IoT Network, powered by The Things Stack. https://www.thethingsnetwork.org/
The Things Stack:
LoRaWAN network server built and provided by The Things Industries.
Using The Things Network / The Things Stack
Requirements / Assumptions
- It is required that you sign up for an account with The Things Network or The Things Industries
- LoRa devices are connected and sending data to your The Things Stack account on either TTI or TTN.
Reference Material
Does it work with The Things Industries?
Yes, this integration supports The Things Stack, used by both The Things Network and The Things Industries. Please contact Exosite to discuss further. The reference material in this document and validation of the software interface use a The Things Network console account.
Quick Summary of Use
TLDR: Quick setup steps
- Exosite Platform: Create a new Cloud Federation IoT Connector using The Things Network template, ensuring the protocol is set to
The Things Network. - TTN / TTI: Create a Things Stack account with TTN or TTI.
- TTN / TTI: Create an Application in your Things Stack LoRaWAN account.
- TTN / TTI: Register a LoRa End Device to your Things Stack application.
- TTN / TTI: Connect your End Device and send (Uplink) data
- TTN / TTI: Create a Custom Javascript formatter in your Things Stack application, returning the required Exosite format schema below.
- TTN / TTI: Add a Web Hook to your Things Stack application, which will use your Exosite IoT Connector FQDN endpoint for the base URL, JSON format, and an Authorization bearer header.
- IoT Connector: Specify the Remote Cloud's Authorization token (paste into the connector protocol settings) and Origin
- IoT Connector: Set any other settings regarding device identity provisioning (e.g. default auto create on data_in events)
- End Device: Start uplink data messages
Device Cloud Federation Overview
Exosite's platform offers its Cloud Federation capabilities through IoT Connectors configured to accept, authenticate and handle connections from remote clouds. Remote clouds will be able to send data on behalf of the devices connected to it.
Device Identities: Cloud Federation vs direct Device API
Similar to directly connected devices, the IoT Connector will maintain state and status for such remote devices with a few exceptions:
- Since the devices are not directly connected to the platform, connection status information may not be available for them, depending on whether the federated cloud forwards such information via the events below (optional).
- Devices can auto-provision when the remote cloud sends data on behalf of them for the first time. In this case, the device identity does not need to exist in the IoT Connector in order for the remote cloud to be able to send data. This feature requires that the Auto Provisioning setting is enabled in the IoT Connector settings.
Normal Usage
After setup, your application on the Things Stack will be able to send data events to the IoT Connector on behalf of any LoRa End Devices connected. This connector federation protocol supports data in (LoRa uplink) messages. The IoT Connector can be set up to auto create device identities on these data_in events or you can manually add your End Device identities.
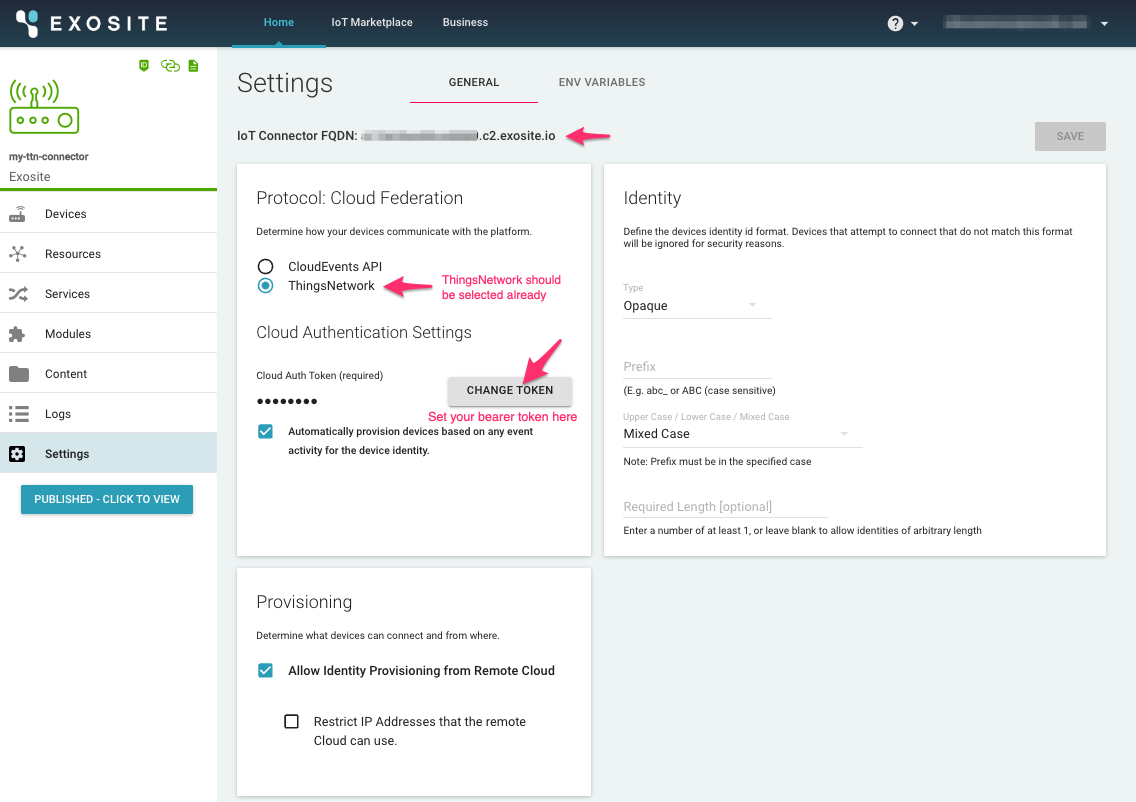
FQDN
The Cloud Federation API uses a single HTTP endpoint per IoT Connector, secured by TLS. The Things Stack application Webhook will use this endpoint to interface with the IoT Connector.
https://<iot_connector_id>.c2.exosite.io
Notice how it is a c2 domain (as opposed to device API IoT Connectors which are m2). Accordingly, these endpoints present a *.c2.exosite.io certificate.
Connection Handling
If the remote cloud keeps the connection to the IoT Connector open and sends multiple requests within the same connection, the requests will be distributed across the platform nodes. This may result in parallel processing, or even chronological inconsistencies, of events originating from the same remote device. The way this manifests is that a received value with a timestamp older than that in the device state (set and reported), will not overwrite the existing value. However, the value will still be sent to the event handler.
Authentication
Authentication of remote clouds connecting to the IoT Connector will happen at the domain level. Once authenticated, they are allowed to send data on behalf of their connected devices without said devices having to authenticate with the IoT Connector. That is because the platform inherently trusts that the devices will already have authenticated to the remote cloud.
The basic authorization is configured in the IoT Connector settings. You will need to provide your token.
Currently only Bearer token is supported
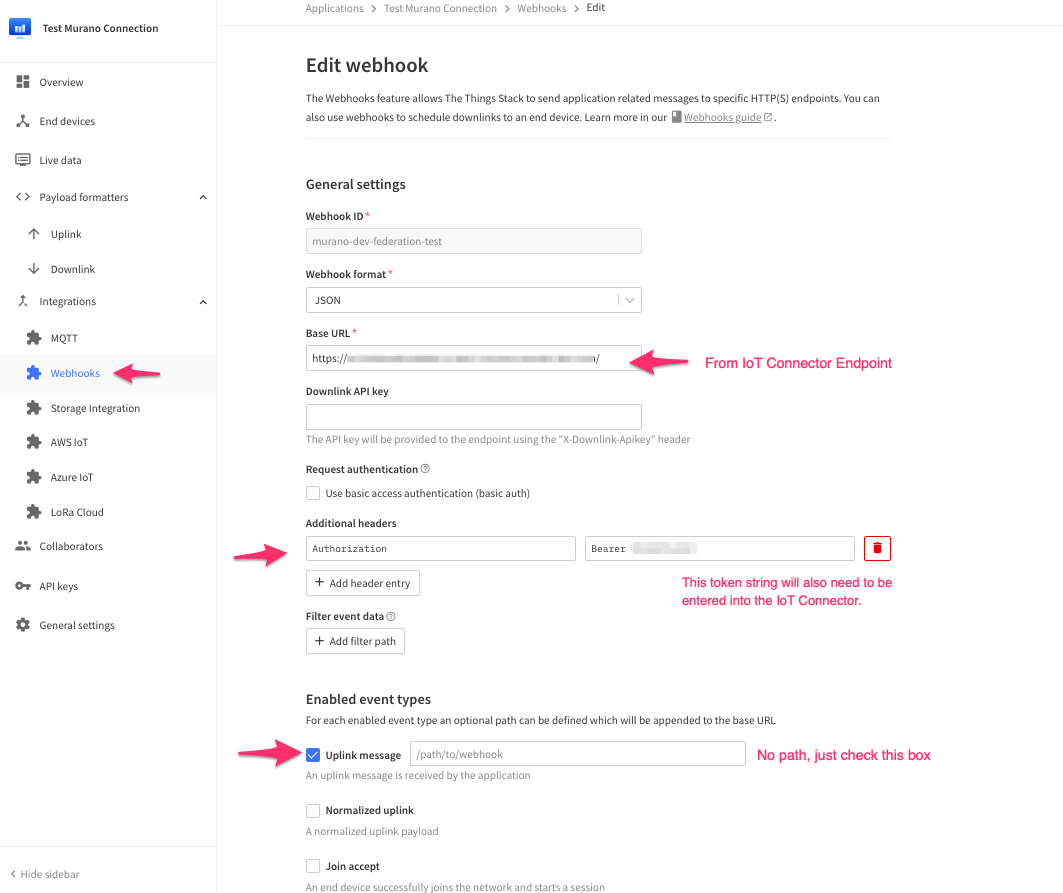
Webhook Events
The Things Stack must be set up to send Webhook requests on each Uplink message.
Only one Things Stack application/webhook source is supported by each IoT Connector
TTN Things Stack webhook format
curl -X "POST" "https://<unique_iotconnector_id>.c2.exosite.io/"
     -H 'Authorization: Bearer <your_token>'
     -H 'Content-Type: application/json; charset=utf-8'
     -H 'Host: <unique_iotconnector_id>.c2.exosite.io'
     -d '{
          "uplink_message": {
            "decoded_payload": {
              "data_in": \{\"ch1\":42,\"ch2\":56,\"ch3\":\"off\"\}
            }
          },
          "end_device_ids": {
            "device_id": "00001",
            "application_ids": {
              "application_id": "my_things_network_application"
            }
          },
          "received_at": "2022-11-04T10:59:46Z"
        }'
As seen in the above example, the request uses the FQDN endpoint, it uses Bearer Token authentication and the origin as set in the IoT Connector.
Decoded Payload Schema
Exosite's IoT Connector protocol for TTN requires a specific decoded payload in the uplink message. Using The Things Stack, a Custom Javascript formatter can be added to supply the proper decoded payload which will convert the End Points uplink message data into a consumable packet of data that can be used on the Exosite platform.
Current fields consumed by Exosite's TTN Federation protocol
uplink_message.decoded_payload: Contains the IoT Connectorresourceand value. In the majority of use cases, this will use the ExoSense I/O data schema in which all data is written to thedata_inresource and contain a JSON string of channel / value pairs.end_device_ids.device_id: The End Device identity that will be mapped to in the Exosite IoT Connector.received_at: the time when the event was generated, which is used by Exosite for the value timestamp.
When using this IoT Connector with ExoSense, the decoded payload must Stringify the data_in JSON value.
"decoded_payload": {
  "data_in": "{\"ch1\":42,\"ch2\":56,\"ch3\":\"off\"}"
}
The easiest way to do this is to use JSON.stringify(data_in) in the decode payload formatter.
Walkthrough Guide
The Things Network Setup
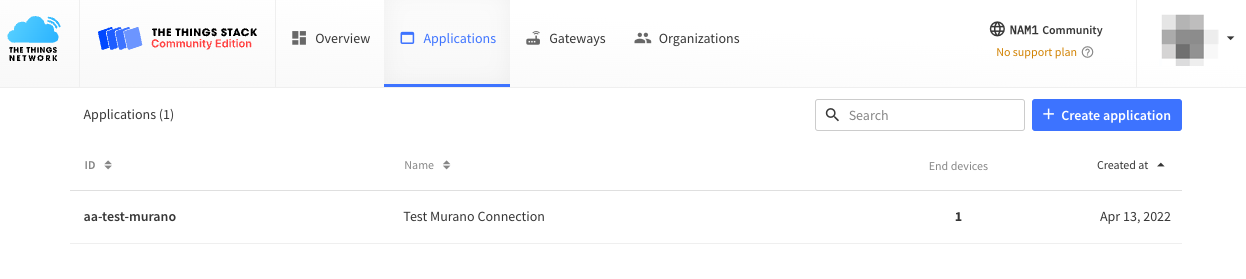
Create TTN Application
Within the TTN Stack console, create an Application if none exists yet. Your LoRa devices will be registered here along with the webhook integration to Exosite.
Register End Devices in TTN
Once you have an application in TTN, register End Devices. This setup can be detailed and documentation provided by TTN should be followed for connecting LoRa end devices.

TTN Uplink Payload Formatter
Exosite uses the decoded payload part of the Webhook Uplink message to properly map your LoRa uplink data into the Exosite IoT Connector device resources, which is used to generate data events to be processed throughout the Exosite Murano platform and specifically into ExoSense.
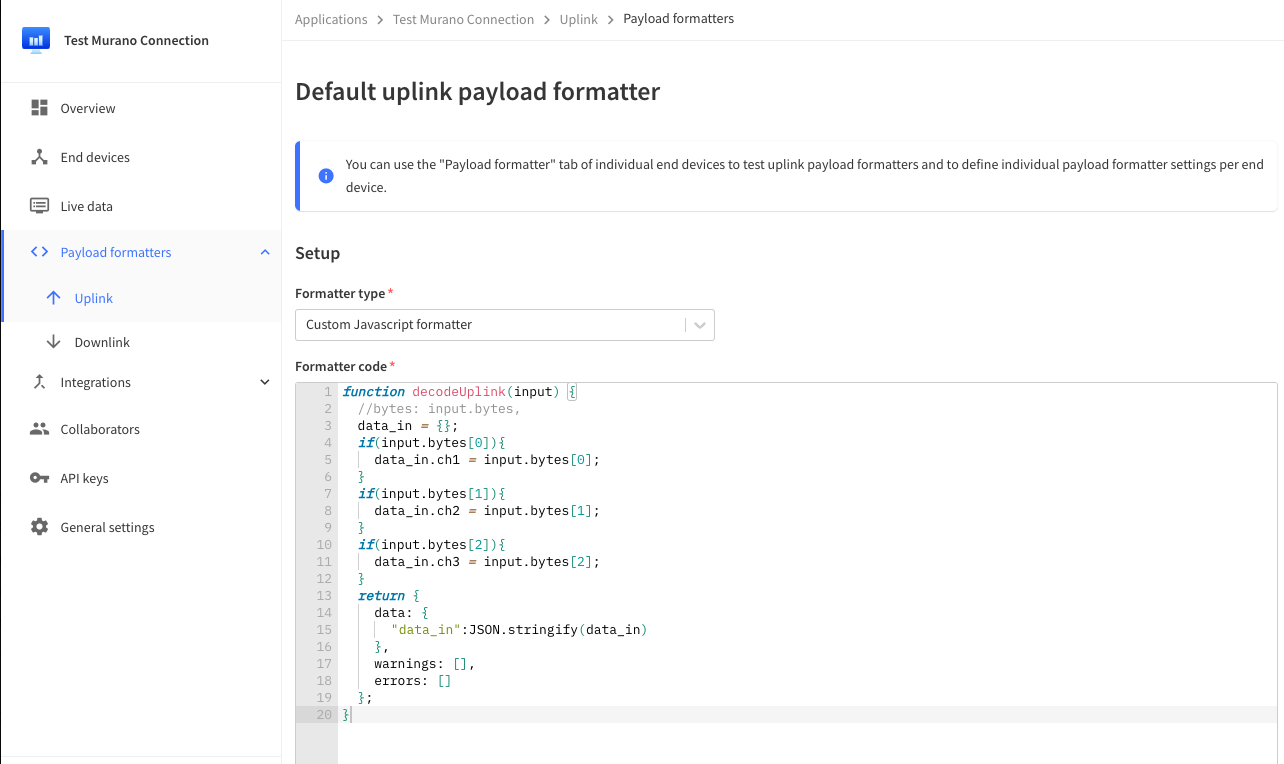
Example Formatter
Here is a very basic example formatter, which is written in Javascript. The LoRa end devices write bytes of data, which usually needs to be parsed into user consumable data such as temperature. The uplink formatter should be used to parse / combine the data from these bytes and map into the Exosite data - usually into ExoSense channels.
This example looks into the byte array, mapping the first 3 into 3 ExoSense channels. Before returning with the JSON value, the data_in JSON blob is turned into a string as required by ExoSense consumption.
function decodeUplink(input) {
  //bytes: input.bytes,
  data_in = {};
  if(input.bytes[0]){
    data_in.ch1 = input.bytes[0];
  }
  if(input.bytes[1]){
    data_in.ch2 = input.bytes[1];
  }
  if(input.bytes[2]){
    data_in.ch3 = input.bytes[2];
  }
  return {
    data: {
      "data_in":JSON.stringify(data_in)
    },
    warnings: [],
    errors: []
  };
}
TTN Webhook Integration
Exosite IoT Connector Setup
IoT Connector settings
Note: the Connector must be created from the Exosite The Things Network template in Exchange.
The only required change in the settings is the Cloud Auth Token (Bearer), which must be set on both the TTN side and Exosite side. Neither tool will generate a token string, so this must be generated by the developer.
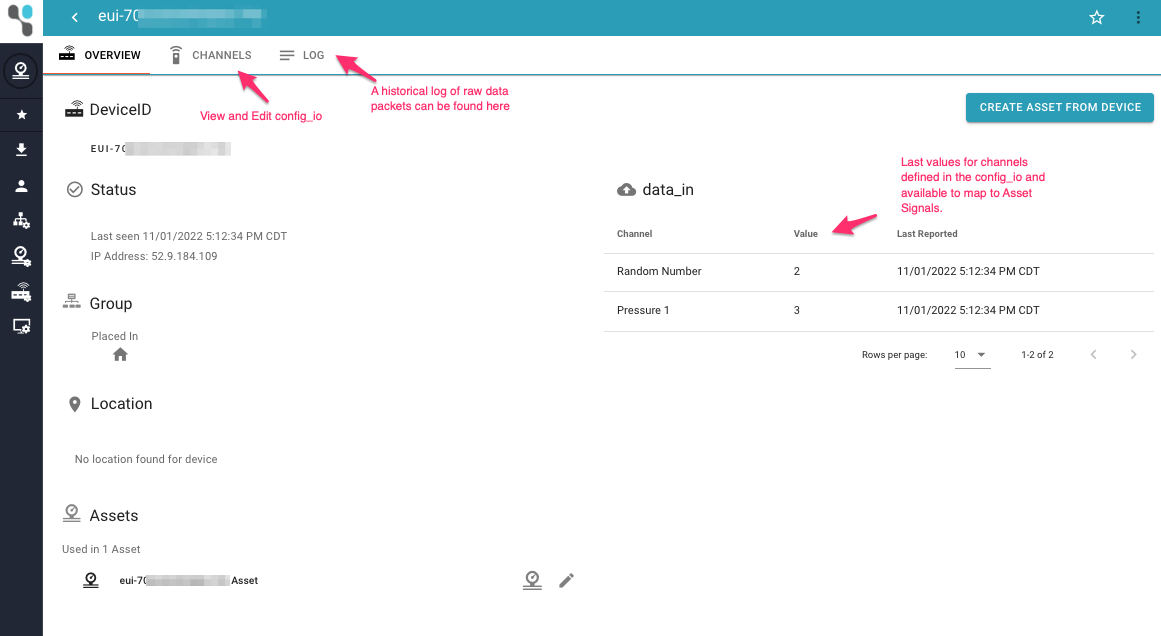
IoT Connector Identities / Incoming Data
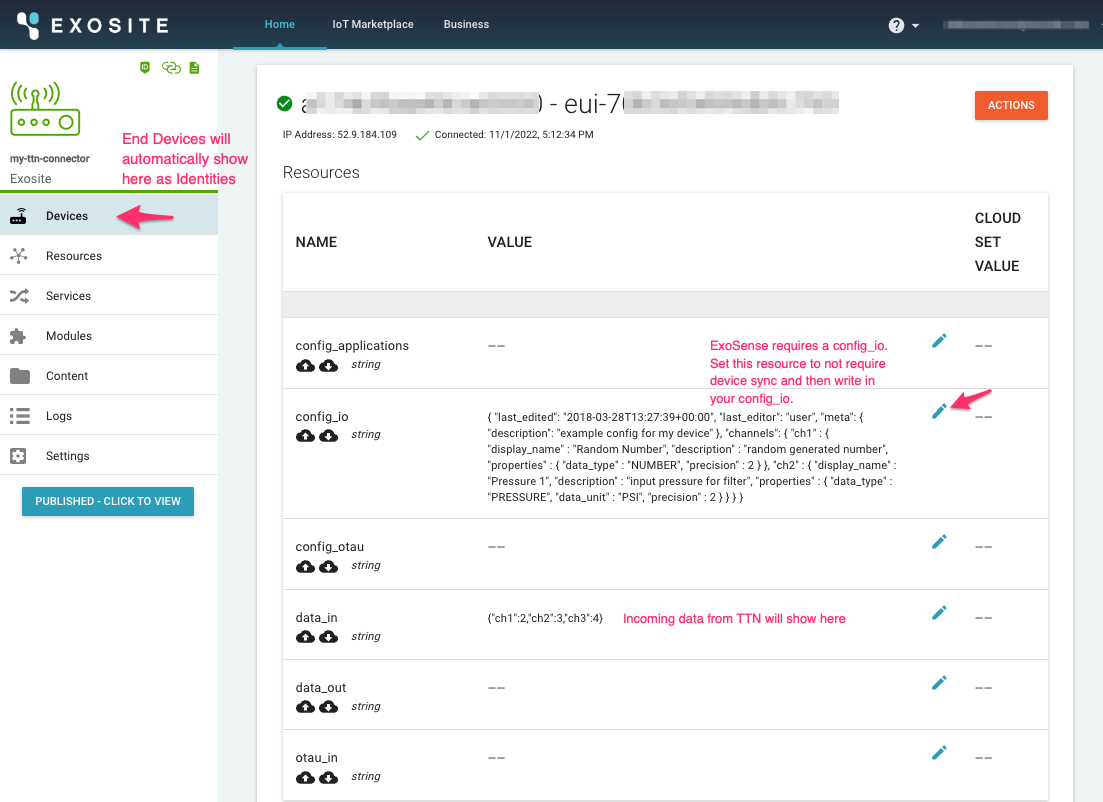
Use in ExoSense
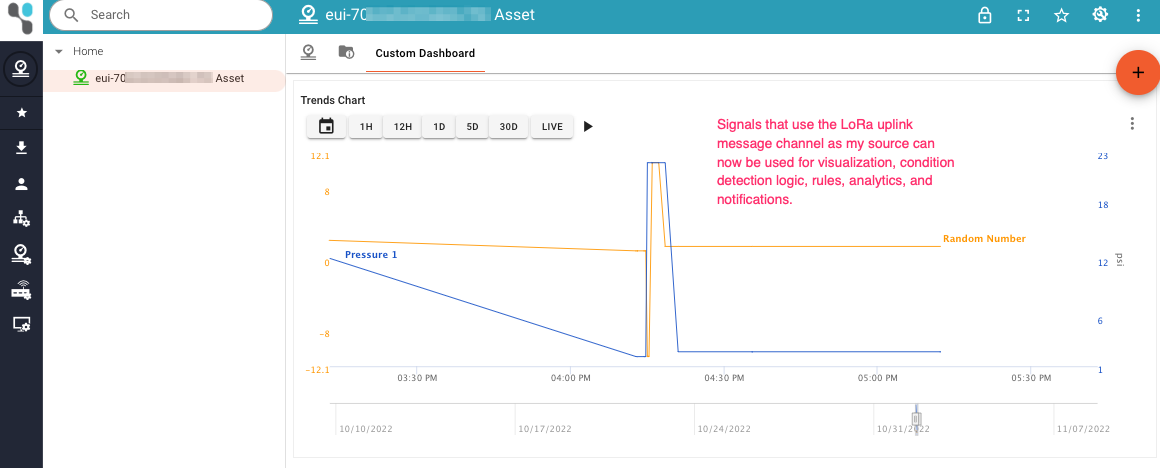
Once data is flowing into the data_in resource, a config_io has been specified, and assuming it is using the ExoSense I/O format, this device identity can be used in an ExoSense application solution. The channels defined in the config_io can be mapped to Asset Signals, which are then available for visualization, rules, condition detection logic, analytics, and alerting.