Device MQTT API
This document acts as a reference and a guide to use MQTT (3.1.1) communication with an Exosite IoT Connector. Once the MQTT protocol is enabled for the IoT Connector, the example code provided shows how a simulated device connects and provisions with the Murano MQTT endpoint.
Overview
The Exosite Murano Platform supports IoT Connectors with bi-directional device communication over MQTT protocol. Devices can provision with a Murano IoT Connector configured for MQTT, publish data to its resources, and receive updates about changes made to its resources. Additionally, devices can publish custom MQTT messages to Murano for processing.
Communication between the device and the Murano MQTT endpoint is secured by TLS and made available by default on port 8883 or on port 443 as an option.
IMPORTANT: Your hardware & Library MUST be compatible with the Device Encryption Requirements , make sure you read it first.
MQTT Messaging
Murano MQTT communication support translates MQTT communication into native Murano commands, allowing MQTT clients to connect and communicate with the Murano Platform. While the translation layer provides most features of MQTT 3.1.1 there are some special considerations to make for Murano integration.
Exceptions to MQTT 3.1.1 Messaging
Murano supports standard MQTT messaging with a few exceptions. Those exceptions are detailed below. MQTT messages or message features not listed below are fully compliant to the MQTT 3.1.1 specification.
There is no specific bandwidth or message size limitation, however each individual resource size MUST respect the maximum size of 1048576 bytes
CONNECT message "Will QoS" and "Will Retain" bits
Only QoS-0 is supported hence setting the "Will QoS" flag to QoS-1 or QoS-2 will be ignored by Murano. It will deliver the Will message with QoS-0. The "Will Retain" flag will be ignored.
CONNECT message "Clean Session" flag
Murano will use device authentication (token, certificate etc.) to identify a device and its state. The Client ID is used for session identification as controlled by the "Clean Session" and "Session Present" flags.
When connecting with Clean Session 1, any existing session for the current Client ID of the authenticated device, will be erased. However, the stored session for a different Client ID of the authenticated device will not be erased if it is newer than 24 hours. If it is older than 24 hours, it will be erased.
When connecting with Clean Session 0, any existing session matching the connection's Client ID of the authenticated device, will be resumed. If a session for the authenticated device is stored under another Client ID, the stored session will be erased.
PUBLISH message "Retain" flag
Ignored, acting as if set to 0.
PUBLISH message "QoS" flags
QoS-0 is fully supported. QoS-1 is supported on device to Murano messages. If the device sets it to QoS-2, Murano will act as if QoS-0 was specified.
PUBLISH message "DUP" flag
This flag is ignored by Murano. However, Murano will disconnect a device if it misuses the flag by setting it to 1 while specifying QoS-0.
PUBACK message
QoS-1 is supported device-to-Murano but not from Murano-to-device, hence PUBACK is supported Murano-to-device only.
PUBREC, PUBREL and PUBCOMP messages
These messages are not supported because QoS-2 is not supported. If a device sends a one of these messages to Murano, it will disconnect the device immediately.
SUBSCRIBE message
By definition, Murano will sync resource state changes back to devices. This does not require explicit subscriptions from the device. Murano will send the device a PUBLISH message with QoS-0 whenever there is a state change to one of its resources.
Reserved topics also exist for the Murano provisioning and content related functionality, as follows:
$content$provision/{device id}$resource/#$resource/+$resource/{alias}$resource.batch
If a device sends a SUBSCRIBE message with a topic filter that it is entitled to, Murano will ack it by returning a SUBACK message, granting QoS-0 level for delivery, even if the device requests a higher QoS level. Arbitrary topics that don't belong to the core Murano feature set, can also be subscribed to by devices. Subscriptions are maintained in the client session as per the MQTT 3.1.1 specification.
If a device sends a SUBSCRIBE message with a topic filter which the device is not entitled to receive messages for, Murano will return a SUBACK with the return code 'failure'. Such topic filter could, for example, be $provision/{not_your_own_device_id}.
UNSUBSCRIBE message
By definition, Murano will sync resource state changes back to devices using PUBLISH messages to the above listed reserved topics. Devices may not opt out of receiving these messages by unsubscribing. Hence, the UNSUBSCRIBE message is accepted, responded to by UNSUBACK but functionally ignored by Murano. That is, after an unsubscription message exchange, the device will continue to receive state updates from Murano.
Arbitrary topics to which a device has subscribed, the device may choose to unsubscribe from at any time.
Topics Support and Isolation
Topics are specially handled in Murano. Topics are not public. Access control isolates a provisioned device to publishing/subscribing only to that device’s topics even though multiple devices will have subscriptions to identically named topics. A device is not allowed to subscribe to another device's topics. A topic called $resource/temperature, for example, will represent an isolated data stream for the authenticated device.
Anonymous clients, by contrast, can only publish to the $provision endpoint and can only subscribe to that endpoint’s provisioning reply topic, $provision/{device id}, which is unique to each provision request. When connecting a device to a Murano IoT Connector for the first time, it must anonymously subscribe to the $provision topic in order to receive its MQTT password via the subscription reply. The password the device receives in the reply represents the "provisioning" of the client and is what enables successive future connections.
The $content topic is shared across devices belonging to the same IoT Connector. That is, if two different devices of the same IoT Connector publish to the $content topic, both will receive the same list of available contents to download. If, however, two devices belonging to two separate IoT Connectors, publish to $content, they will each receive a different list, unique to each IoT Connector - despite the topic name being the same. Note, however, that content uploaded by devices, will not be shared across all devices of the same IoT Connector. A listing of available contents by one device, will not contain content uploaded by another device, even on the same IoT Connector.
Libraries and Sample Code
Sample code, libraries, and client applications that uses this API can be found on the Device API Libraries / Reference page.
MQTT APIs
Provision authentication credentials
To provision a device identity to Murano, you have to send a PUBLISH message with the topic:
$provision/<device_id>
Response message with the secret token (When an IoT Connector is configured for token authentication):
eY4f3tyrE4Jqe3HsLGnPYf7cACKZlb0uvKVatFxX
- This is only for token and password authentication types.
- Device ID must conform to the identity format specification defined in the Settings tab of the IoT Connector UI.
- Only password authentication needs to provide the credentials (at least 20 characters) as the request payload. For token authentication, leave the payload empty since the token will be generated by Murano.
Publish Data
ExoSense Specific Data Schema
See the ExoSense Data IO Schema for more context about the values used in the examples below.
to a specific resource
To report data to a specific resource, send a PUBLISH message to the target topic:
$resource/<resource_alias>
For Example:
$resource/config_io
{"channels":{"001":{"display_name":"Temperature","description":"Ambient temperature reading","properties":{"data_type":"TEMPERATURE","data_unit":"DEG_FAHRENHEIT","precision":2},"protocol_config":{"report_rate":30000,"timeout":60000}}}}
$resource/data_in
{"001":73.16492}
Note
- The published value must follow the format specification defined in the resource's settings.
- The timestamp of the data will be assigned as the time at which it was received by the platform.
to historical timestamps
To report historical data to multiple resources, send a PUBLISH message to the batch topic:
$resource.batch
The publish payload must be an array of JSON objects, each one containing the following keys and values:
"timestamp": <epoch_timestamp_in_microseconds>"values": <json_object><resource_alias>: <value>
For example:
[{"timestamp":1531111131679000,"values":{"data_in":"{\"001\":73.16492}"}},{"timestamp": 1531111131689665,"values":{"data_in":"{\"001\":72.73459}"}}]
Note
- Each internal value must follow the format specification defined in the respective resource's settings.
- The timestamp of the data will be assigned as the specified timestamp.
to multiple resources
To report data to multiple resources at once, without specifying any timestamp(s), send a PUBLISH message to the general topic:
$resource/
- The publish payload must be a JSON object, containing any number of the following pairs:
<resource_alias>: <value>
For example:
{"data_in":"{\"001\":73.16492}","config_io":"{\"channels\":{\"001\":{\"display_name\":\"Temperature\",\"description\":\"Ambient tmperature reading\",\"properties\":{\"data_type\":\"TEMPERATURE\",\"data_unit\":\"DEG_FAHRENHEIT\",\"precision\":2},\"protocol_config\":{\"report_rate\":30000,\"timeout\":60000}}}}"}
Note
- Each value must follow the format specification defined in the respective resource's settings.
- The timestamp of the data will be assigned as the time at which it was received by the platform.
Receiving Data
from resources
Murano will sync resource state changes from the platform/application back to devices. This does not require explicit subscriptions from the device.
Reserved topics exist for the Murano provisioning and content related functionality, as follows:
$content$provision/{device id}$resource/#$resource/+$resource/{alias}$resource.batch
about file content info
To retrieve all meta information (name, length, mime, url) for all contents, you have to send a PUBLISH message with the topic:
$content
Leave the request payload empty.
Response message with a list of JSON objects, each one containing the name, length, mime and url keys. For example::
[
  {
    "name": "logo.gif",
    "length": 16214,
    "mime": "image/gif",
    "url": "https://s3.something.something.logo.gif"
  }
]
The values for name, length, mime and url keys are:
- name: The name of this content. Example:
"name": "logo.gif" - length: The content length for this content in bytes. Example:
"length": 16214 - mime: The mime type for this content. Example:
"mime": "image/gif" - url: The download url for this content. Example:
"url": "https://s3.something.something.logo.gif"
Arbitrary topics support
If a domain has the protocol.mqtt.topics option set to true, its devices will be allowed to publish messages to arbitrary topics, topics that are not reserved for the standard operation principles of Device2. Devices are also allowed to subscribe/unsubscribe to such topics. Currently, the maximum supported QoS level is 0.
When a device publishes to such a topic, the device state managed by Device2 will not be affected, i.e. no device resources will be updated. Instead, it will generate the publish event type.
MQTT Tutorial
MQTT client libraries are readily available. Exosite requires that the library supports TLS and requires that the TLS support is modern enough that it includes Server Name Indication (SNI). Please contact Exosite support if a preferred MQTT client library fails either criteria.
This tutorial will use Python and Eclipse Paho™ MQTT Python Client to connect to Murano. For an example in C using Eclipse Paho™ MQTT C Client, take a look at https://github.com/exosite-garage/mqtt_example.
Setup
Hardware
A development computer or laptop.
Software
To complete this guide, download and install the following on the development machine:
- Python 3.6+ from the Python website.
- Install the Eclipse Paho™ MQTT Python Client via the following command:
pip install paho-mqtt
You must have an Exosite account and an IoT Connector within it. For more information on how to create an account and an IoT Connector, visit the Create an IoT Connector article for more information.
Setup a local Sandbox
This guide will require files to be created on the development machine. Throughout this guide it will be assumed that all commands and files will be run from the following directory:
mkdir ~/murano-mqtt-client
cd ~/murano-mqtt-client
IoT Connector Settings

Protocol: MQTT
Verify your IoT Connector Settings are configured with the protocol set to MQTT and port (8883 for the purposes of this tutorial).
Provisioning
The default IoT Connector settings are such that devices are allowed to register their own identities.
In some provisioning models it is required or advantageous to have a list of pre-authorized device identities registered in the IoT Connector. For purposes of this Tutorial, identies are allowed to provision themselves.
Authentication: Token
For this first tutorial, Token authentication will be used, which is the default. Additonal authentication method details (TLS Client Certificate and Password) can be found below.
Root Certificate Authority: Exosite Root CA RSA 2048
For this first tutorial, we will assume use of the Exosite root CA, Exosite Root CA RSA 2048. More information about the two options and the ability to download the root CA files can be found here: Root Server Certificates.
Provision Your Device
Download the Exosite Root Server Certificate: Root Server Certificates
For the sake of this demo, the steps will include downloading and using the Exosite Root CA. For questions about using DigiCert Root CA, please contact support as this is typically less of a technical decision and more of a business one.
Move the Root Server certificate file to the local directory:
~/murano-mqtt-client/Exosite_Root_CA_RSA_2048.pem
Save the following code into a file in the local directory called ~/murano-mqtt-client/provision.py:
from paho.mqtt import client as mqtt
import ssl
import logging

# logging.basicConfig(level=logging.DEBUG)

try:
    with open("iot_connector_fqdn.txt", "r") as connector_file:
        print("File 'iot_connector_fqdn.txt' found...")
        connector_fqdn = connector_file.read()
except FileNotFoundError as exc:
    print("File 'iot_connector_fqdn.txt' not found...")
    connector_fqdn = input("IoT Connector FQDN? ")
    with open("iot_connector_fqdn.txt", "w") as connector_file:
        connector_file.write(connector_fqdn)

print("\nUsing IoT Connector FQDN: {}".format(connector_fqdn))
device_id = input("Device ID? ")
host = connector_fqdn
cert = "./Exosite_Root_CA_RSA_2048.pem"

def on_connect(client, userdata, flags, rc):
    provision_topic = "$provision/{}".format(device_id)
    client.publish(provision_topic, None, qos=0)

def on_message(client, userdata, msg):
    payload = msg.payload.decode()

    if '$provision/' in msg.topic:
        topic, identity = msg.topic.split('/')

    if topic == "$provision" and payload:
        print("\nIdentity '{}' successfully provisioned!".format(identity))
        print("Cloud-Generated Token: {}".format(payload))
        open('token.txt', "w").write(payload)

    client.disconnect()

def on_disconnect(client, userdata, rc):
    if rc != 0:
        # Unexpected disconnect
        print("\nDisconnected with error: {}".format(rc))
        exit()

client = mqtt.Client(client_id="")
logger = logging.getLogger(__name__)
client.enable_logger(logger)

# Ref: https://github.com/eclipse/paho.mqtt.python/blob/1.1/README.rst#tls_set
client.tls_set(
    ca_certs=cert,
    cert_reqs=ssl.CERT_REQUIRED
)

client.on_connect = on_connect
client.on_disconnect = on_disconnect
client.on_message = on_message

client.connect(host, 8883)
client.loop_forever()
Now execute the above script as follows, providing the Connector ID and a Device Identity of your choice if prompted:
$ python provision.py
File 'iot_connector_fqdn.txt' not found...
IoT Connector FQDN? x2lmj5npsktbuik9.m2.exosite.io

Using IoT Connector FQDN: x2lmj5npsktbuik9.m2.exosite.io
Device ID? 12345

Identity '12345' successfully provisioned!
Cloud-generated token: SiOiudD5A7I8GkVfDlyLN4MLjVvql3j0T2dcGGKJ
A successful result, as shown above has performed the following actions:
- Provisions the chosen Device Identity
- Prints the cloud-generated Token credential
- Saves the Token to a local file called
token.txtfor later reference.
Notice in the IoT Connector UI that the chosen Device ID (12345 if you used the example example) is now "provisioned".
In the above example, a client connected anonymously and then provisioned itself using the provided Device Identity (e.g., 12345) - this would serve as the MQTT ClientID, if used, moving forward.
Publishing Data
Next use the newly-generated Token credential to reconnect your client, as the new Device in your Connector, and publish data.
Save the following code into the file ~/murano-mqtt-client/publish.py:
from paho.mqtt import client as mqtt
import ssl
import logging

# logging.basicConfig(level=logging.DEBUG)

try:
    with open("iot_connector_fqdn.txt", "r") as connector_file:
        print("File 'iot_connector_fqdn.txt' found...")
        connector_fqdn = connector_file.read()
except FileNotFoundError as exc:
    print("File 'iot_connector_fqdn.txt' not found...")
    connector_fqdn = input("IoT Connector FQDN? ")
    with open("iot_connector_fqdn.txt", "w") as connector_file:
        connector_file.write(connector_fqdn)

print("\nUsing IoT Connector FQDN: {}".format(connector_fqdn))
host = connector_fqdn
cert = "./Exosite_Root_CA_RSA_2048.pem"

def on_connect(client, userdata, flags, rc):
    # Example resource: 'data_in'
    resource = input("Resource? ")
    topic = "$resource/" + resource

    # Example value: {"hello":"world"}
    value = input("Value? ")

    print("Publishing value '{}' to topic '{}'".format(value, topic))
    client.publish(topic, value, qos=0)

    print("Done! Disconnecting...")
    client.disconnect()

def on_message(client, userdata, msg):
    print("Cloud-originated message '{}' found for topic '{}'".format(msg.payload.decode(), msg.topic))

def on_disconnect(client, userdata, rc):
    if rc != 0:
        # Unexpected disconnect
        print("Disconnected with error: {}".format(rc))
        exit()

client = mqtt.Client(client_id="")
logger = logging.getLogger(__name__)
client.enable_logger(logger)

# Ref: https://github.com/eclipse/paho.mqtt.python/blob/1.1/README.rst#tls_set
client.tls_set(
    ca_certs=cert,
    cert_reqs=ssl.CERT_REQUIRED
)

token = open("./token.txt", "r").read()
print("Using Token: {}\n".format(token))
client.username_pw_set("", token)

client.on_connect = on_connect
client.on_disconnect = on_disconnect
client.on_message = on_message

client.connect(host, 8883)
client.loop_forever()
Next, execute the script with the following command:
python publish.py
The script prompts the user for the data to send. The Device’s resources are represented as topics $resource/ (e.g., $resource/data_in).
Below is some example output of the script prompting the user for data and then publishing:
$ python publish.py
File 'iot_connector_fqdn.txt' found...

Using IoT Connector FQDN: x2lmj5npsktbuik9.m2.exosite.io
Using Token: SiOiudD5A7I8GkVfDlyLN4MLjVvql3j0T2dcGGKJ

Resource? data_in
Value? {"hello": "world"}

Publishing value '{"hello": "world"}' to topic '$resource/data_in'

Done! Disconnecting...
Checking in the IoT Connector UI, you should find the Device resource's value (e.g. data_in) reflects the value published by the script.
Receiving Data
Copy the following code to a file called ~/murano-mqtt-client/subscribe.py:
from paho.mqtt import client as mqtt
import ssl
import logging

# logging.basicConfig(level=logging.DEBUG)

try:
    with open("iot_connector_fqdn.txt", "r") as connector_file:
        print("File 'iot_connector_fqdn.txt' found...")
        connector_fqdn = connector_file.read()
except FileNotFoundError as exc:
    print("File 'iot_connector_fqdn.txt' not found...")
    connector_fqdn = input("IoT Connector FQDN? ")
    with open("iot_connector_fqdn.txt", "w") as connector_file:
        connector_file.write(connector_fqdn)

print("\nUsing IoT Connector FQDN: {}".format(connector_fqdn))
host = connector_fqdn
cert = "./Exosite_Root_CA_RSA_2048.pem"

def on_connect(client, userdata, flags, rc):
    print("Connected and awaiting cloud-originated messages...\n")

def on_message(client, userdata, msg):
    payload = msg.payload.decode()

    if '$resource/' in msg.topic:
        topic, resource, ts = msg.topic.split('/')

    if topic == "$resource" and payload:
        print("New cloud-originated message received!")
        print("Resource: {}".format(resource))
        print("Value: {}".format(payload))
        print("Timestamp: {}".format(ts))

    print("Disconnecting...")
    client.disconnect()

def on_disconnect(client, userdata, rc):
    if rc != 0:
        # Unexpected disconnect
        print("Disconnected with error: {}".format(rc))
        exit()

client = mqtt.Client(client_id="")
logger = logging.getLogger(__name__)
client.enable_logger(logger)

# Ref: https://github.com/eclipse/paho.mqtt.python/blob/1.1/README.rst#tls_set
client.tls_set(
    ca_certs=cert,
    cert_reqs=ssl.CERT_REQUIRED
)

token = open("./token.txt", "r").read()
print("Using Token: {}\n".format(token))
client.username_pw_set("", token)

client.on_connect = on_connect
client.on_disconnect = on_disconnect
client.on_message = on_message

client.connect(host, 8883)
client.loop_forever()
Executing this subscribe.py script (command provided below) will connect the client, using the token received with the provision.py script, and inherently subscribe to any cloud-originated messages for the Device. Once a message is received, its context will be printed and, for the purposes of this tutorial, the connection terminated.
python subscribe.py
Now, using Connector UI, change the state of the config_io resource:
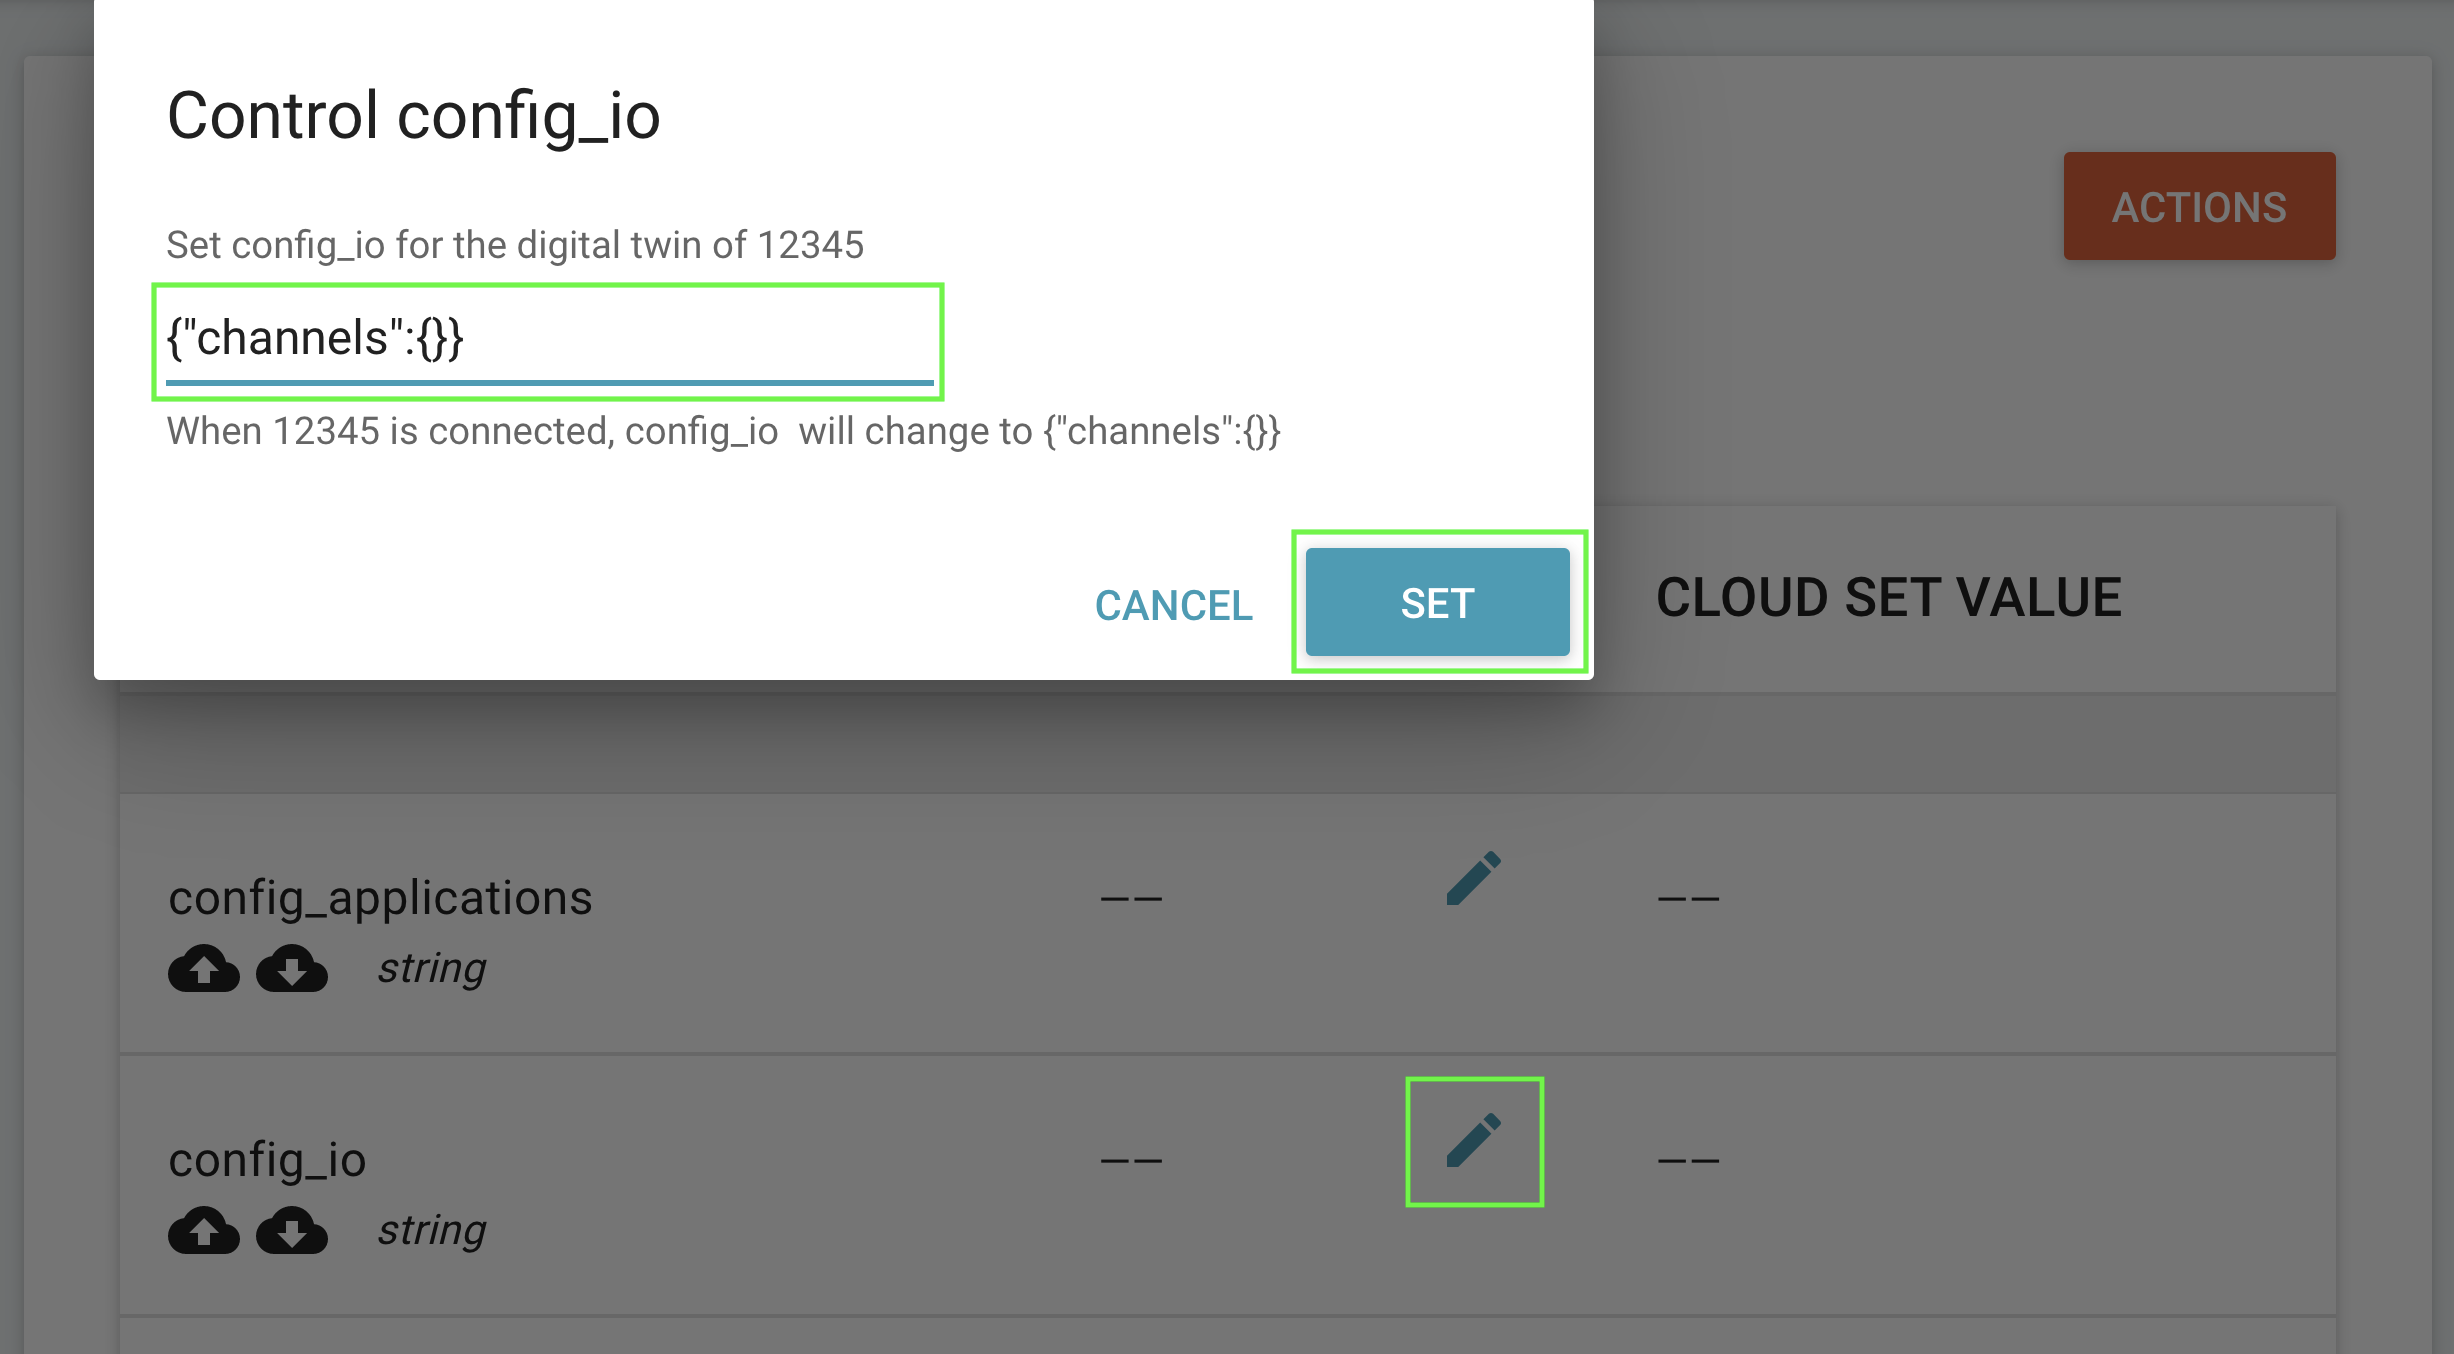
After setting a new value from a cloud interface, as shown above, the subscribe.py script should print something like the following:
$ python subscribe.py
File 'iot_connector_fqdn.txt' found...

Using IoT Connector FQDN: x2lmj5npsktbuik9.m2.exosite.io
Using Token: SiOiudD5A7I8GkVfDlyLN4MLjVvql3j0T2dcGGKJ

Connected and awaiting cloud-originated messages...

New cloud-originated message received!
Resource: config_io
Value: {"channels":{}}
Timestamp: 1633800180299724

Done! Disconnecting...
Tutorial Alternative Authentication
The Tutorial above used the Token authenication method. Below you will find information about the alternative authentication methods.
MQTT message field overview
This table shows what values to place in each of the MQTT ClientId, Username, Password fields of the MQTT Connect message, depending on the Murano IoT Connector configured authentication type.
| MQTT Field | Token Auth | Password Auth | Client Certificate Auth |
|---|---|---|---|
| ClientID | Empty / DeviceID | Empty / DeviceID | Empty |
| Username | Empty / DeviceID | DeviceID | Empty |
| Password | Token Credential | Password Credential | Empty |
DeviceIDreferes to the device identity in the Exosite IoT Connector.ClientIDreferes to a MQTT message field.
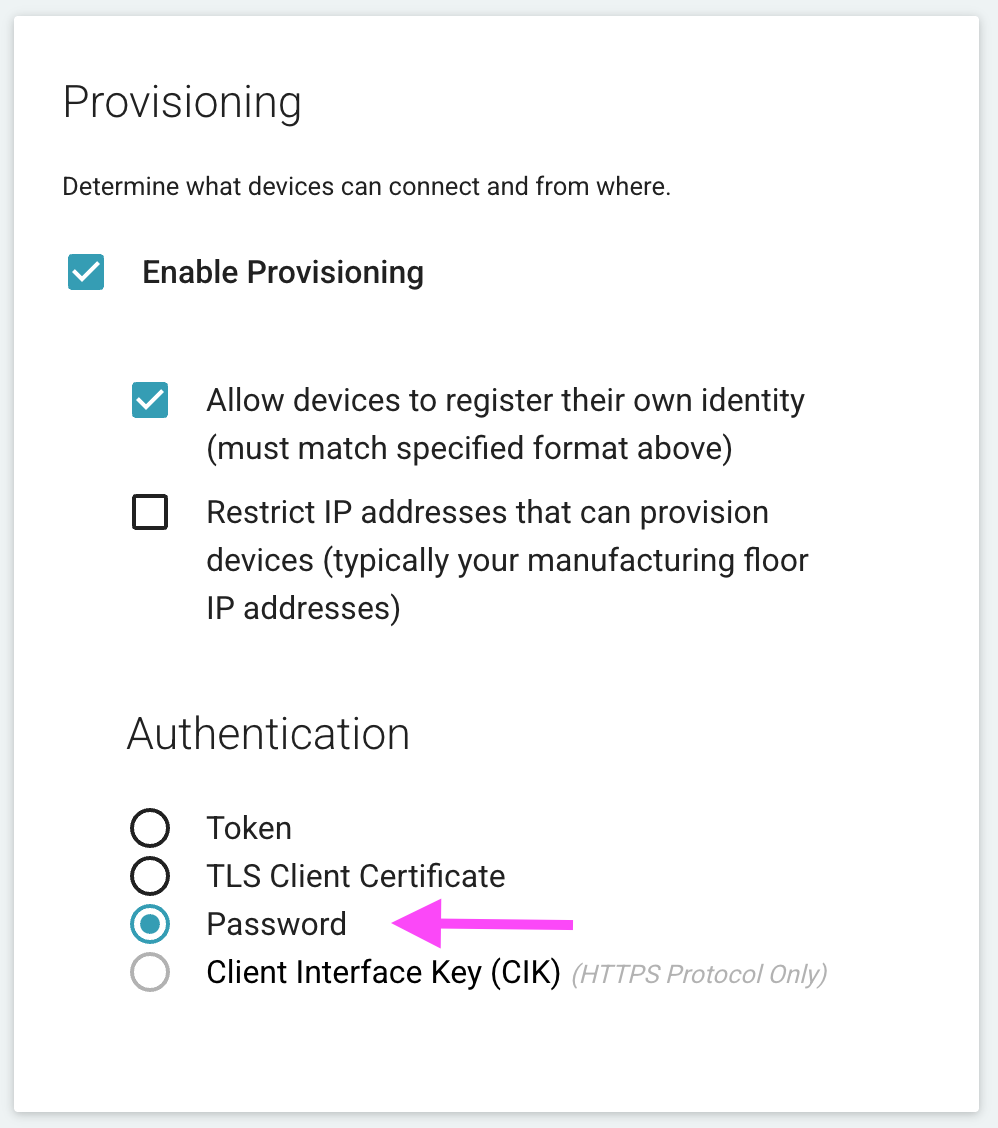
Password Authentication
Ensure you have the IoT Connector's provisioning/authentication configuration is set to Password. You can use the previous examples, but will need to make some minor changes, as outlined below.
Provisioning
- The
ClientIDfield must be set as empty while provisioning. - Send the password (at least 20 characters) as the request body when you publish to
$provision/<DEVICE_IDENTITY>.- For example:
client.publish("$provision/12345", "a1b2c3d4e5f6g7h8i9j0", qos=0)
- For example:
- No token will be returned.
Publishing / Receiving
- The
ClientIDfield does not need to be set but, if set, must be the DeviceID. - Use the DeviceID and chosen password, as the client username and password respectively, for any further communication.
- For example:
client.username_pw_set("12345", "a1b2c3d4e5f6g7h8i9j0")
- For example:
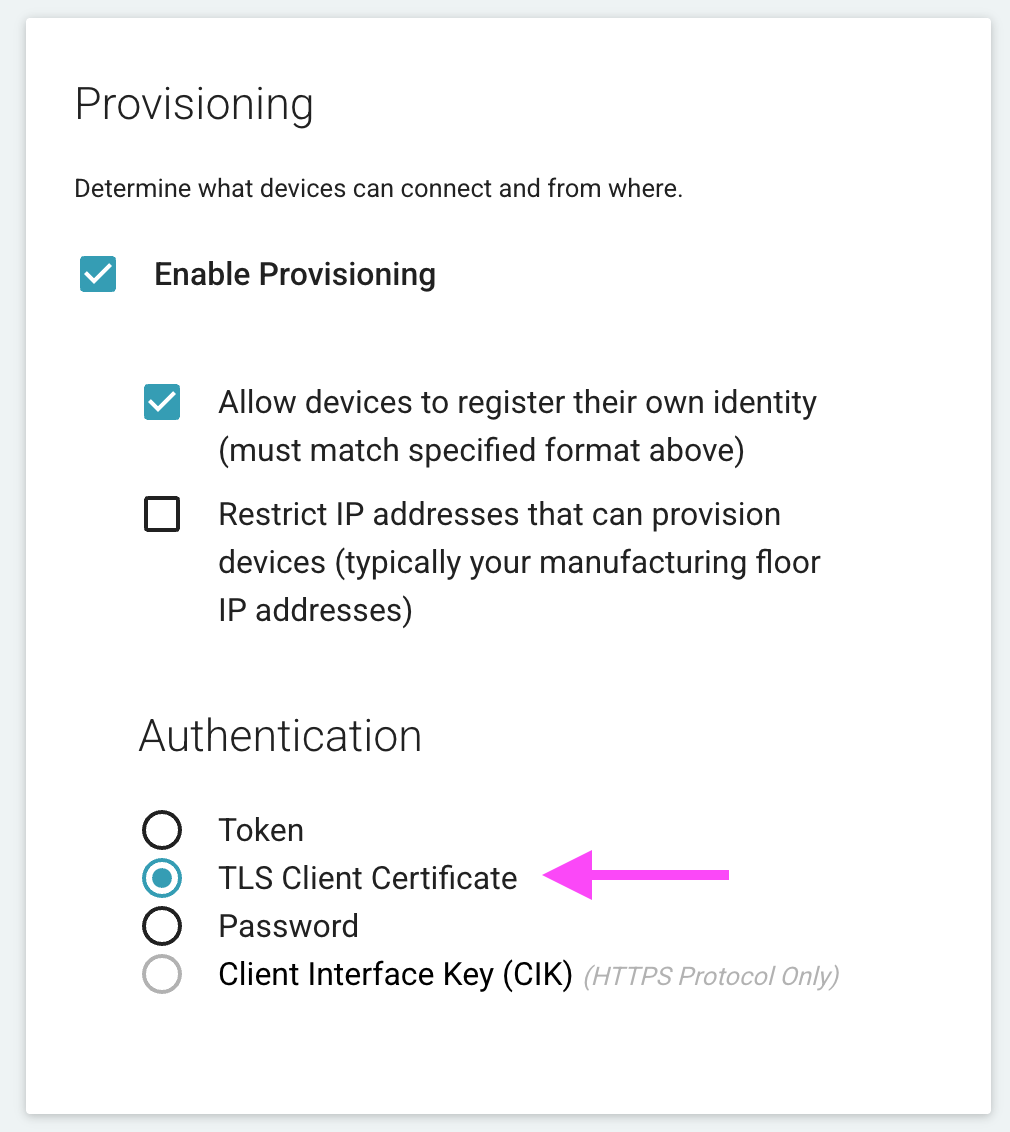
Client Certificate Authentication
First ensure you have the IoT Connector's provisioning/authentication configuration set to TLS Client Certificate.
Client Certificate vs Root Server Certificate
- The Client Certicate is used for the Exosite Murano platform to verify and authenticate your edge IoT device.
- The Root Server certicate is used as the chain of trust for TLS connection to Exosite's platform. (https://en.wikipedia.org/wiki/Root_certificate)[https://en.wikipedia.org/wiki/Root_certificate]
- The
ClientIDmust always be set as empty. - The client key/cert is always set.
- If the identity contained within the cert is valid and available for the Connector, it will "provision" (associate the identity/cert) upon first connection.
Generate Client Certficate
To generating your device's client cerficiate, follow these steps.
Create a ./certs/ directory
Generate your client cert and corresponding private key, as files called cert.pem and key.pem, and place in the certs directory.
Generating your Client Cerficiate and Private Key
The device identity that will be used in the IoT Connector is used as the certificate's common name ("CN"). Examples of this unique identifier for your device are a MAC Address, Serial Number, etc. For this totorial you can choose any identit without special characters. For example "000001".
openssl req -subj '/CN=000001' -x509 -newkey rsa:4096 -nodes -keyout key.pem -out cert.pem -days 1500
This will generate a cert.pem and key.pem file to be used in the example below.
X.509 certificates formats
This article exaplins X.509 Certficates well: https://schartz.github.io/blog/x509-certificates-explained/
Provisioning / Publishing / Receiving
The following examples use your device client's Client Certficate files generated in the previous step.
Copy the code below to a file called cert_pubsub.py.
from paho.mqtt import client as mqtt
import os
import ssl
import logging

# logging.basicConfig(level=logging.DEBUG)

try:
    with open("iot_connector_fqdn.txt", "r") as connector_file:
        print("File 'iot_connector_fqdn.txt' found...")
        connector_fqdn = connector_file.read()
except FileNotFoundError as exc:
    print("File 'iot_connector_fqdn.txt' not found...")
    connector_fqdn = input("IoT Connector FQDN? ")
    with open("iot_connector_fqdn.txt", "w") as connector_file:
        connector_file.write(connector_fqdn)

print("\nUsing IoT Connector FQDN: {}".format(connector_fqdn))
host = connector_fqdn
cert = "./Exosite_Root_CA_RSA_2048.pem"

def on_connect(client, userdata, flags, rc):
    # Example resource: 'data_in'
    resource = input("Resource? ")
    topic = "$resource/" + resource

    # Example value: {"hello":"world"}
    value = input("Value? ")

    print("Publishing value '{}' to topic '{}'".format(value, topic))
    client.publish(topic, value, qos=0)

    print("Done! Disconnecting...")
    client.disconnect()

def on_message(client, userdata, msg):
    payload = msg.payload.decode()

    if '$resource/' in msg.topic:
        topic, resource, ts = msg.topic.split('/')

    if topic == "$resource" and payload:
        print("New cloud-originated message received!")
        print("Resource: {}".format(resource))
        print("Value: {}".format(payload))
        print("Timestamp: {}".format(ts))

    print("Disconnecting...")
    client.disconnect()

def on_disconnect(client, userdata, rc):
    if rc != 0:
        # Unexpected disconnect
        print("Disconnected with error: {}".format(rc))
        exit()

client = mqtt.Client(client_id="")
logger = logging.getLogger(__name__)
client.enable_logger(logger)

# print("Current directory: {}".format(os.getcwd()))
certfile = "./certs/cert.pem"
keyfile  = "./certs/key.pem"
print("Client Cert: {}".format(certfile))
print("Client Key: {}".format(keyfile))

# Ref: https://github.com/eclipse/paho.mqtt.python/blob/1.1/README.rst#tls_set
client.tls_set(
    ca_certs=cert,
    cert_reqs=ssl.CERT_REQUIRED,
    certfile=certfile,
    keyfile=keyfile
)

client.on_connect = on_connect
client.on_disconnect = on_disconnect
client.on_message = on_message

client.connect(host, 8883)
client.loop_forever()
Now execute the above script, as follows, providing the IoT Connector ID if prompted:
python cert_pubsub.py
The script prompts the user for the data to send, but is also ready to receive - and print context about - cloud-originated messages.
Below is some example output of the script prompting the user for data and then publishing:
$ python cert_pubsub.py
File 'iot_connector_fqdn.txt' found...

Using IoT Connector FQDN: x2lmj5npsktbuik9.m2.exosite.io
Client Cert: ./certs/cert.pem
Client Key: ./certs/key.pem

Connected and awaiting cloud-originated messages...

Resource? data_in
Value? {"hello":"world"}

Publishing value '{"hello":"world"}' to topic '$resource/data_in'

Done! Disconnecting...