Device Provisioning Tutorial
In this tutorial, you will create a custom IoT Connector and demonstrate how to whitelist and provision devices. The tutorial covers the Murano UI as well as how to use APIs to accomplish the same thing in a manufacturing automation process. It will cover provisioning using token-based authentication, password authentication or TLS client certificates.
Note: this guide uses the HTTP Device API and we invite you to look the reference page along with this one.
Requirements
Before going further you should have:
- An Exosite Account
- A new IoT Connector (Ideally not in use)
- Access and knowledge of using CURL on your computer using command lines in a terminal shell.
Notational Conventions
This document uses the following notational conventions:
- A name in angle brackets (e.g.,
<myvar>) is a placeholder that will be defined elsewhere.
Getting Started
The concept of "provisioning" a device roughly outlines the process of authorizing a device to access and modify the resources and content of a particular IoT Connector. Provisioning devices of a given IoT Connector can be done with several variations on prescribing the process.
This tutorial covers two of these variations separately by splitting up an optional "whitelisting" step from the "provisioning" step. Depending on your connectivity Settings, devices may or may not need to be whitelisted.
Encoding
For all requests examples as of Content-Type: application/x-www-form-urlencoded Non-alphanumeric characters from both part of the equal sign must be percent encoded as defined by the standard https://www.w3.org/TR/html401/interact/forms.html.
Configure Device Identity Format
Determine the format of your device identities and configure the new IoT Connector according to the chosen format.
A device identity uniquely identifies each device of a given IoT Connector. For example, you might configure a device identity to reflect the serial number scheme in your hardware manufacturing process (e.g. 00:14:22:01:23:45, 651b3b4d-5bf3-446d-9fd0-bacdc7bfbfff, 000001, etc.).
Navigate to your Solutions List and click the IoT Connector link you created for this tutorial.

Click Settings.
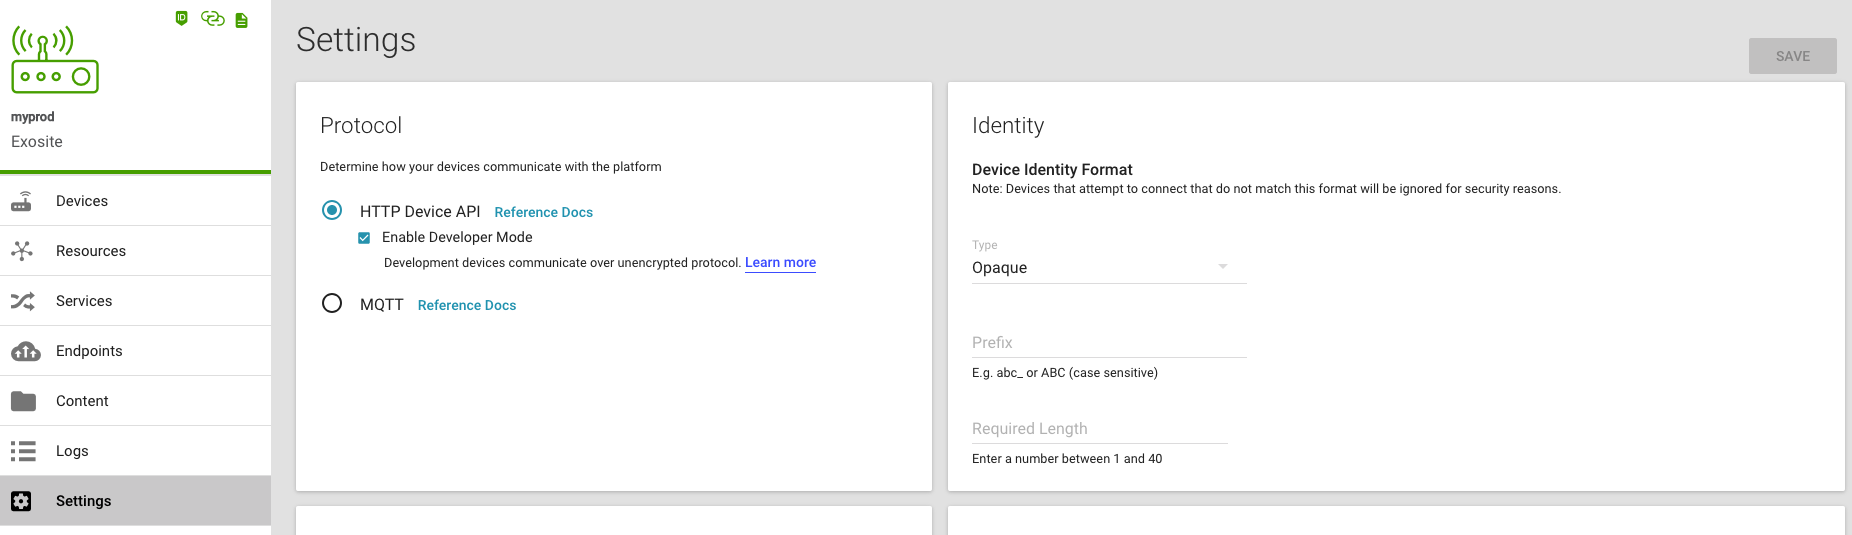
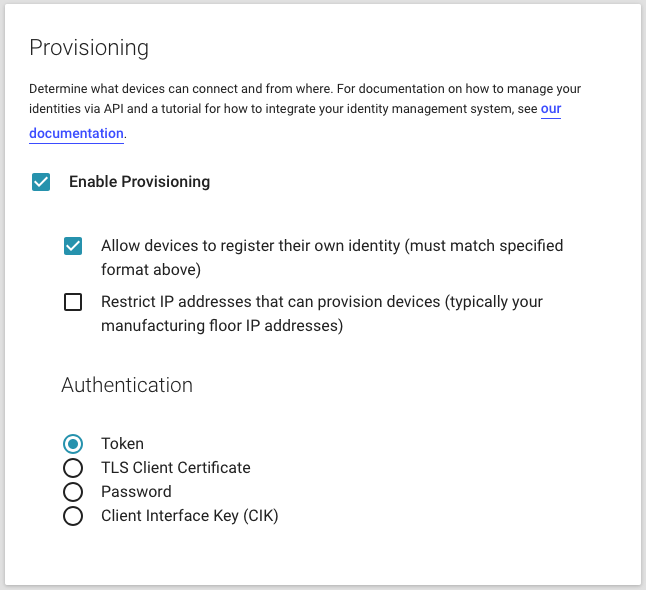
For now, retain the default authentication method (token based) and leave "Enable Developer Mode" unchecked as all uses of the API in this tutorial are made over a secure connection (HTTPS). Next, scroll down to the Provisioning section.
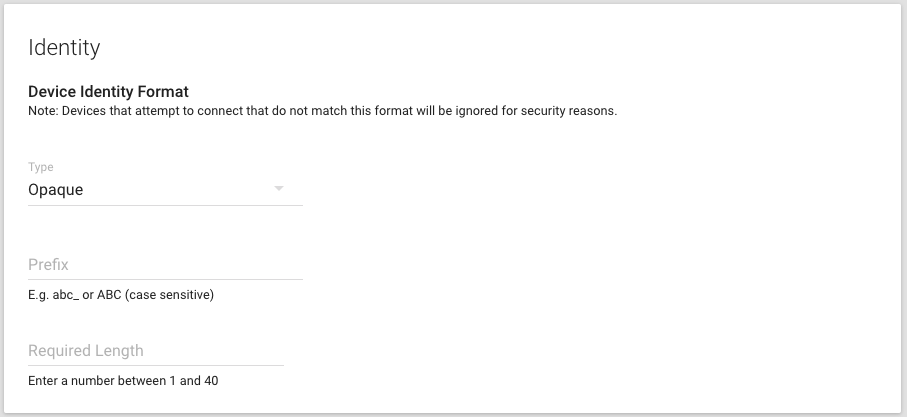
Configure the chosen identity format for the IoT Connector. There are a few things that may be configured for the identity format:
- An optional Prefix for all identities. If not left blank, all identities must begin with this prefix in order to authenticate. If your device uses its
wlan0interface's MAC address as its identity, you would not need to choose a prefix unless it prepends a number of characters to the MAC address. For instance, if the MAC address is00:00:00:01:23:45, but it's identity isCC3220-00:00:00:01:23:45then the Prefix would beCC3220-. - An identifier Type. This may a number or various MAC address formats if you are using, for example, the MAC address from a WiFi chip to uniquely identify each device. It also may be in UUIDv4 format or an opaque string of characters, meaning that it has no required format.
- A Length, if a specific length is required. Leave this blank if you want the length to be unlimited. The length of a specified Prefix does not factor in to the Length of the device identity (e.g. if Prefix=
ABCand device_id=ABC123, then Length=3).
Verify the box that says "Allow devices to register their own identity" is unchecked. This option specifies that device identities either do, or do not, need to be whitelisted in the IoT Connector before they connect. Leaving this option unchecked means we will prescriptively define which device identities are allowed to connect, authenticate and communicate. If this option was checked, devices will be provisioned with the identity that they present to Murano when connecting for the first time. For now, leave this unchecked.
Leave the box that says "Restrict IP addresses..." unchecked. This feature may be used to provision devices from a manufacturing facility that has a specific set of IP addresses.

Click SAVE. You have now configured the provisioning settings for your IoT Connector. Next you will whitelist some devices and provision them.
Whitelisting Devices
There are several ways to whitelist devices. This tutorial will show how to whitelist one at a time, or in bulk with a file containing the identities.
Whitelist One Device
IoT Connector Management User-Interface
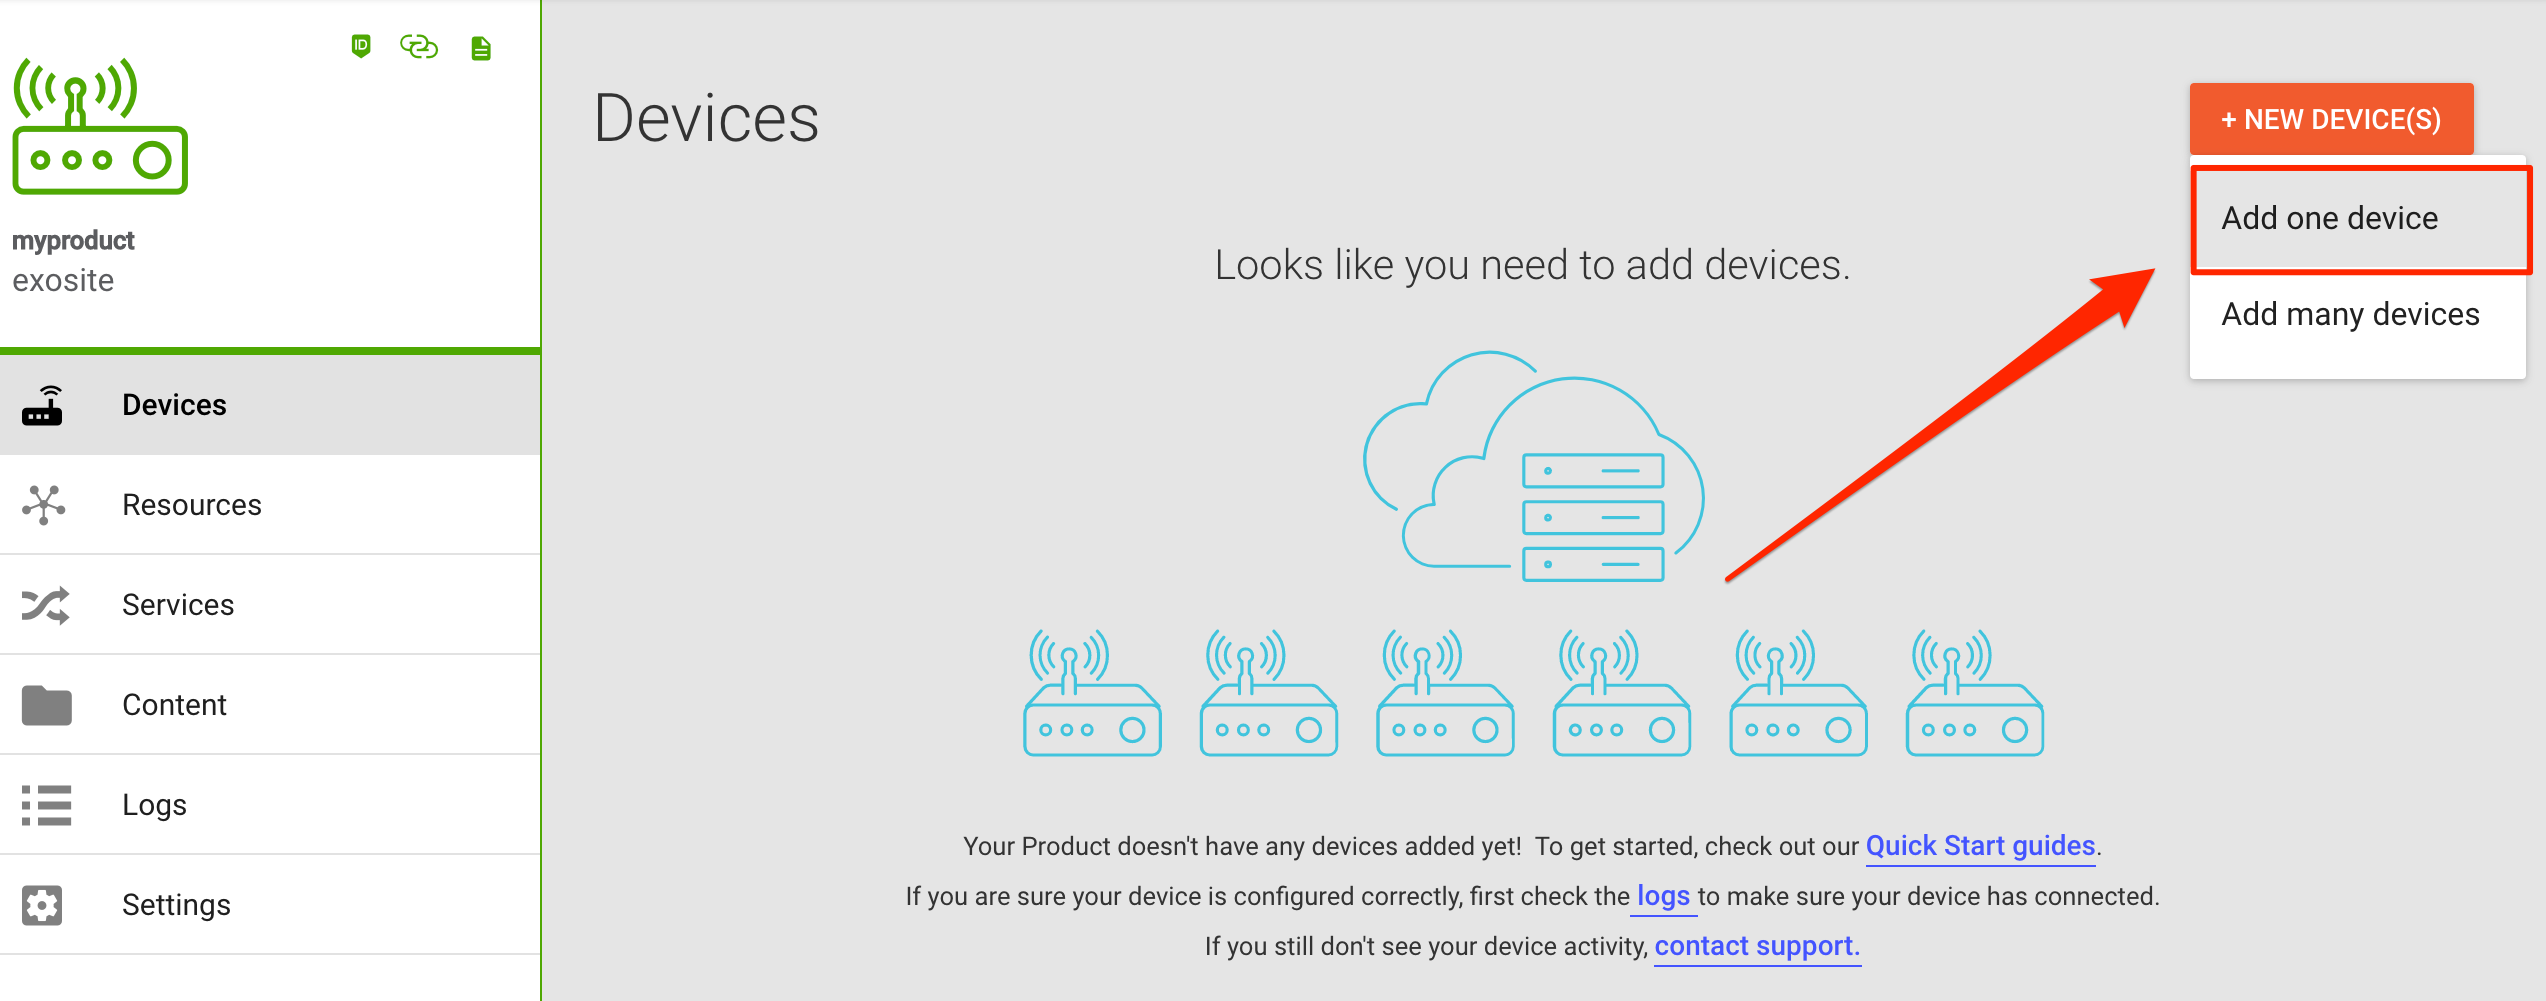
Click the Devices tab and click the + NEW DEVICE(S) button, select Add one device.
Enter a serial number that conforms to the Identity Format you chose, above. For the sake of the tutorial it will be assumed that the chosen identity format is Base 10 with a length of 8. The identity entered in this box must conform to that format.
There is a default activation period of 48 hours. This means the device must be provisioned within 48 hours of being whitelisted.
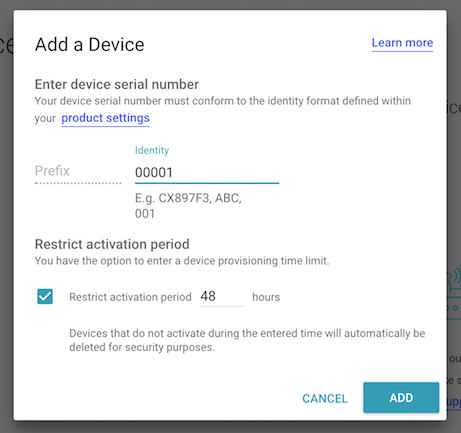
Enter an id for the device. Eg. 00000001.
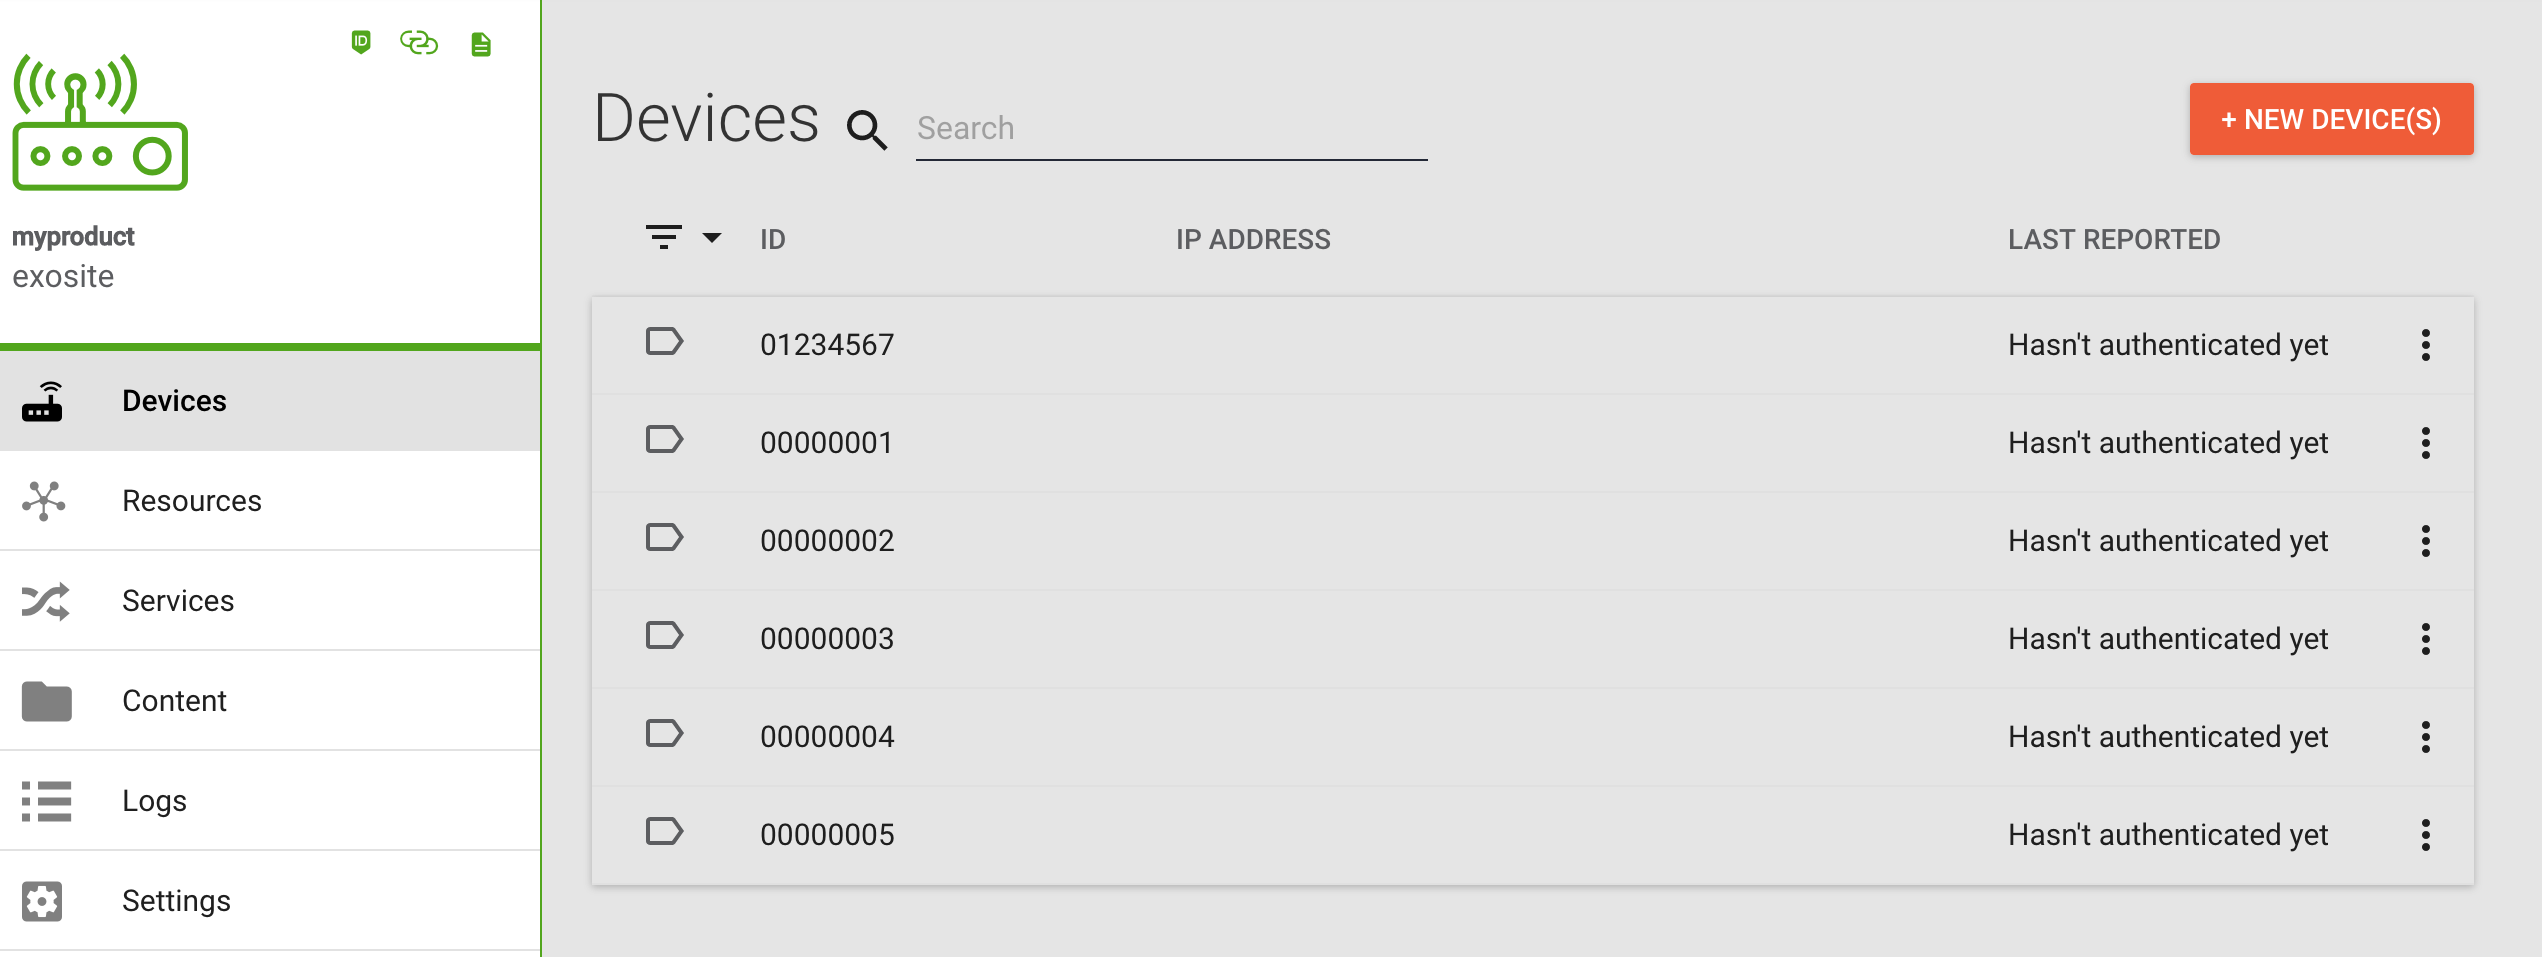
Click ADD to create the device. You will see the device listed in a whitelisted status indicated by the tag icon on the left side of the device listing.
The filter tooltip menu provides a list of device status icons and their meanings.
Using the API:
$ curl -X PUT "https://www.exosite.io/api:1/service/<iot-connector-id>/device2/identity/<device-id>" \
-H "Content-Type: application/json" \
-d '{"auth":{"expire":<µs-timestamp-to-provision-by>},"locked":false}' -vvv \
-u '<exosite-account-email>'
The auth object can omit the expire key if not restricting activation period.
Whitelist Devices In Bulk
You may whitelist multiple device identities by uploading a CSV file containing the list of device identities. This can be uploaded through the IoT Connector management interface or using the API.
First, create a text file called identities.csv (examples below). This can be done using a text editor or by using a spreadsheet tool (e.g. MS Excel, Google Sheets, etc) and downloading / exporting as a csv.
Example as a spreadsheet table
| ID |
|---|
| 00000001 |
| 00000002 |
| 00000003 |
| 00000004 |
| 00000005 |
| ID | TLS Client Certificate | Tags |
|---|---|---|
| 00000001 | "[{""name"": ""group"", ""value"": ""g1""},{""name"": ""claim_code"", ""value"": ""abc""}]" | |
| 00000002 | "[{""name"": ""group"", ""value"": ""g1""},{""name"": ""claim_code"", ""value"": ""abc""}]" | |
| 00000003 | "[{""name"": ""group"", ""value"": ""g2""},{""name"": ""claim_code"", ""value"": ""def""}]" | |
| 00000004 | "[{""name"": ""group"", ""value"": ""g2""},{""name"": ""claim_code"", ""value"": ""def""}]" | |
| 00000005 | "[{""name"": ""group"", ""value"": ""g3""},{""name"": ""claim_code"", ""value"": ""def""}]" |
Example CSV formats for whitelisting multiple identities
ID
00000001
00000002
00000003
00000004
00000005
ID,TLS Client Certificate,Tags
00000001,,"[{""name"": ""group"", ""value"": ""g1""},{""name"": ""claim_code"", ""value"": ""abc""}]"
00000002,,"[{""name"": ""group"", ""value"": ""g1""},{""name"": ""claim_code"", ""value"": ""abc""}]"
00000003,,"[{""name"": ""group"", ""value"": ""g2""},{""name"": ""claim_code"", ""value"": ""def""}]"
00000004,,"[{""name"": ""group"", ""value"": ""g2""},{""name"": ""claim_code"", ""value"": ""def""}]"
00000005,,"[{""name"": ""group"", ""value"": ""g3""},{""name"": ""claim_code"", ""value"": ""def""}]"
TLS certificates in bulk whitelisting
The example above is in Comma Separated Value (CSV) format, and the second column is intentionally left blank. This is where the TLS client certificate would go for each device identity.
IoT Connector Management User-Interface
Click + NEW DEVICE(S) and then click the Add many devices option.

Click UPLOAD CSV, navigate to your identities.csv file on your computer, and click ADD. Now additional devices are whitelisted.
Using the API:
$ curl -X POST "https://www.exosite.io/api:1/service/<iot-connector-id>/device2/identities" \
-F "identities=@identities.csv" \
-u '<exosite-account-email>'
Provisioning Devices
Activation time window
Once your device identities have been whitelisted, there is a set window of time before they expire. After the identities expire, devices may no longer provision themselves for security purposes. The default activation window time is 48 Hours.
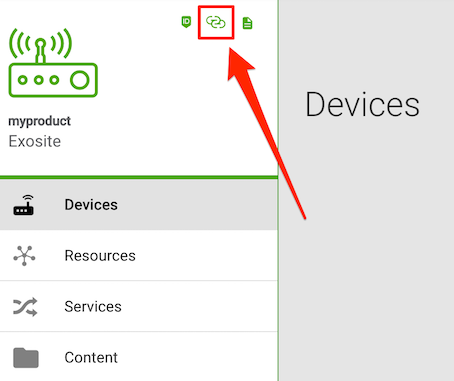
On the IoT Connector page, click on the Devices tab and find the copy app link button located near the top-left corner of the screen. Click it to save the to your clipboard.
Provision with Token or Password
Provisioning a device with the "Allow devices to register their own identity" IoT Connector configuration setting enabled means that your device will appear in the Devices tab of the IoT Connector page once it connects for the first time. After Provisioning, devices will have to use the provisioned credentials in all subsequent HTTP Data API methods (e.g. read, write, record, etc.)
- Provisioning the device is typically done by the device firmware/software, but can be done with a tool such as
curlfor development purposes. The example command as below.
Token Authentication:
$ curl -X POST 'https://<IOT_CONNECTOR_FQDN>/provision/activate' \
 -H 'Content-Type: application/x-www-form-urlencoded; charset=utf-8' \
 -d 'id=<identity>'
The device's authentication token <device-token> (40 characters) is contained in the body of the response.
Password Authentication:
$ curl -X POST 'https://<IOT_CONNECTOR_FQDN>/provision/activate' \
 -H 'Content-Type: application/x-www-form-urlencoded; charset=utf-8' \
 -d 'id=<identity>&password=<password>'
It will get HTTP/1.1 204 No Content.
NOTE: If you see a response like HTTP/1.1 415 Unsupported Media Type, this likely means you have forgotten to enable Token or Password Authentication and Murano is expecting you to use TLS Client Certificate authentication. Or, the password you provided was less than 20 bytes in length.
- Confirm that the device is now displayed with a provisioned status icon and displays an IP Address.
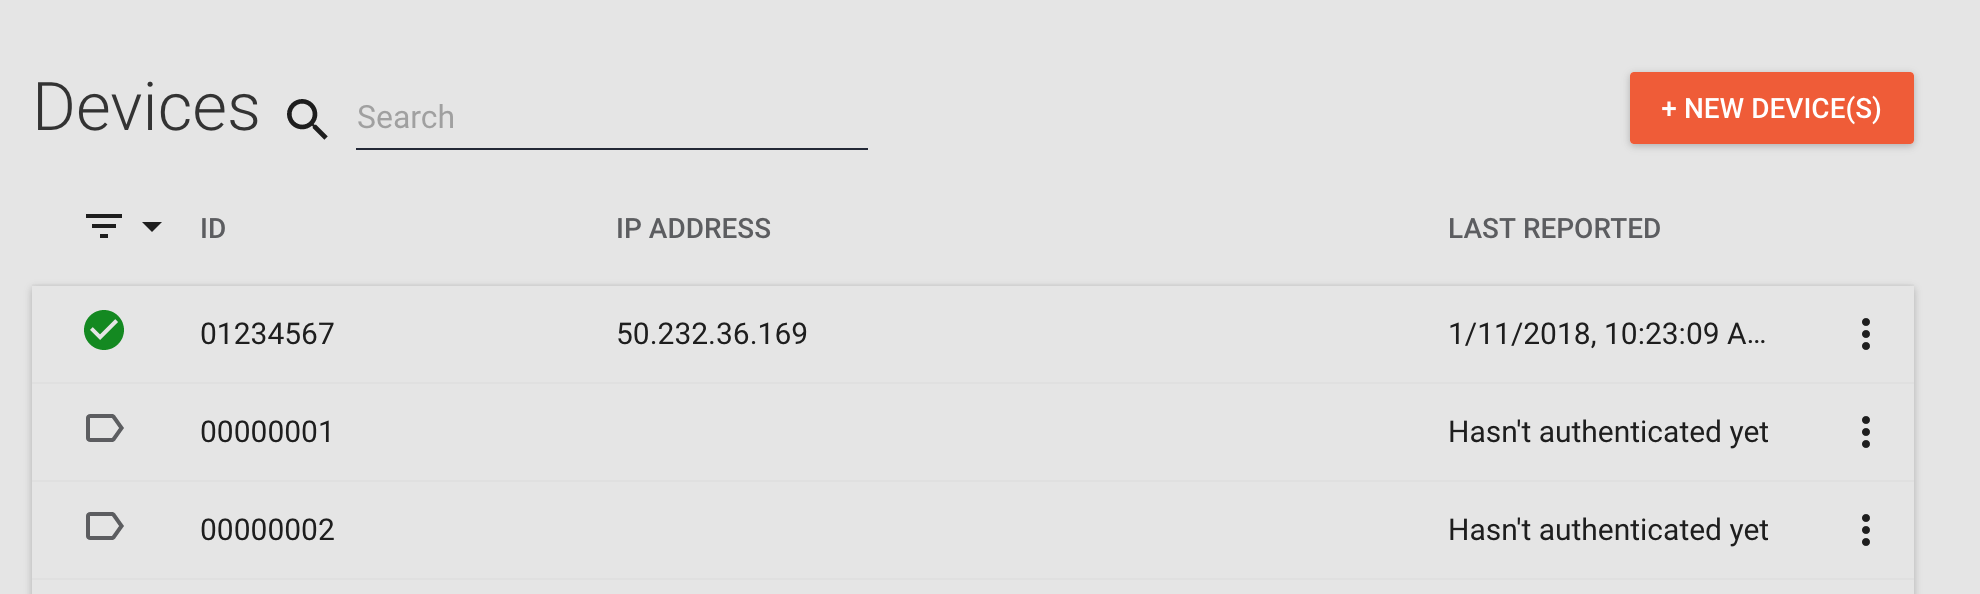
- Click on the Logs tab. There you can see the provision event for this device. The Logs tab provides a "live" view that displays events associated with this product's API host that came in while the Murano product UI was running.

- Perform a device-write using the
tokenorpasswordand confirm that a204 No Contentis returned from the call.
Token Authentication: The device token goes in the X-Exosite-CIK header.
$ curl -i -X POST 'https://<IOT_CONNECTOR_FQDN>/onep:v1/stack/alias' \
 -H 'X-Exosite-CIK: <device-token>' \
 -H 'Content-Type: application/x-www-form-urlencoded; charset=utf-8' \
 -d 'myalias=50'
Password Authentication: The device credentials (base64-encoding of identity:password) in the Authorization header.
$ curl -i -X POST 'https://<IOT_CONNECTOR_FQDN>/onep:v1/stack/alias' \
 -H 'Authorization: Basic <base64-encoding of identity:password>' \
 -H 'Content-Type: application/x-www-form-urlencoded; charset=utf-8' \
 -d 'myalias=50'
- Verify the write was logged.
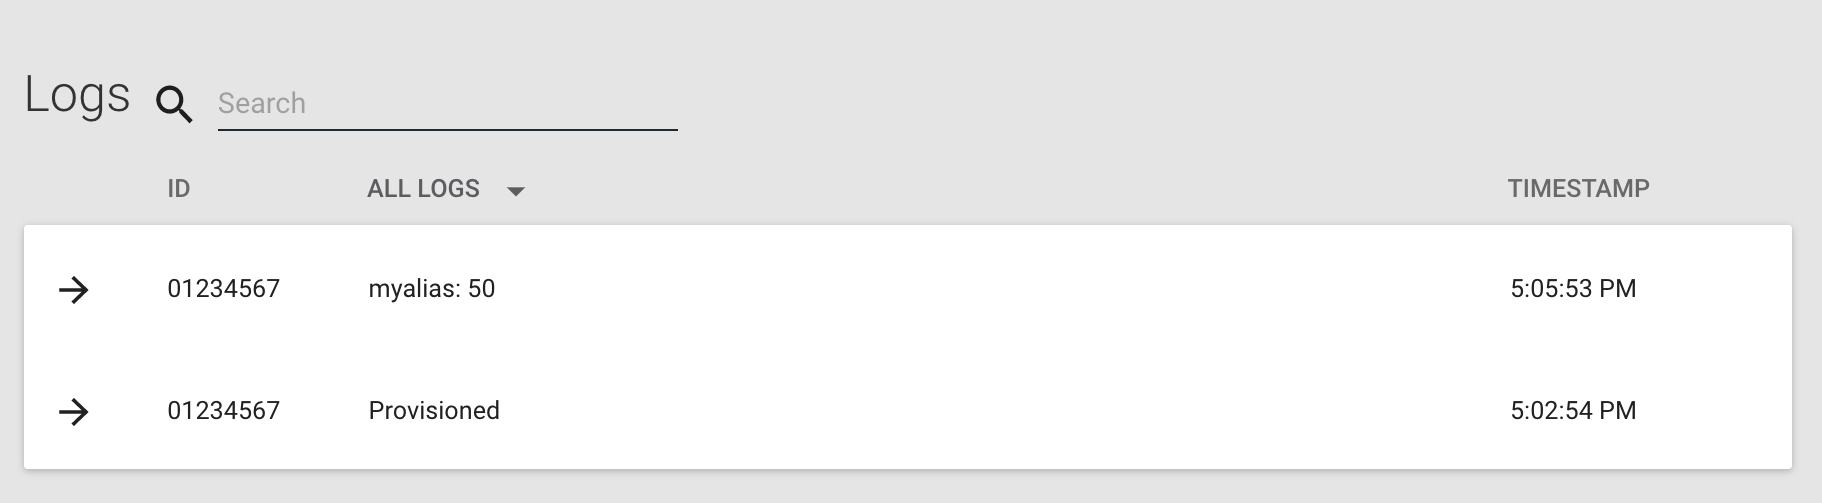
NOTE: Previous users of One Platform might be surprised to learn that the myalias resource does not need to be created before making the previous call in order for it to be logged. However, the data will not appear in the myalias resource unless it is defined in the Resources tab of the Murano IoT Connector.
Provision with TLS Client Certificate
In the previous section, you provisioned a device using token authentication. Next, you may use TLS client certificate, which provides enhanced security:
- No secret information needs to be transmitted in order to authenticate requests.
-
The private key can be stored on a hardware security chip that makes it difficult to obtain the key.
-
Go to the Settings tab and switch the product to use TLS Client Certificate authentication. This does not affect already-provisioned devices, which retain their previous authentication type. Click the SAVE button at the bottom of that page.
- Find an identity that has not been provisioned yet. For this tutorial, you can use
00000002. - Generate a certificate file. This will require a tool like OpenSSL. The CN of the certificate must be set to the device ID. For example, here is a command that generates a certificate good for 365 days:
openssl req -x509 -nodes -days 365 -sha256 -subj /C=US/ST=MN/L=Mpls/O=Exosite/CN=00000002 -newkey rsa:2048 -keyout device-key.pem -out device-cert.pem
-days 365specifies that the certificate is valid for one year. The certificate also gets a start time based on the current time on the machine generating the certificate. This may differ by a few seconds from the API's clock and cause subsequent API calls to fail until the API's clock catches up to the start time of the certificate. You can check the API time by callingcurl <IOT_CONNECTOR_FQDN>/timestamp, which returns a timestamp in seconds since the epoch.-subj /C=US/ST=MN/L=Mpls/O=Exosite/CN=00000002specifies a specific location, organization, and identity. You should set most of this appropriately for your business, but Murano's Device API requires that the common name/CNbe set to your device identity.- Provision the device. This may be done by making an HTTP API call using the certificate created above. You will make a write call in this example. The provisioning step here is combined with the first write to the API.
$ curl -v "https://<IOT_CONNECTOR_FQDN>/onep:v1/stack/alias" -d 'myalias=50' --cert device-cert.pem --key device-key.pem
The first time you write with the certificate, you will see two events in the log: a provision event and a write event.
Here is a full example of certificate creation sequence and provisioning on an OSX machine:
$ openssl req -x509 -nodes -days 365 -sha256 -subj /C=US/ST=MN/L=Mpls/O=Exosite/CN=00000002 -newkey rsa:2048 -keyout device-key.pem -out device-cert.pem
Generating a 2048 bit RSA private key
................................+++
.+++
writing new private key to 'device-key.pem'
-----
$
$ curl -v https://<IOT_CONNECTOR_FQDN>/onep:v1/stack/alias -d 'myalias=50' --cert device-cert.pem --key device-key.pem
*   Trying 52.9.81.106...
* TCP_NODELAY set
* Connected to <IOT_CONNECTOR_FQDN> (52.9.81.106) port 443 (\#0)
* WARNING: SSL: Certificate type not set, assuming PKCS#12 format.
* Client certificate: 00000002
* TLS 1.2 connection using TLS_ECDHE_RSA_WITH_AES_128_GCM_SHA256
* Server certificate: *.m2.exosite.io
* Server certificate: RapidSSL SHA256 CA
* Server certificate: GeoTrust Global CA
> POST /onep:v1/stack/alias HTTP/1.1
> Host: <IOT_CONNECTOR_FQDN>
> User-Agent: curl/7.51.0
> Accept: */*
> Content-Length: 10
> Content-Type: application/x-www-form-urlencoded
>
* upload completely sent off: 10 out of 10 bytes
< HTTP/1.1 204 No Content
< content-length: 0
< date: Wed, 03 May 2017 11:27:44 GMT
< server: Murano
<
* Curl_http_done: called premature == 0
* Connection #0 to host <IOT_CONNECTOR_FQDN> left intact
PKI
This section is going further and demonstrates how a custom Certificate Authority (CA) can be used to securely connect devices to a Murano IoT Connector.
Configuration
Navigate to the IoT Connector Product page under the Settings tab.
In the Provisioning section, select the TLS Client Certificate authentication method and leave everything else at their defaults.
In the Public Key Infrastructure section, check the box next to Enable PKI. This will reveal a text box titled Add Client CA Cert Here.
That is where you have to paste your Client CA Certificate in PEM format.
With PKI enabled, a drop-down box titled Validator Vendor Name also appears, allowing you to choose a PKI vendor to sign Certificate Signing Requests (CSR). This is optional.
If you leave it blank, devices will have to be provisioned with certificates already signed by the Certificate Authority configured as the Client CA above.
If you select a vendor, a manufacturing fixture can provision devices with Certificate Signing Requests and have Murano forward the requests to the selected vendor for signing.
The currently supported vendors are:
- DigiCert, with the following options:
- Profile Name: Your DigiCert Profile Name (please refer to DigiCert's API documentation).
- API Key: Your DigiCert API Key (please refer to DigiCert's API documentation).
- Validity Duration Months: The number of months for which the issued certificate will be valid.
Your settings should look like the following (except for the optional Vendor Validator options):
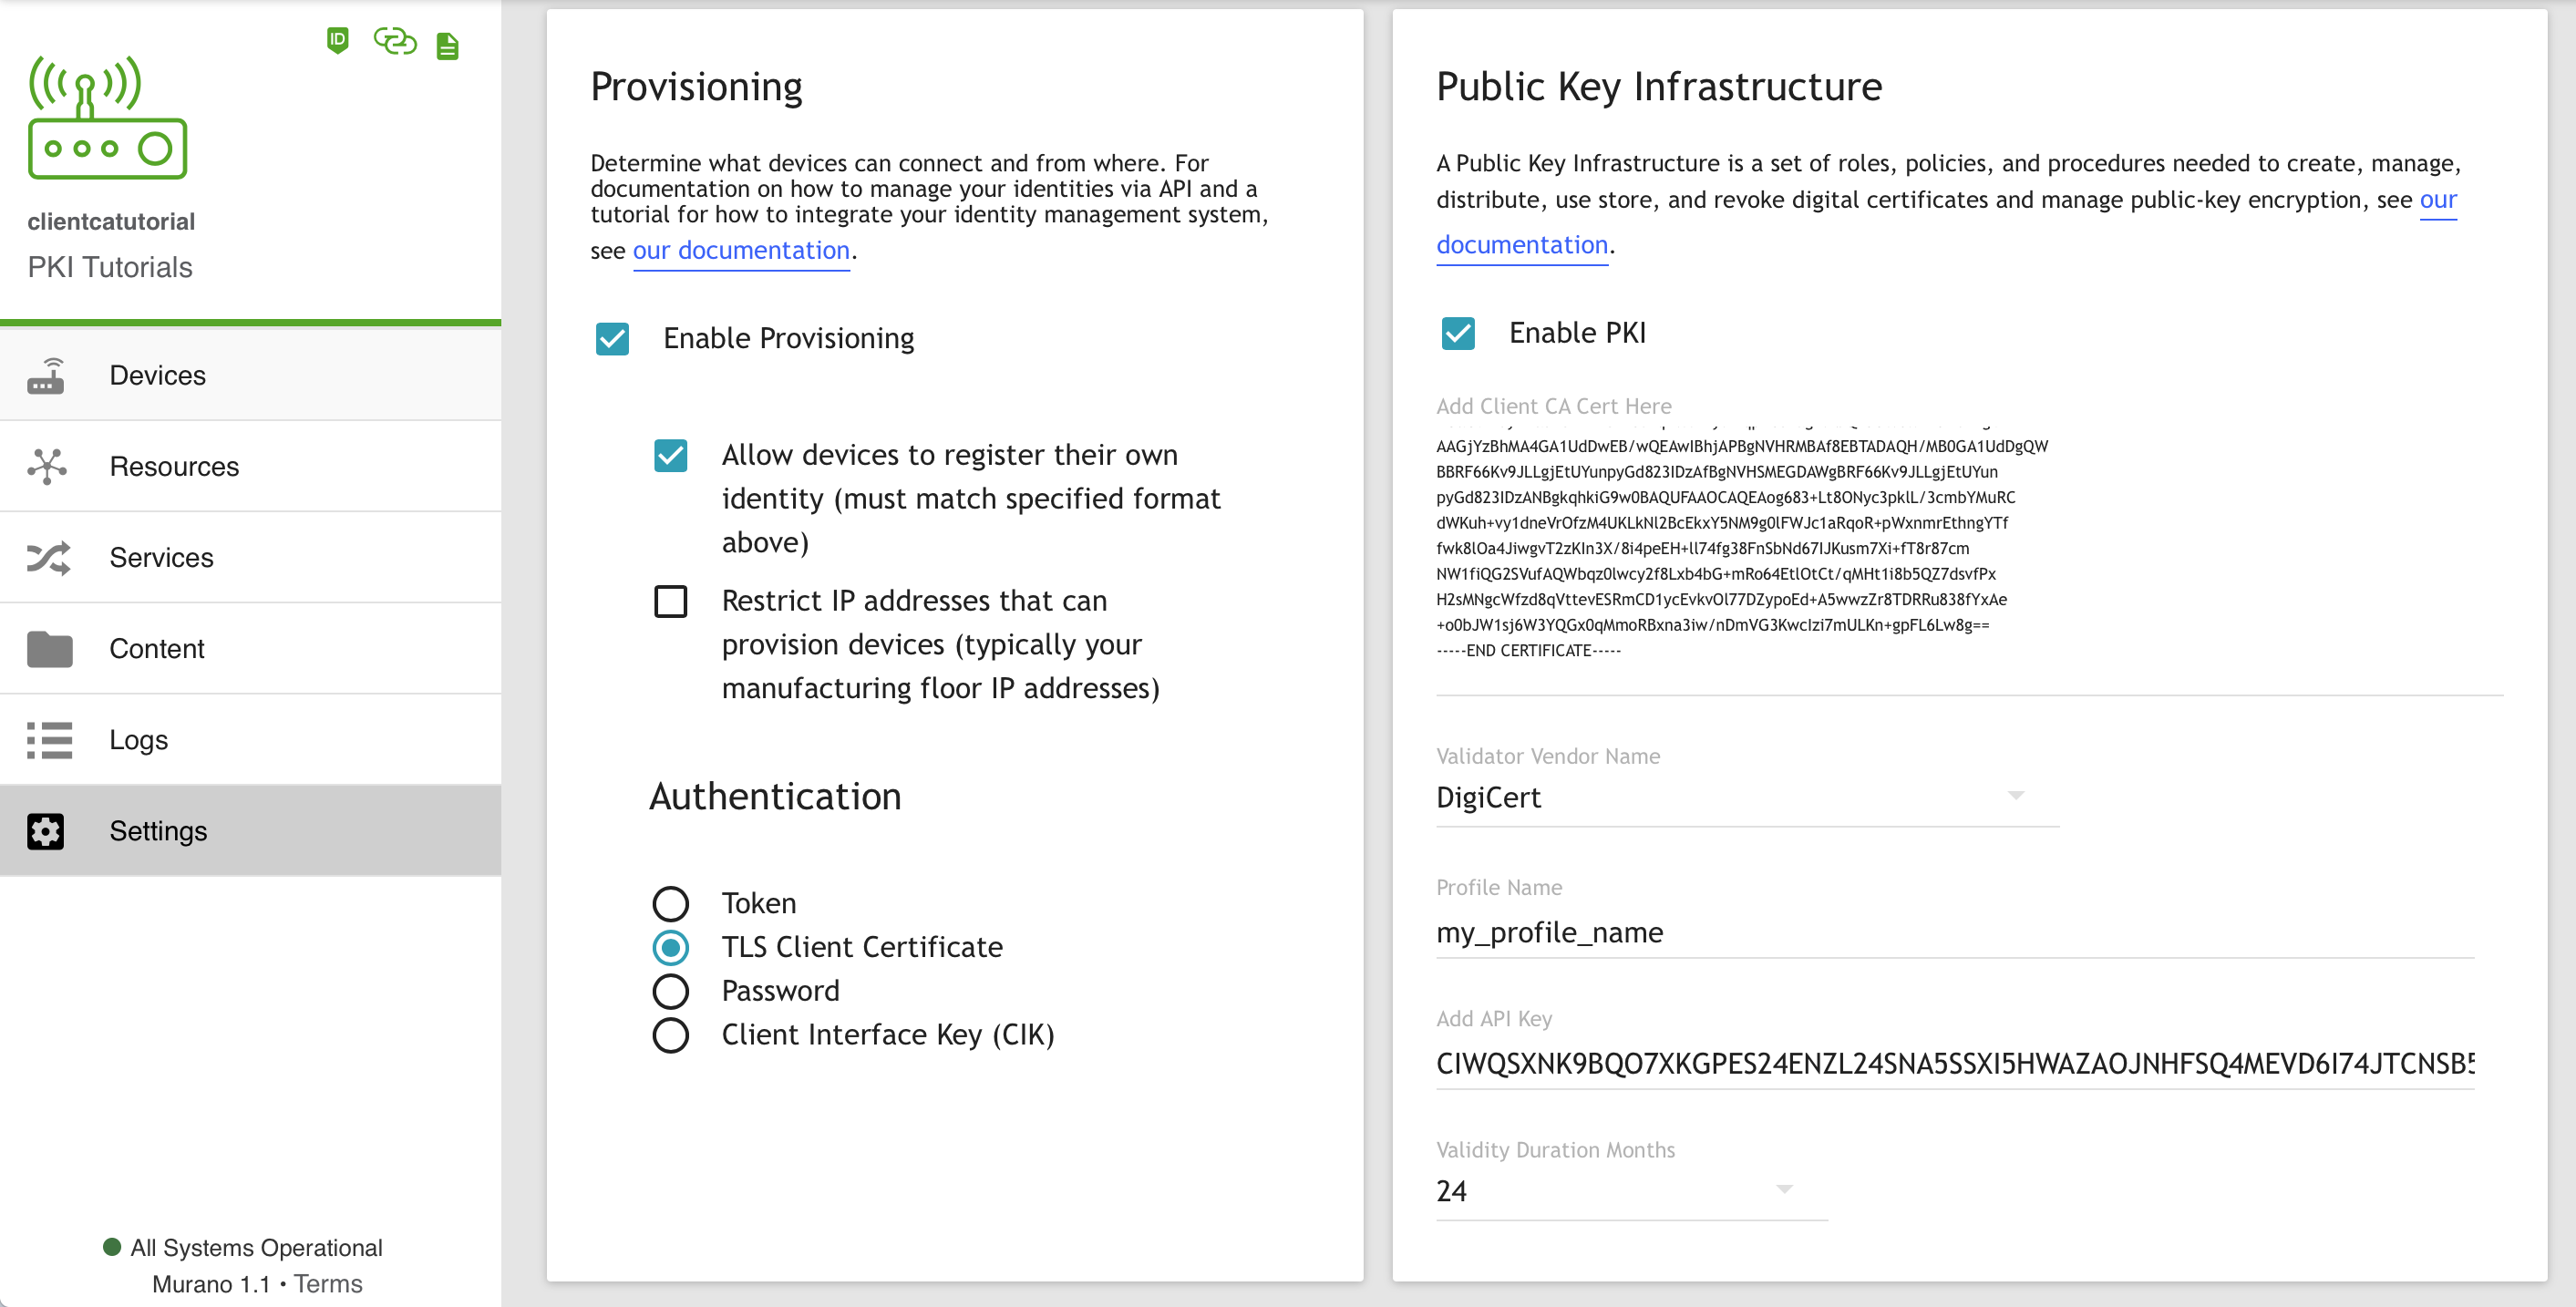
Now, click the SAVE button in the upper right corner to commit your changes to your product's settings.
At this point, your Murano Cloud setup is ready.
Signing Device Certificate with PKI 
If you HAVE NOT configured a PKI validator vendor you can skip this section.
With a PKI vendor configured, Murano is ready to submit Certificate Signing Requests (CSR) to the configured vendor, using the configured credentials and options. When a device is added with its "auth.type" field set to "csr" and its "auth.key" populated with the actual CSR in PEM format, Murano will initiate the signing procedure with the configured vendor, save the returned certificate as the "auth.key" and set "auth.type" to "certificate".
That said, follow the steps below:
- Using OpenSSL, create a Certificate Signing Request:
openssl req -nodes -new -subj "/C=US/O=<your company>/OU=<your division>/CN=<common name>" -newkey rsa:2048 -keyout <common name>.key.pem -out <common name>.req.pem
- Using Murano CLI, create a device with the above created CSR as its authentication key. This assumes that you already have a product set up with Murano CLI.
murano device enable --auth csr --cred ./<common name>.req.pem
The return value will be a JSON holding the signed certificate, save that into a file named <common name>.client.crt.pem:
{"certificate": "<signed certificate here>"}
- Concatenate the above created certificate with the Client CA configured for the product:
cat <common name>.crt.pem <client ca certificate>.crt.pem >> client.crt
Connecting Device
In the previous section, we left the Enable Provisioning and Allow devices to register their own identity options selected. Because of that, we don't need to explicitly whitelist a device for provisioning. The device can simply connect to Murano with its client side certificate provided and Murano will automatically save the device's identity (Common Name extracted from the certificate) and certificate for subsequent authentication. On top of that, devices using TLS Client Certificate authentication, do not need to explicitly call the activate endpoint to get provisioned. Instead, they can start sending data on their first connection.
For the --cert option, use the client side certificate (signed by the configured Client CA) concatenated with the Client CA. For the --key option, use the private key.
curl -v \
 -X POST https://<IOT_CONNECTOR_FQDN>/onep:v1/stack/alias \
 --cert ./client.crt \
 --key ./client.key \
 -d temp=50
The above command has now provisioned the device and wrote the value 50 with the alias "temp". Murano has verified that the provided certificate had been signed by the Client CA Certificate that is configured for this product.
Issuing the same command subsequently, will cause Murano to use the client certificate to identify (by extracting the Common Name) and authenticate the device (by verifying that the client certificate has been issued by the configured Client CA Certificate and by checking whether the provided certificate has been associated with the connecting device in Murano's database).