Asset Templates 
Overview
Asset Templates provide a way to create many assets with the same asset configuration using different source IoT data, either as a starting point or for applications where the assets are always the same. With template versioning, updates can be made to the template and then migrations to the existing linked assets may occur.

Templates provide the following functionality:
- Creating new assets using a template
- Linked assets remain the same as the template except in cases overrides are used
- Create new versions of the template
- Migrate existing assets to new versions or other templates
Asset Templates include:
Linked Assets 
When an asset is created from a template or migrated to a template, it is 'linked' and by default essentially all properties are locked to that template version. An Asset Manager may choose to Stop Template Tracking from the linked asset's configuration menu, which unlinks that asset from the template and makes fully configurable again.

Modifications of Linked Assets 
The following items may be modified or overridden on a linked (locked) Asset. When any of these elements are modified or added, it will continue to be available after the asset is migrated to new template versions.
Metadata - The metadata fields defined in the template will always be in the linked assets. Additional metadata fields can be added to the linked asset though. If the template has a value specified for a field, that will also be carried through to the linked asset, but if no value is set by default, the linked asset can specify any value for that metadata field. This allows some metadata to be used so that all linked assets have exact the same field and value, where other fields are present (such as 'serial number'), but can be set for each linked asset.
Dashboards - The Template's dashboards are included in the Linked Asset and are locked from editing with a few panel exceptions noted below. Users with the Asset Manager permission may create additional custom dashboards that are fully configurable. These asset manager roles may choose which dashboards to show to asset viewers in the dashboard management interface. Dashboard Management
Dashboard Panels - The Image Overlay dashboard panel may be customized while the dashboard is 'linked' or locked to the Asset Template. The image and the location of signal values may be updated. Image Overlay Panel
The following may not be available on all solutions
Signal Properties - Signal properties such as the 'Name' of a signal may be edited, creating an override in the application by Asset Managers. These modified properties may be cleared in the Edit Signal panel using the Clear All Overrides button. Any modified signal will included an 'unlock' icon in the Asset Configuration table.

Transform and Rule Settings - Transform and Rules may be edited by Asset Managers, for example changing a threshold value or a transform function constant. These modifications are applied to the data pipeline when saved. Clearing the overrides will save the default template parameters to the data pipeline.
Overrides as Parameters
Template Parameter Overrides - Asset Template managers may expose specific signal, transform, and rule parameters for editing by users who do not have the Asset Manager permission. These users can edit only the exposed parameters from a dedicated Parameters tab on the asset. See Asset Template Parameter Overrides for details.
Using Asset Templates 
Create an Asset with a Template 
Start from wherever the asset will be created:
- A group – open the group's menu in the side navigation and select Create Asset
- A device – select Create Asset from Template from the device's menu
- A template – select Create Asset From Template on the template, or Create Asset From Version from the version menu. The template and version are preselected.
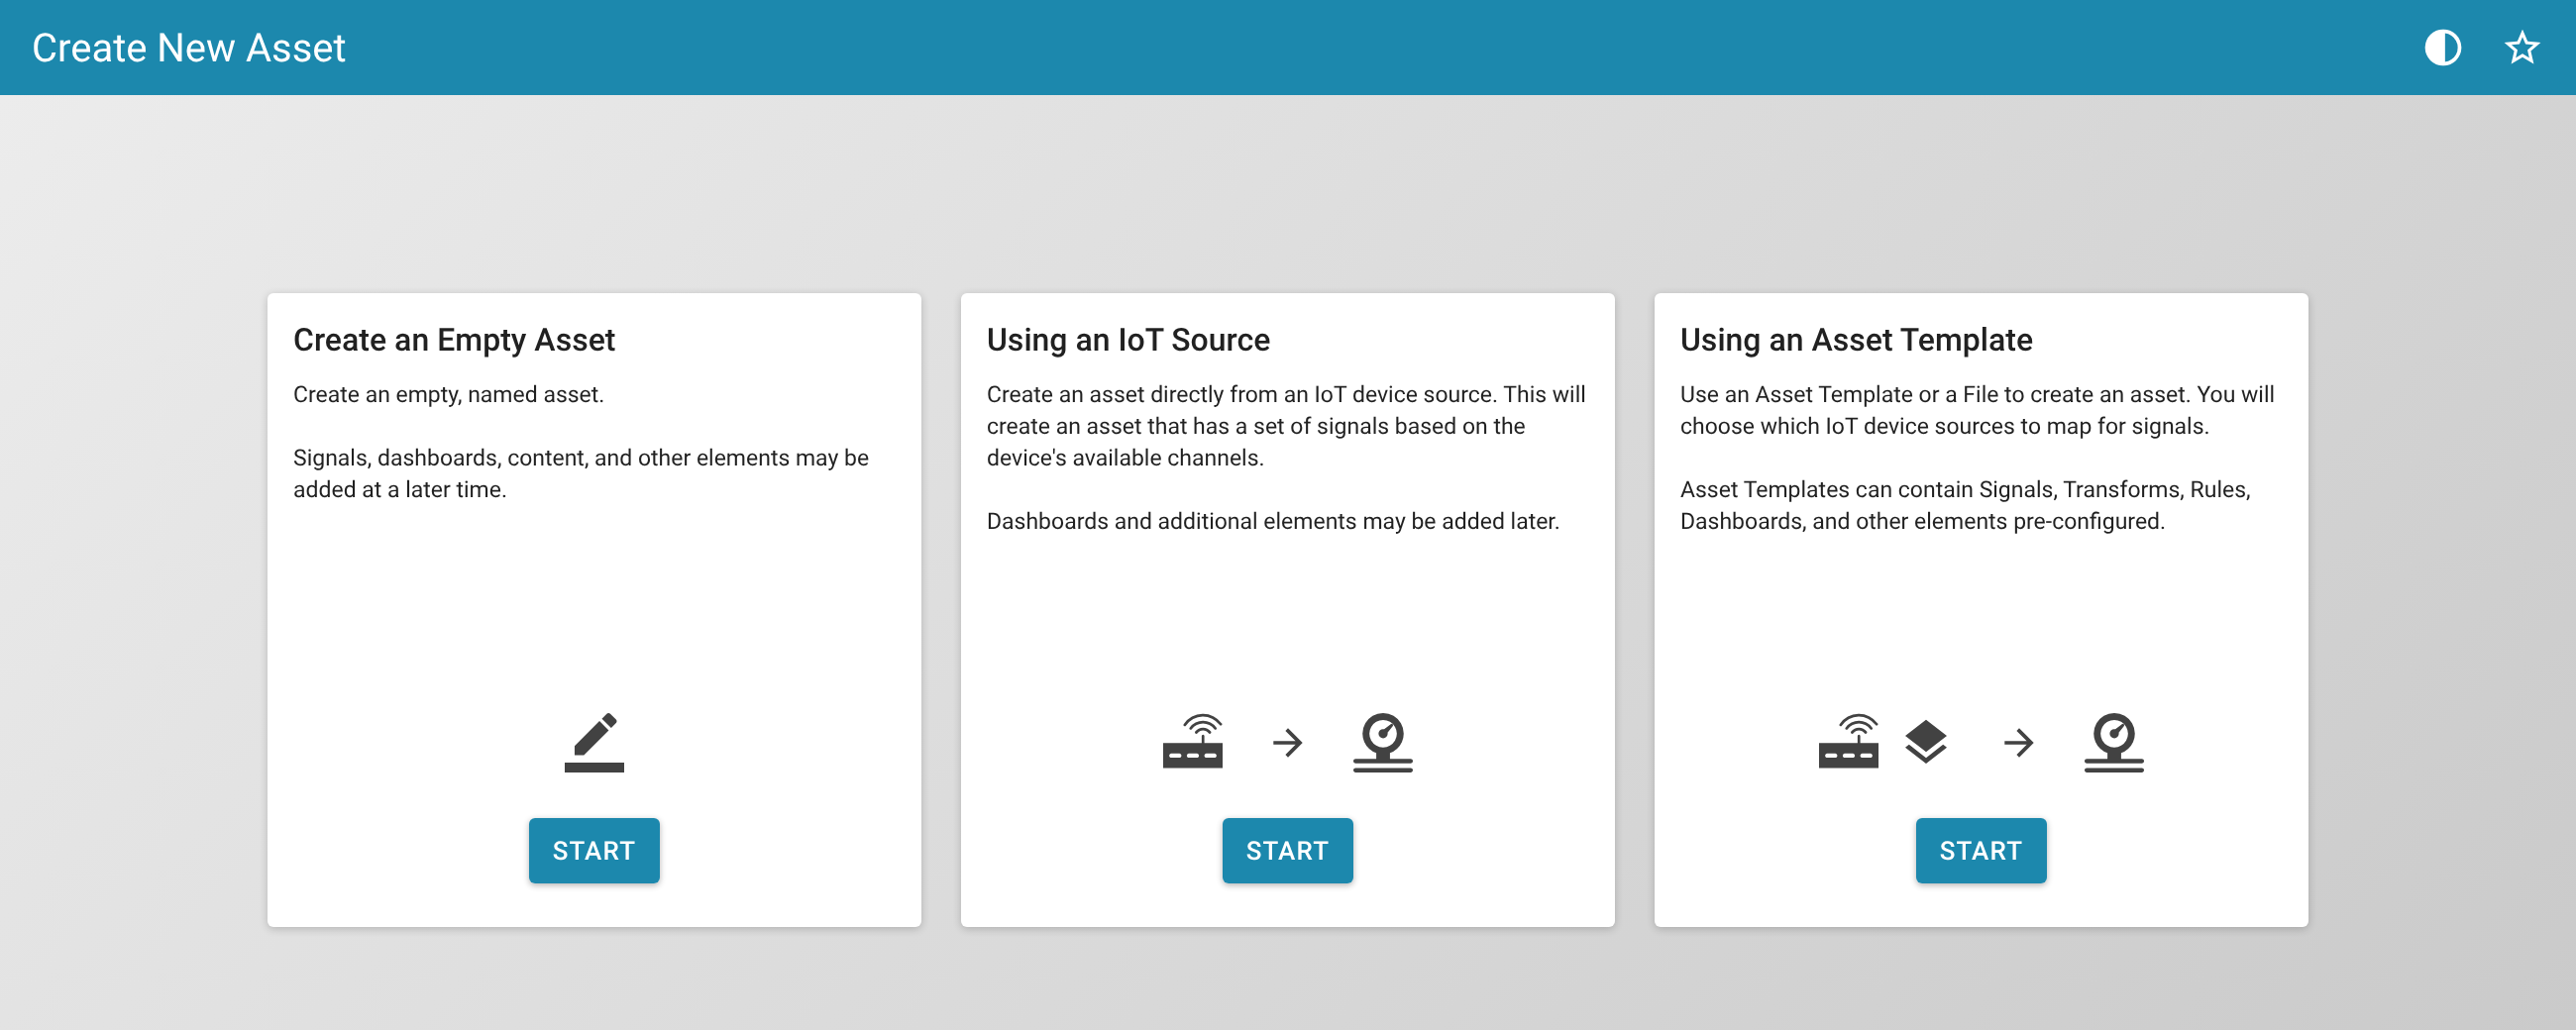
When starting from a group, choose Using an Asset Template. Starting from a device or a template skips this screen.
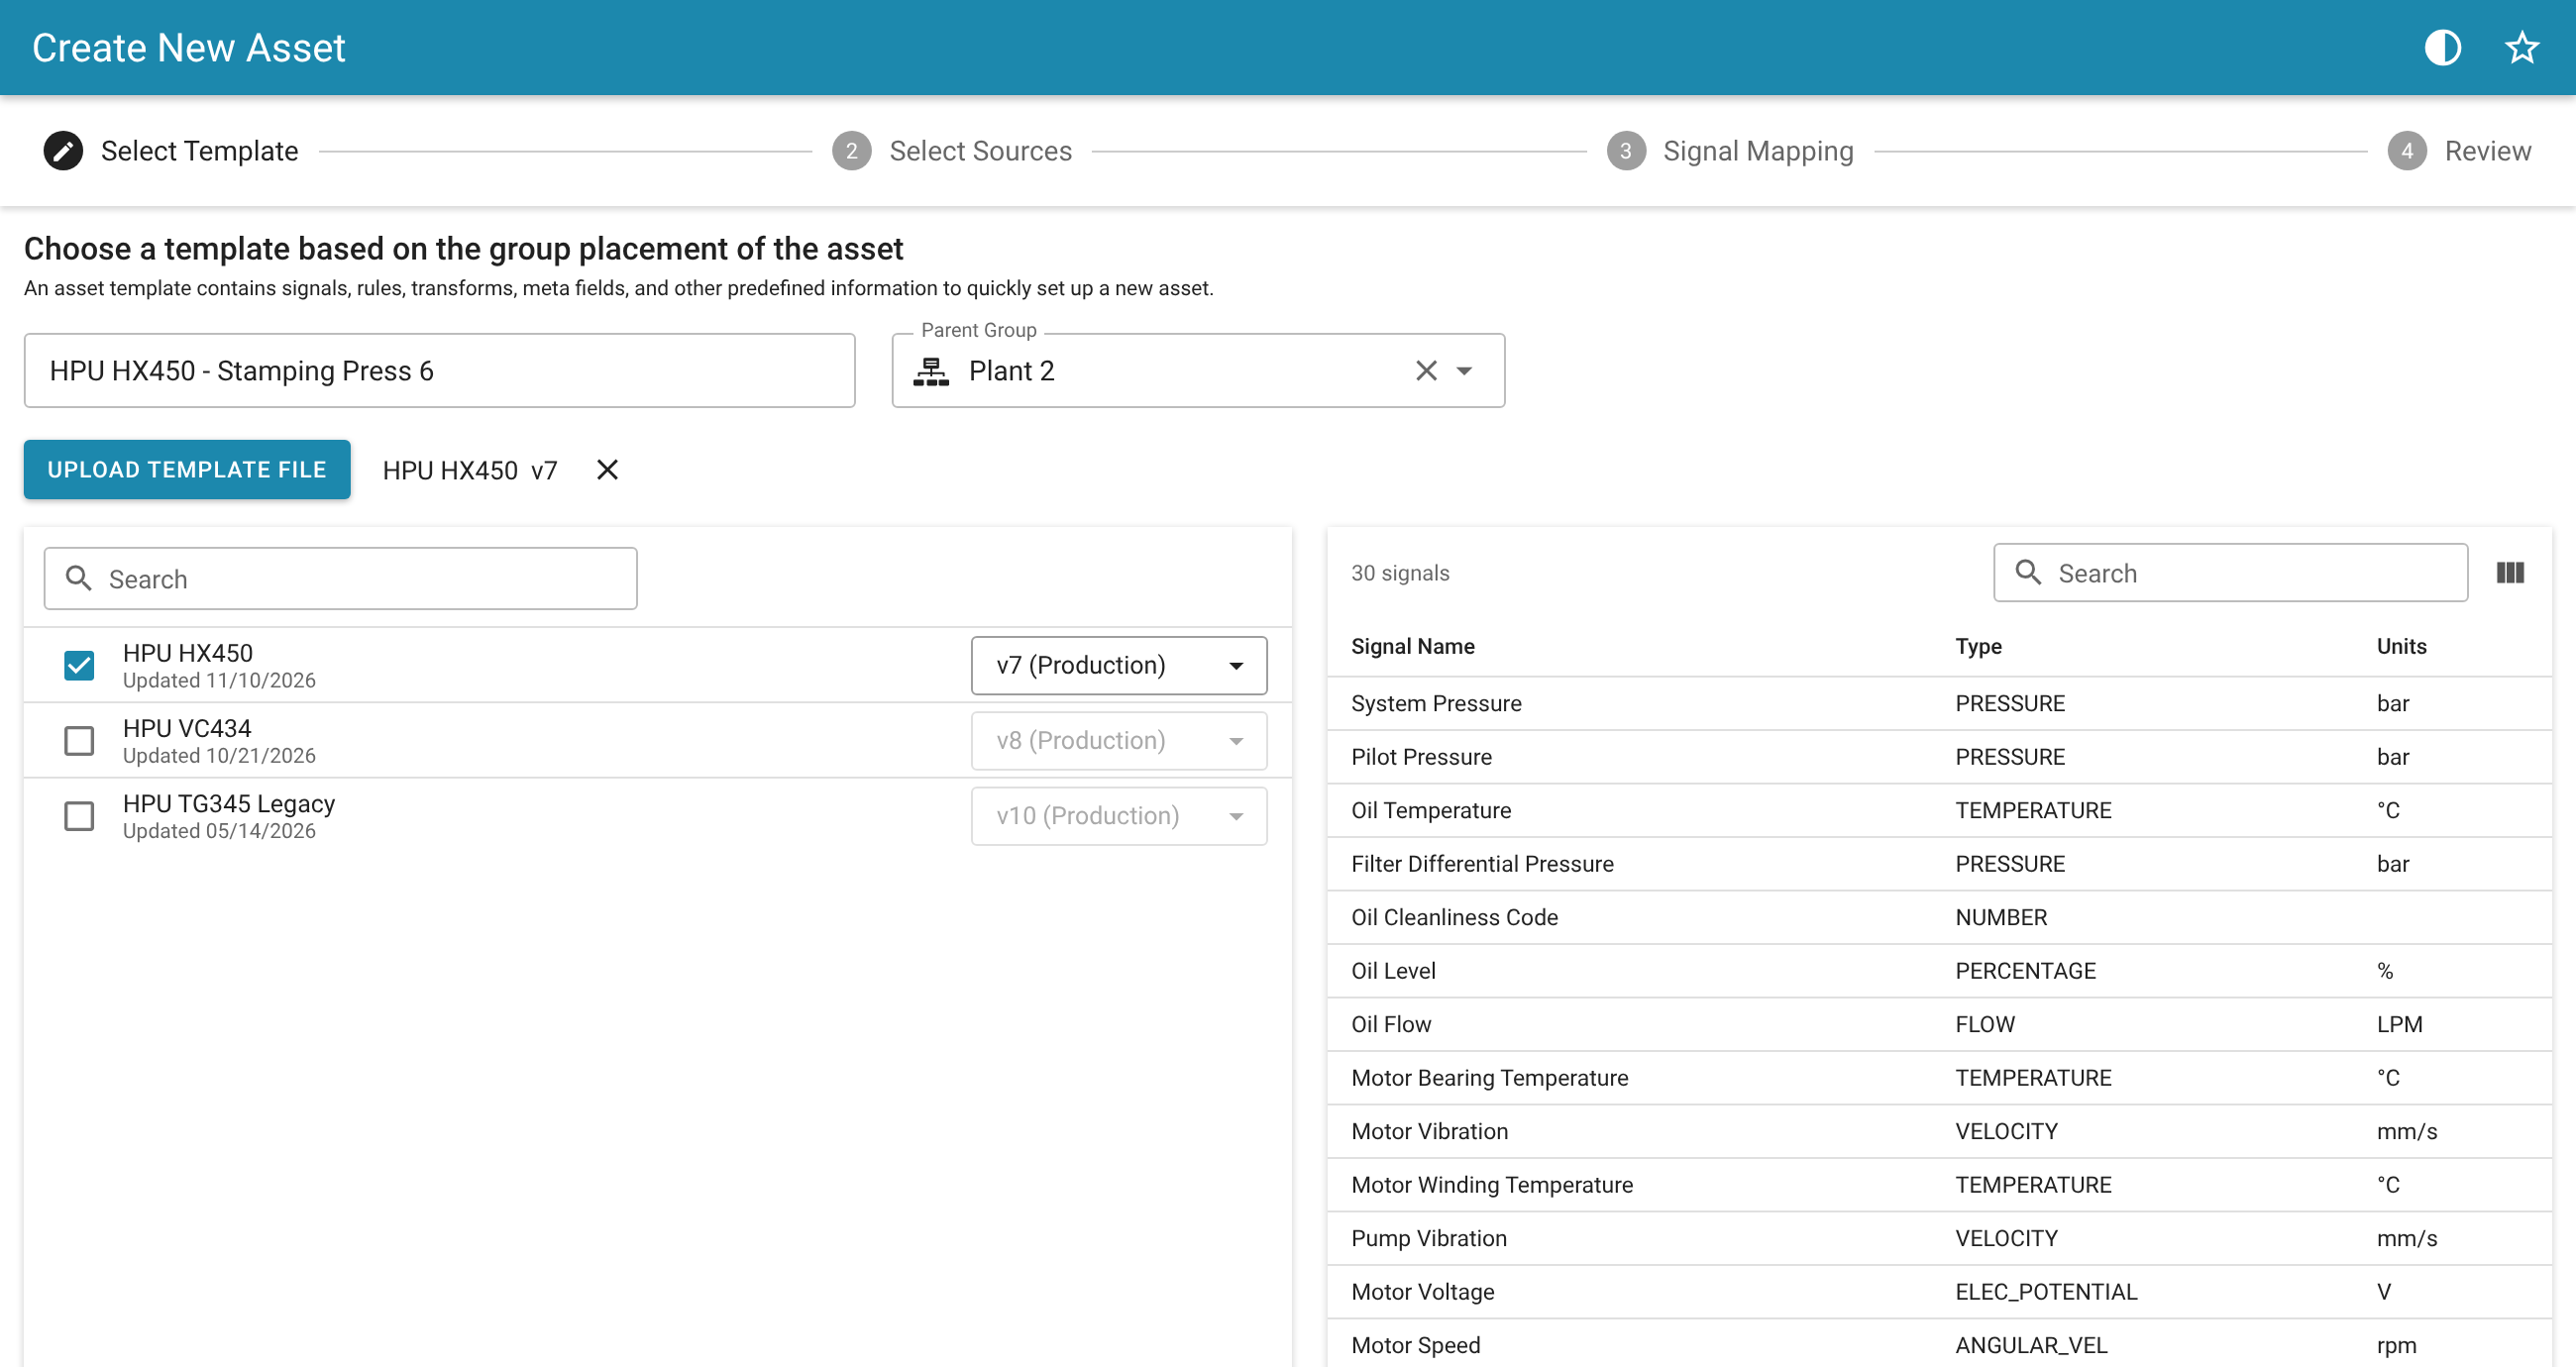
Enter the asset name and parent group, then select a template and version. The Production Version is selected by default. You can also select Upload Template File to use a template file instead. The signals in the selected version are listed on the right.
Continue through Select Sources, Signal Mapping, and Review to create the asset.
These screens are part of the New Asset Creation and Signal Management feature. Without it, the same entry points open the original asset creation dialogs.
Device Channel Mapping
When you create an asset from a template, you choose a source device for each source device in the template, then map each signal to a channel.
Choosing a device – the device list only shows devices that have at least one channel of each data type the template uses. Clear Require matching devices to supply all channels to also show devices that have only some of them.
Mapping channels – select Show additional channel mapping detail to choose the channel for each signal. Only channels of the same data type are listed. ExoSense preselects the channel with the same ID as the template's source device, or the first channel of the same type if there's no match. If your devices use the same channel IDs as the template's source device, no changes are needed.
With the New Asset Creation and Signal Management feature enabled, mapping happens in the Signal Mapping step instead. Use Auto Map Channels to match by channel ID, or download and upload a mapping file. Signals can be left unmapped and set up later.
Managing Asset Templates 

Creating and Updating Asset Templates 
Create a template
In Asset Management, open the Asset Templates tab and select the add button. Enter a template name, choose the group the template belongs to, and choose how to start:
- Create from existing asset – copies the configuration of an asset you choose into the template. The asset you choose is then linked to v1 of the template.
- Create from scratch – starts with a blank template
- Upload template file – uses a template or asset config file, such as one saved with Download Version or downloaded from an asset in Modify Asset
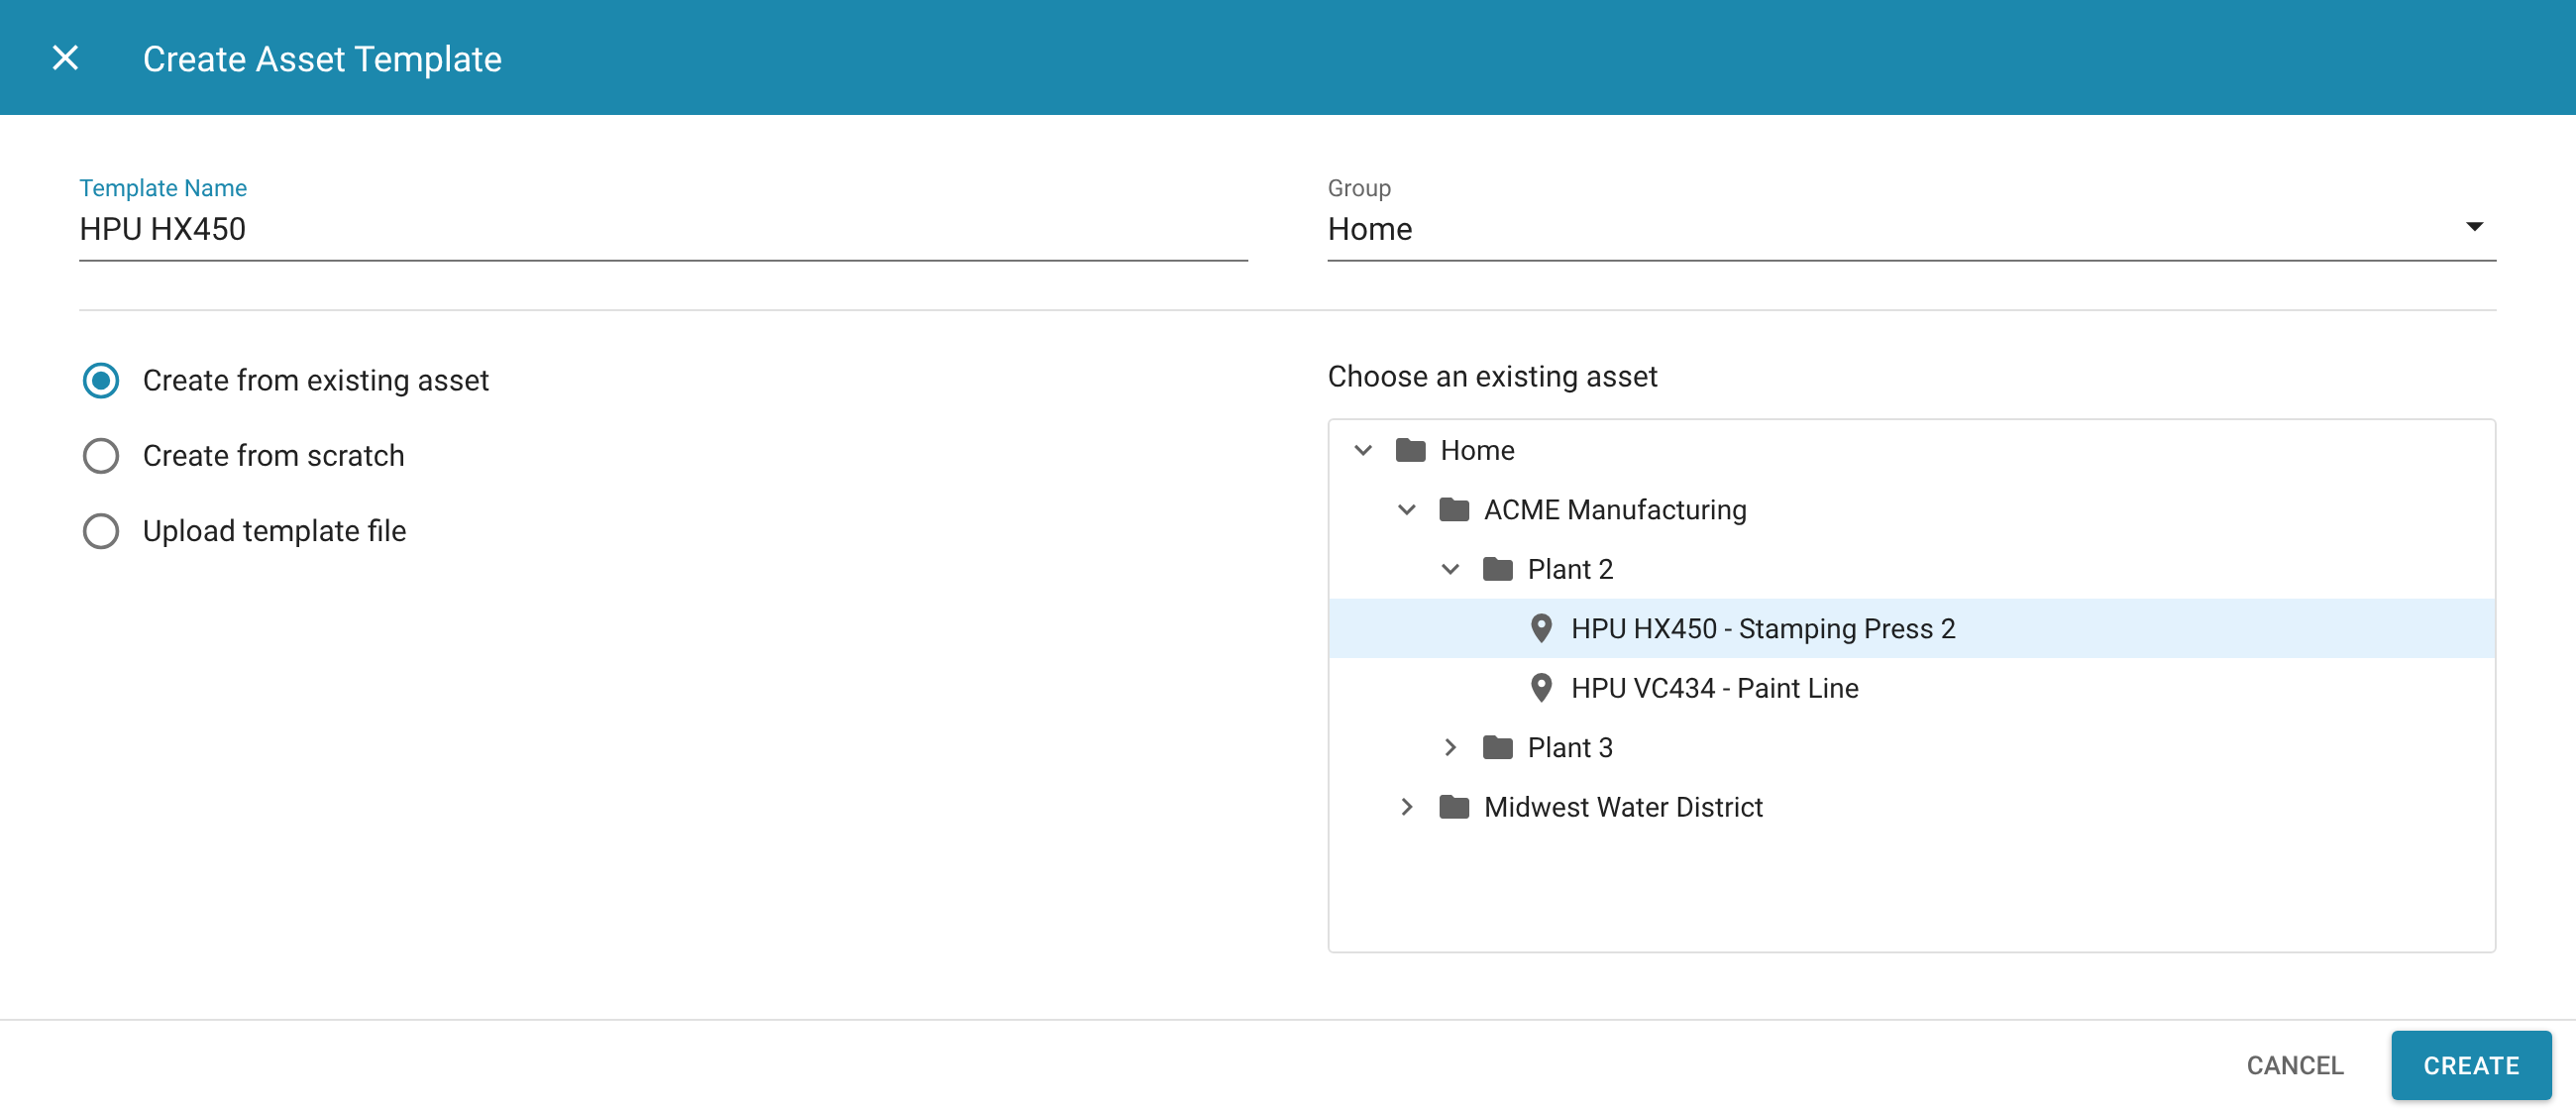
The first version (v1) is saved and set as the Production Version.
Edit the template configuration
Each template has its own configuration, separate from the assets linked to it. To change it, select the template and select Edit Template Config.
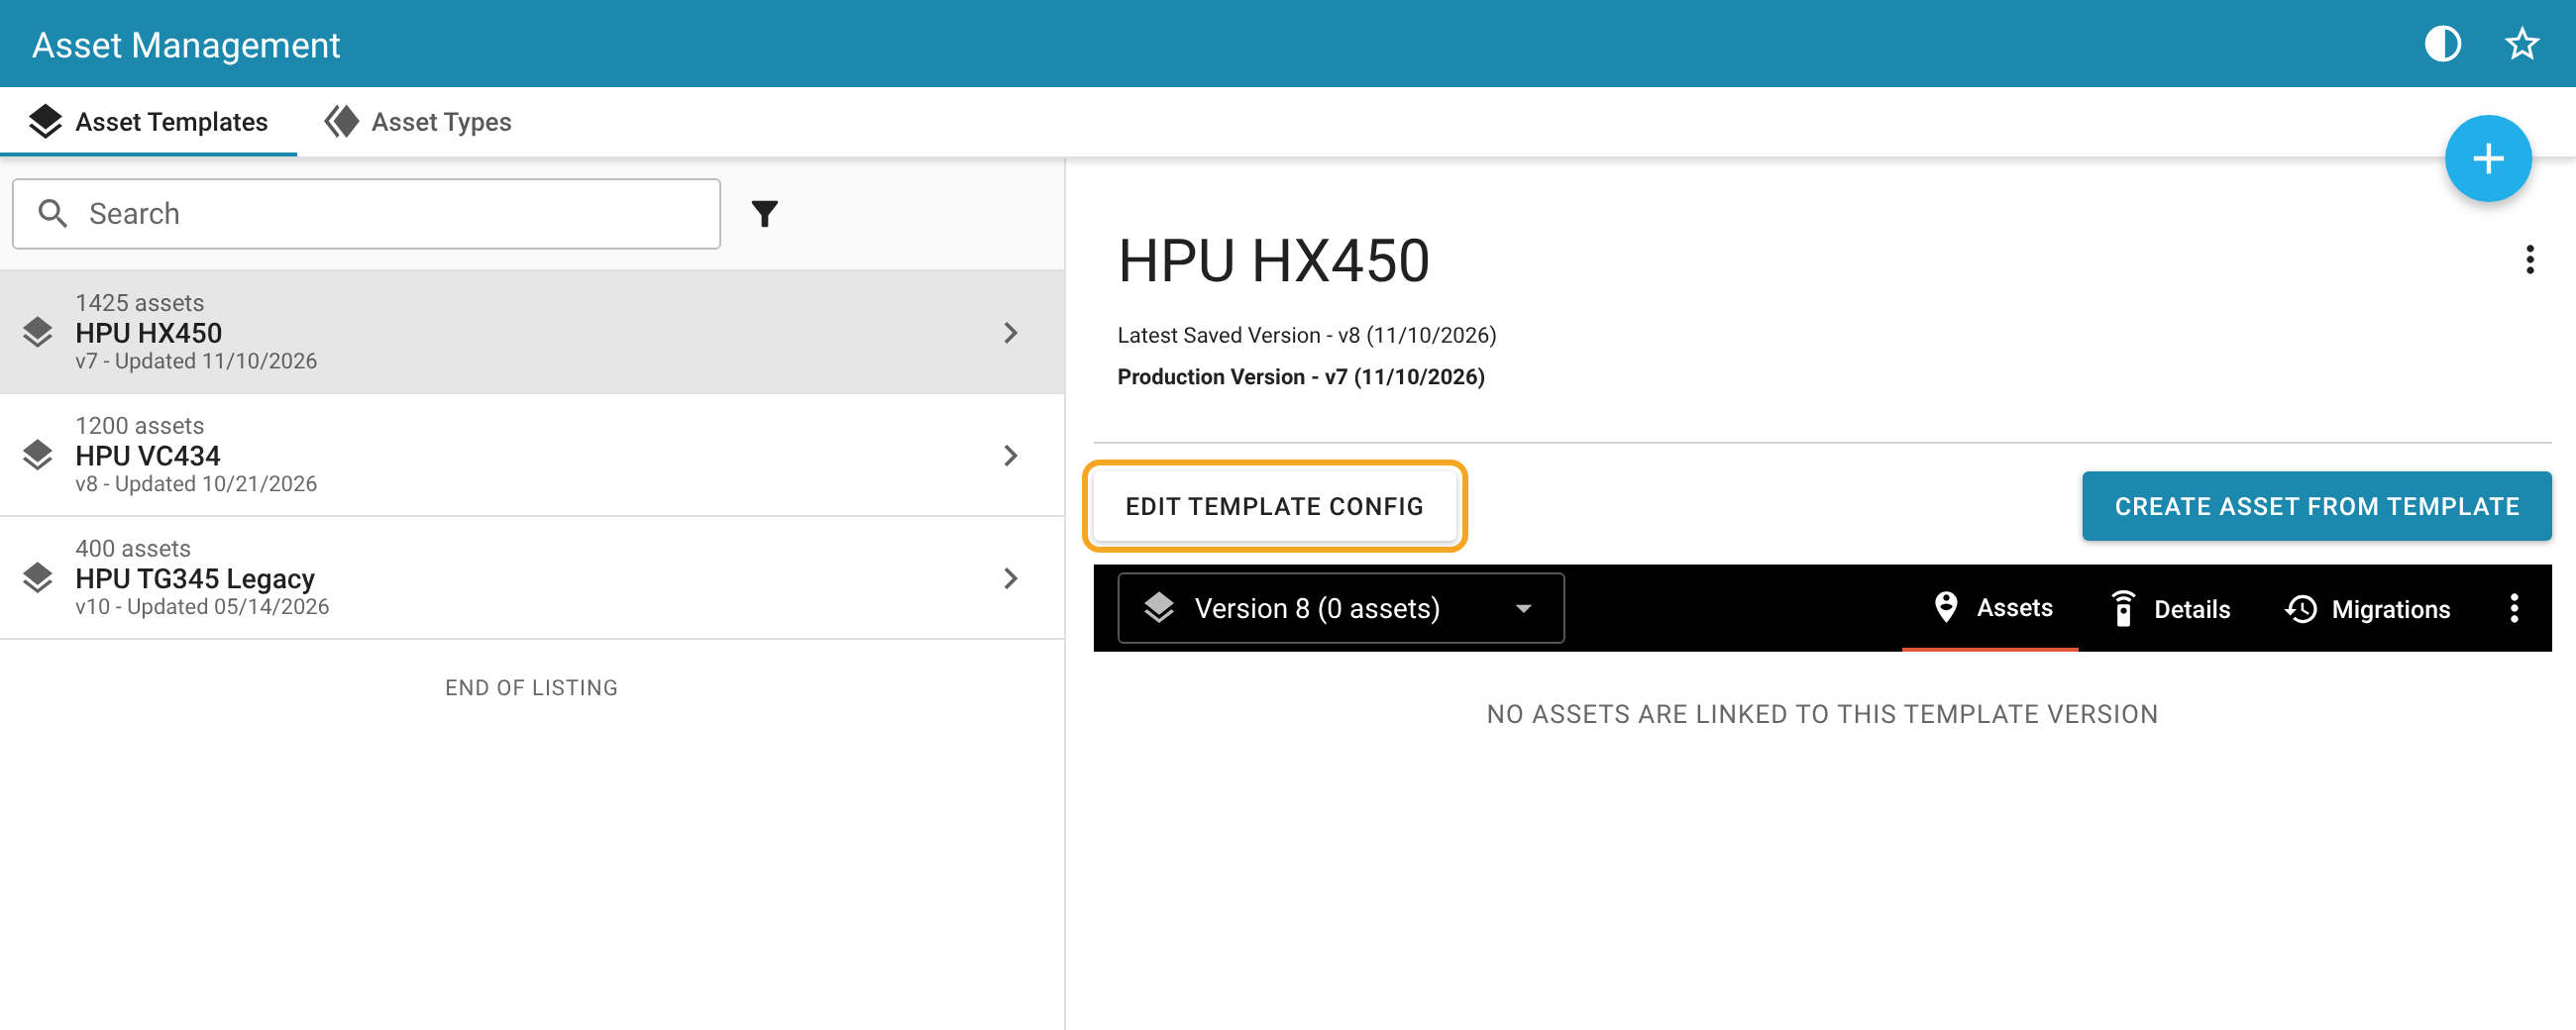
This opens the template's configuration in Modify Asset, where you edit signals, transforms, rules, dashboards, metadata, and asset details the same way as on any asset. The Editing Template label in the top right shows which template you are editing.
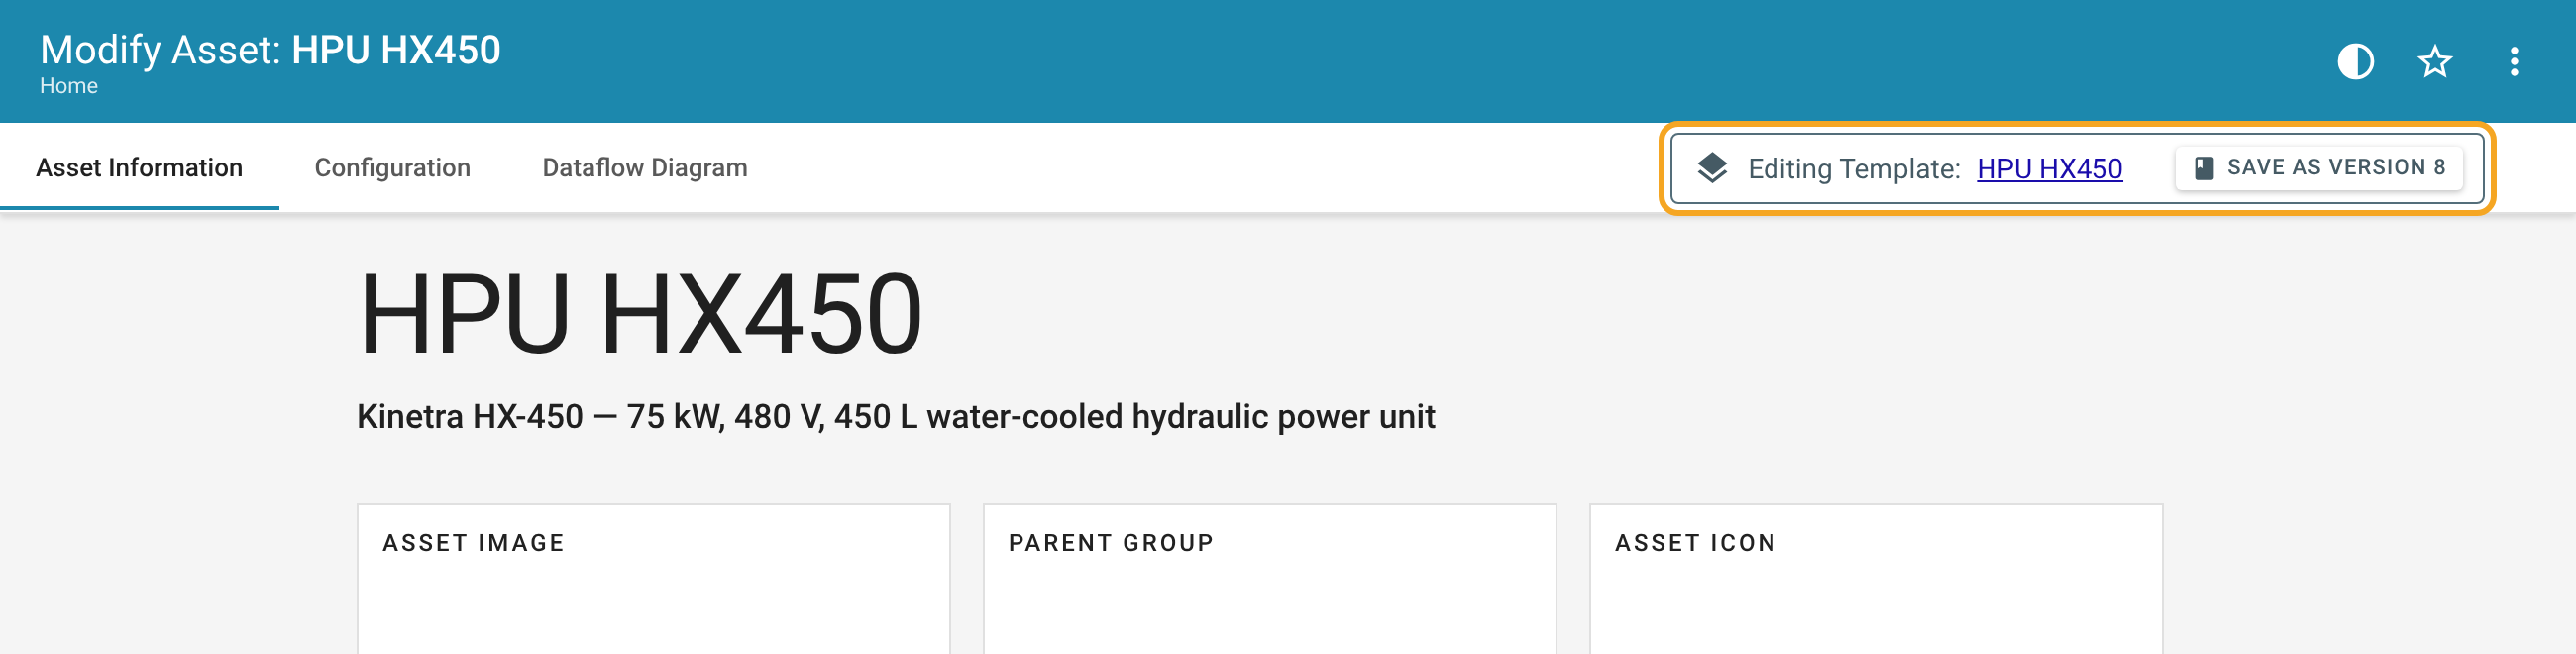
Changes to the template configuration do not affect linked assets until they are saved as a version and the assets are migrated.
Save a new version
When the changes are ready, select Save As Version n next to the Editing Template label. The new version becomes the Latest Saved Version. The Production Version stays the same, so new assets created from the template keep using the current Production Version until you change it.
To roll out the new version:
- Select the version on the template and choose Set As Production Version from the version menu.
- Migrate the assets on the previous version. See Migrating Assets to a New Version.
To change the template name or group, use Edit Template Details from the template's menu .
Viewing Templates and Versions 
The Asset Templates tab in Asset Management lists the templates in your groups, with the number of linked assets and the Production Version for each. A group can list and manage up to 200 Asset Templates, including child templates.
Select a template to see its Latest Saved Version and Production Version. Use the version list to switch between versions; each version shows how many assets are linked to it.
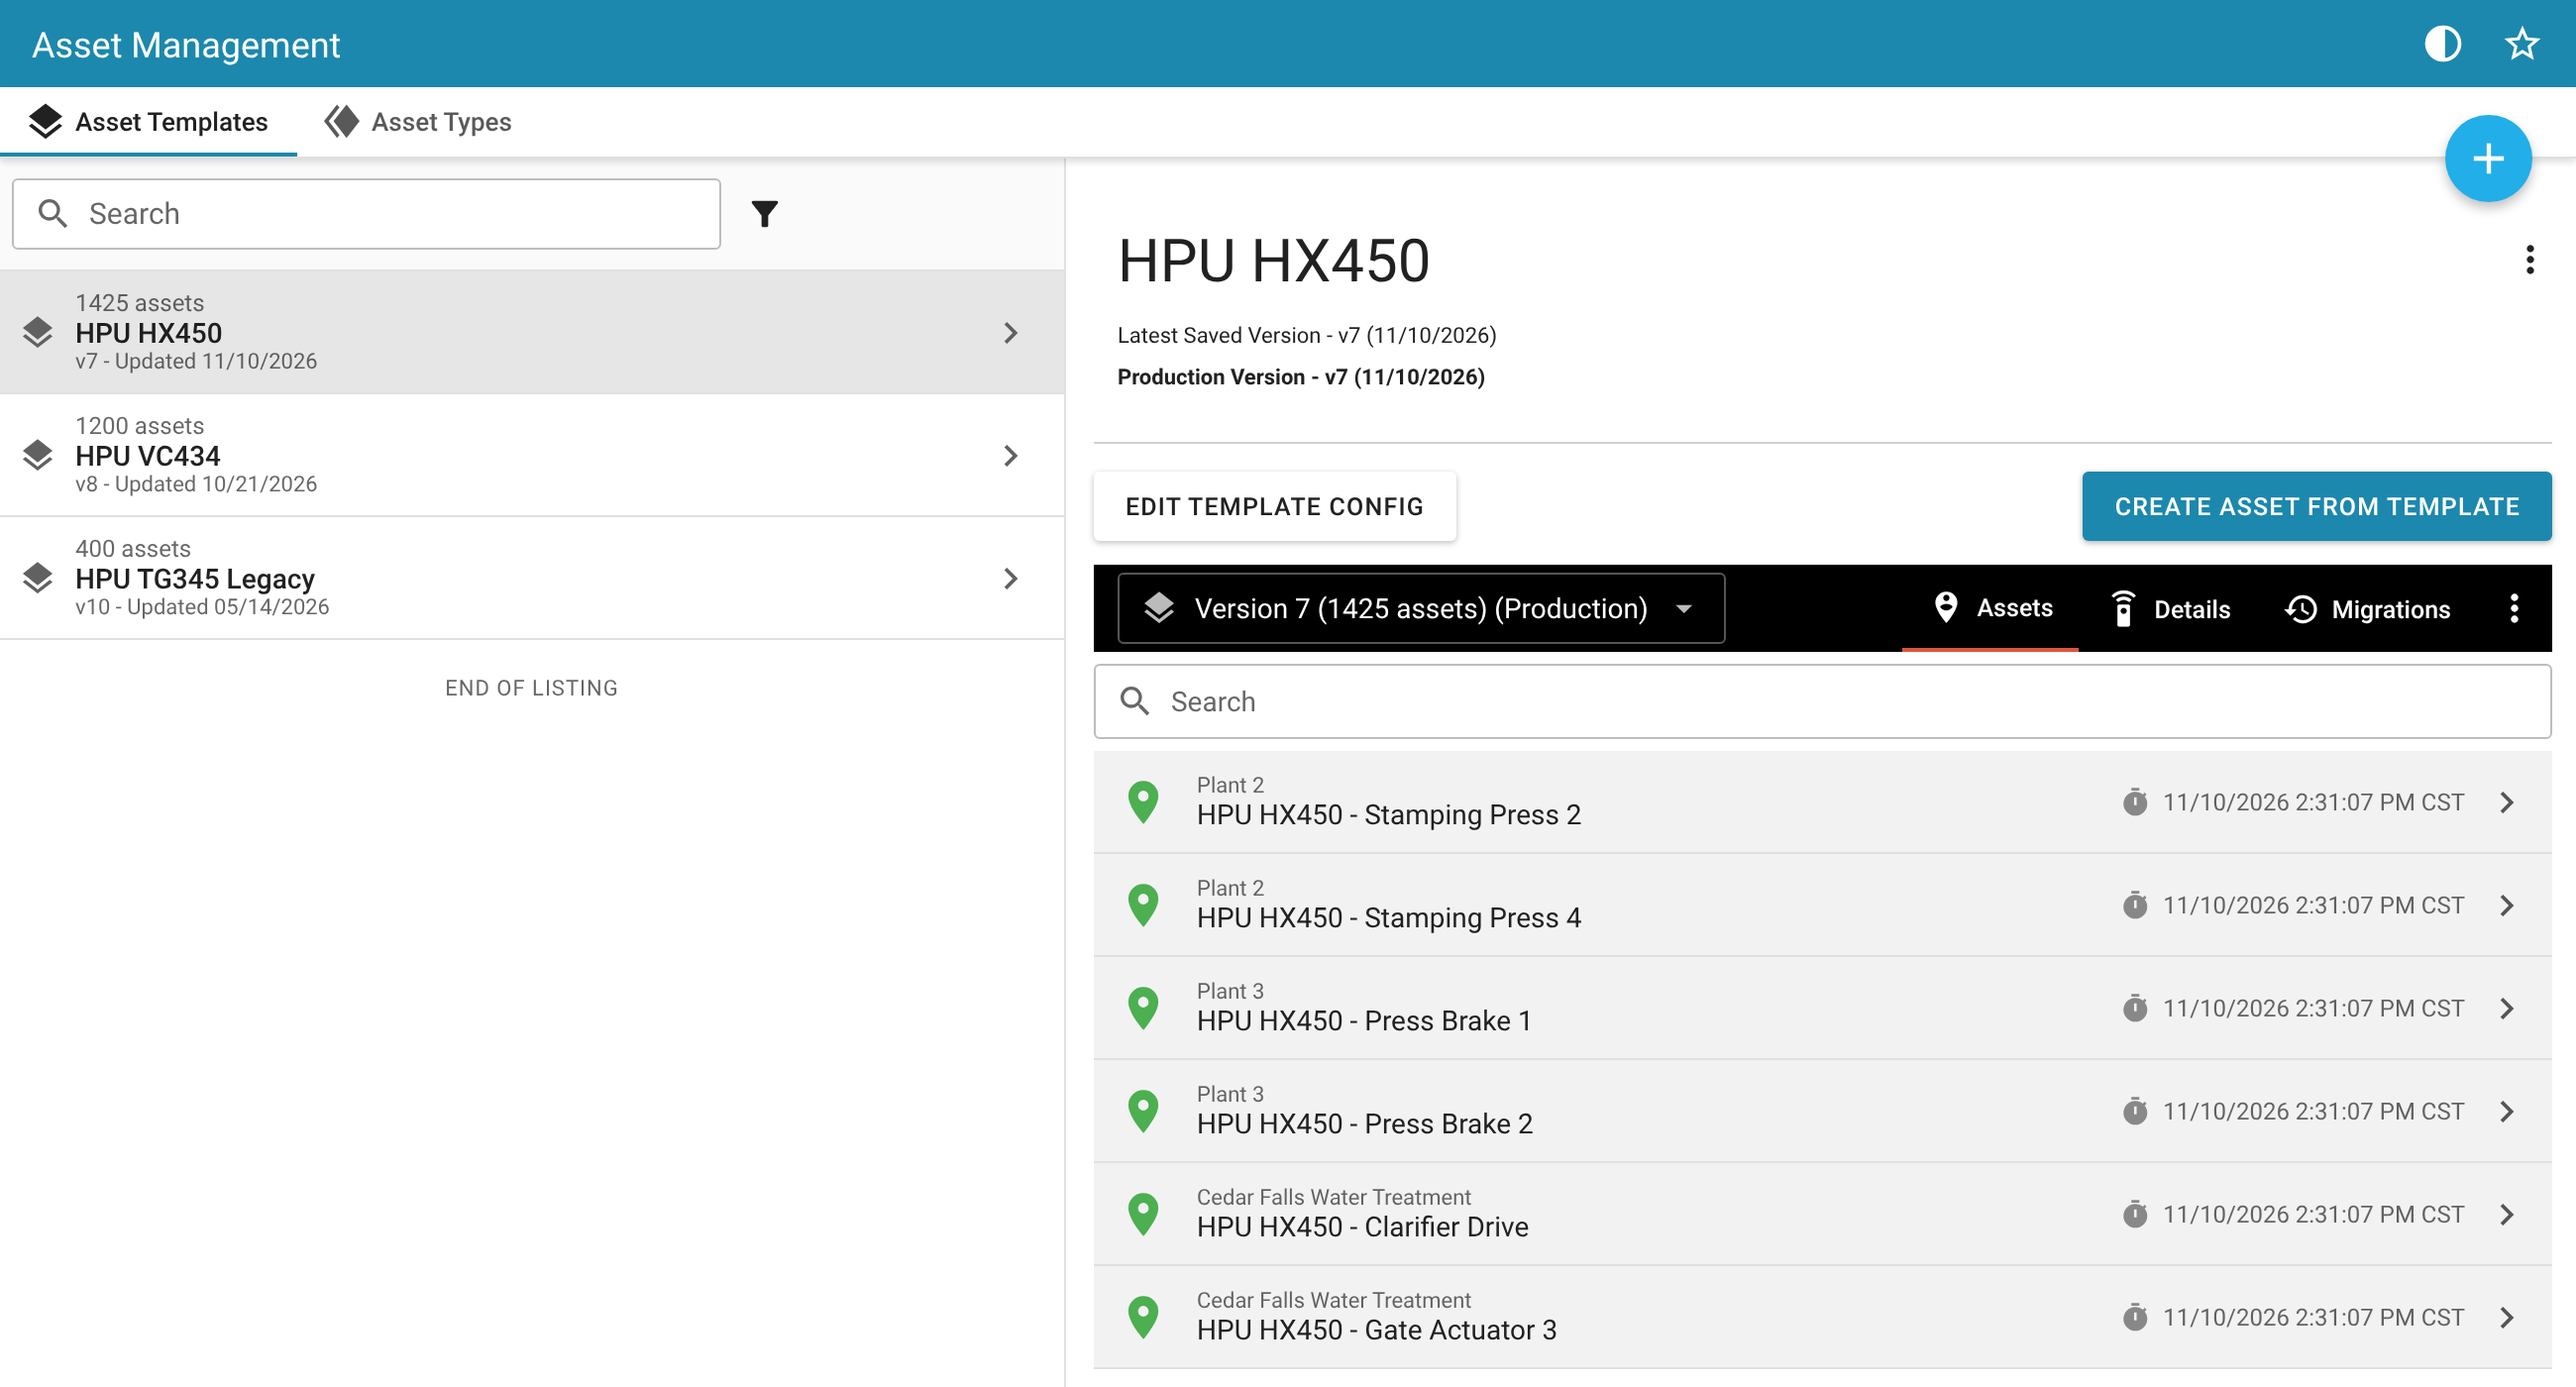
- Assets – the assets linked to the selected version
- Details – the signals in the selected version
- Migrations – the migration history for the template. See Migration history.
Migrating Assets to a New Version 
Linked assets stay on their template version until they are migrated. The usual flow after changing a template is:
- Save the new template version.
- Set it as the Production Version.
- Migrate the assets on the previous version to the new one.
Start a migration
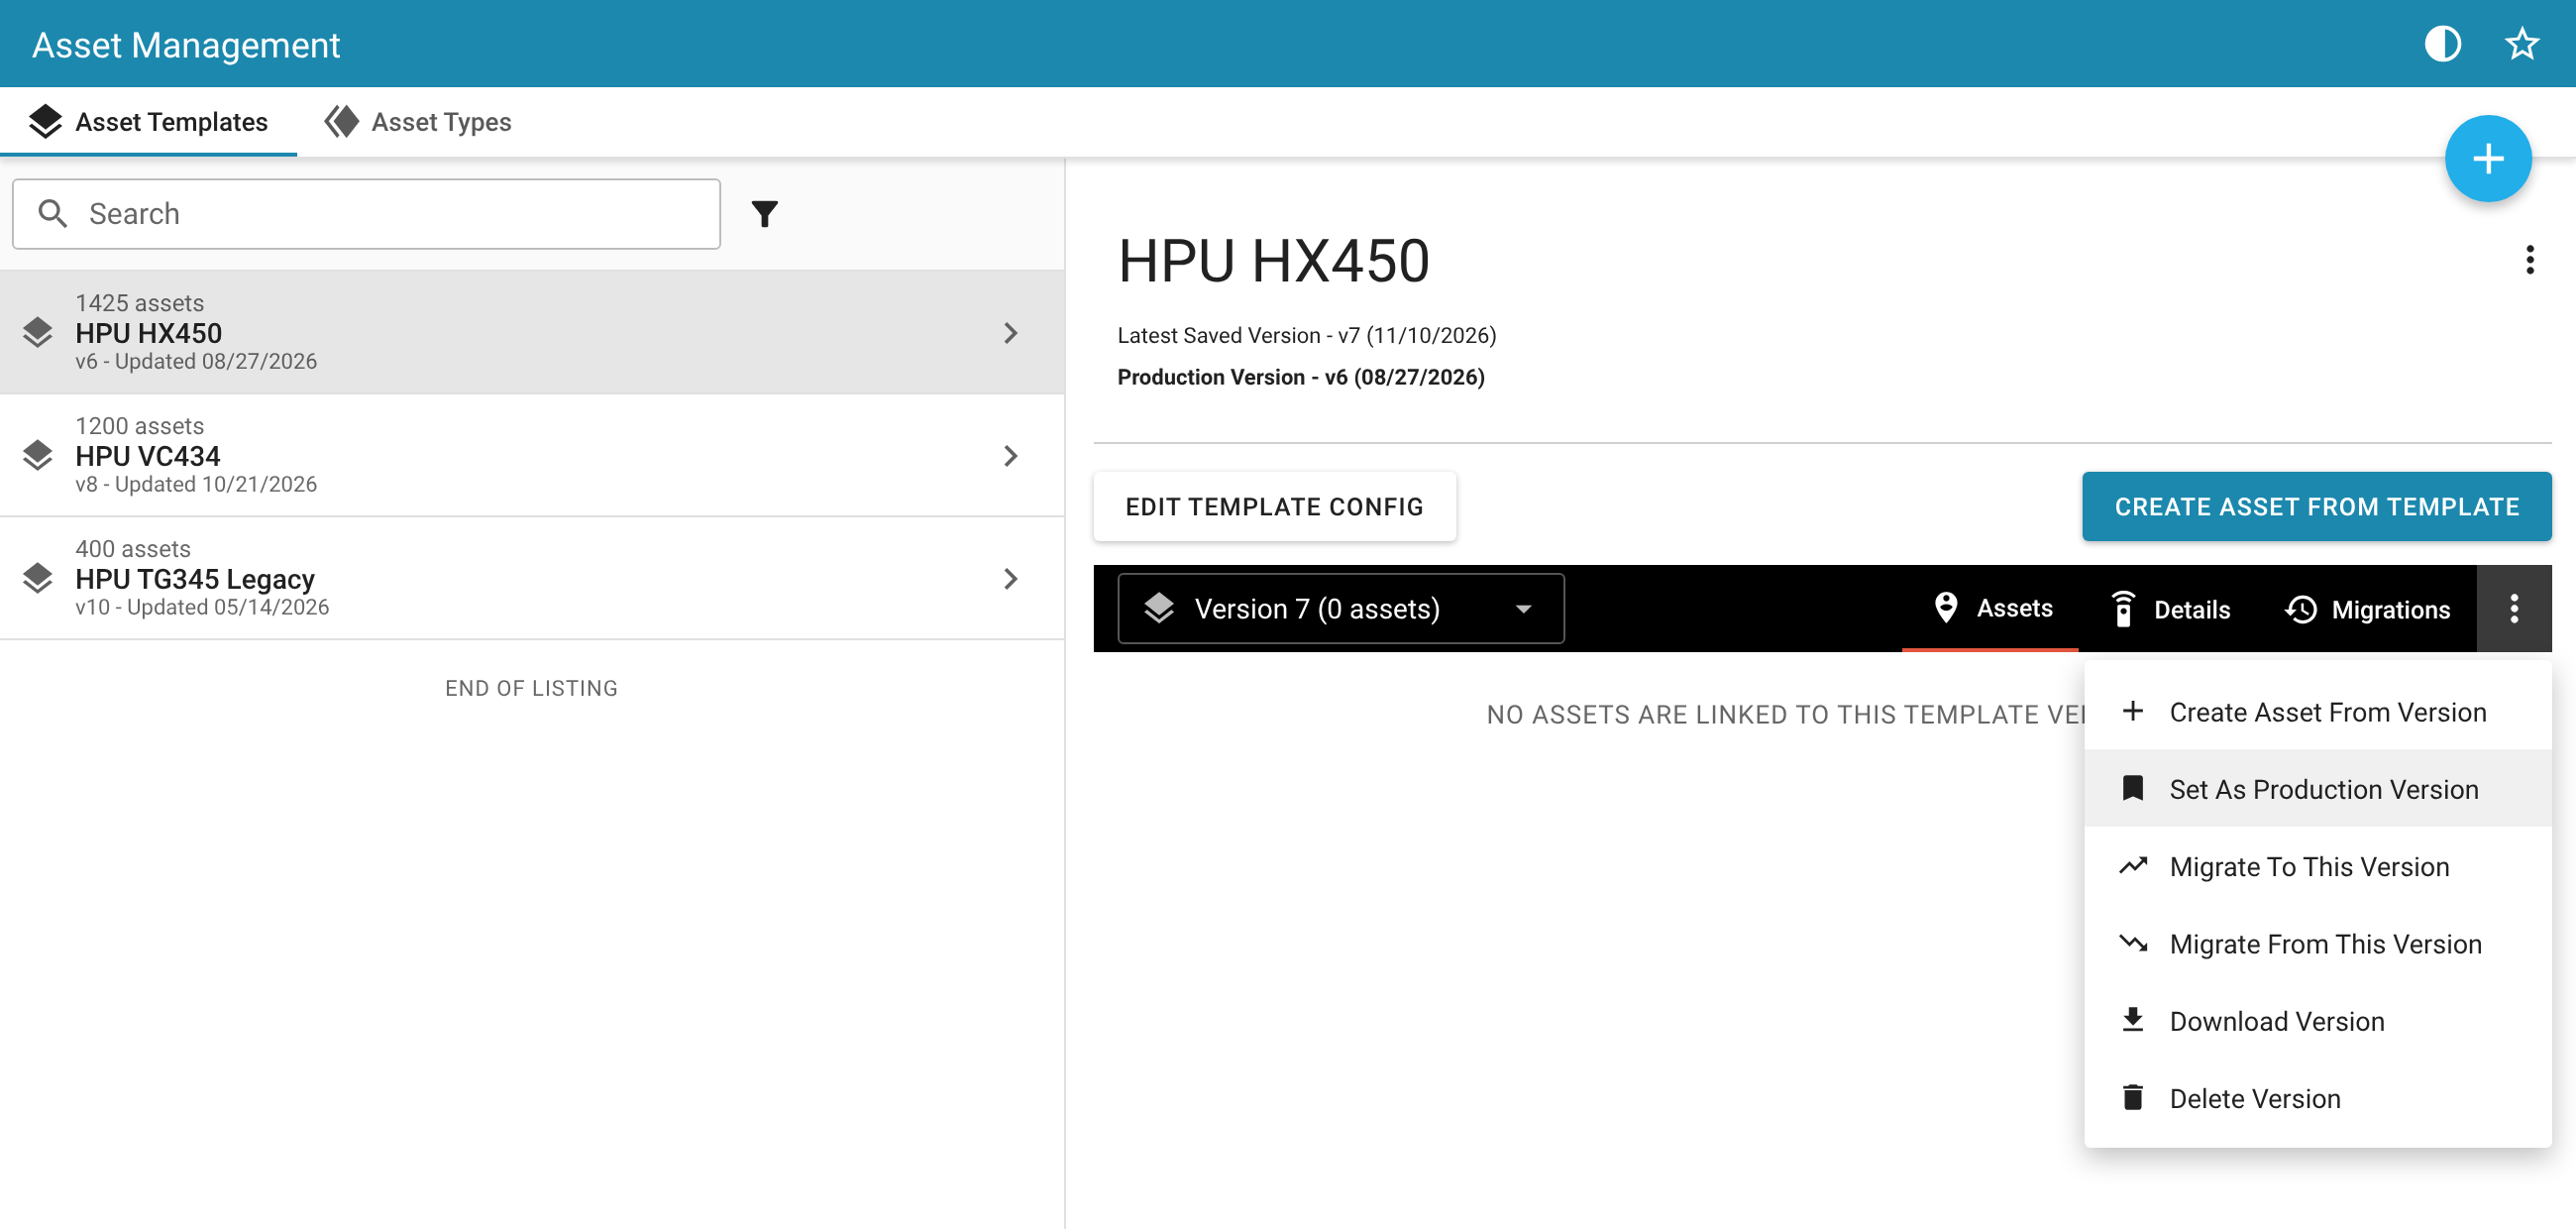
Select a version from the version list on the template, then open the version menu .
- Migrate To This Version – opens the migration with this version as the destination
- Migrate From This Version – opens the migration with this version as the source
- Set As Production Version – after the version is promoted, select Migrate Assets to move the assets on the former Production Version
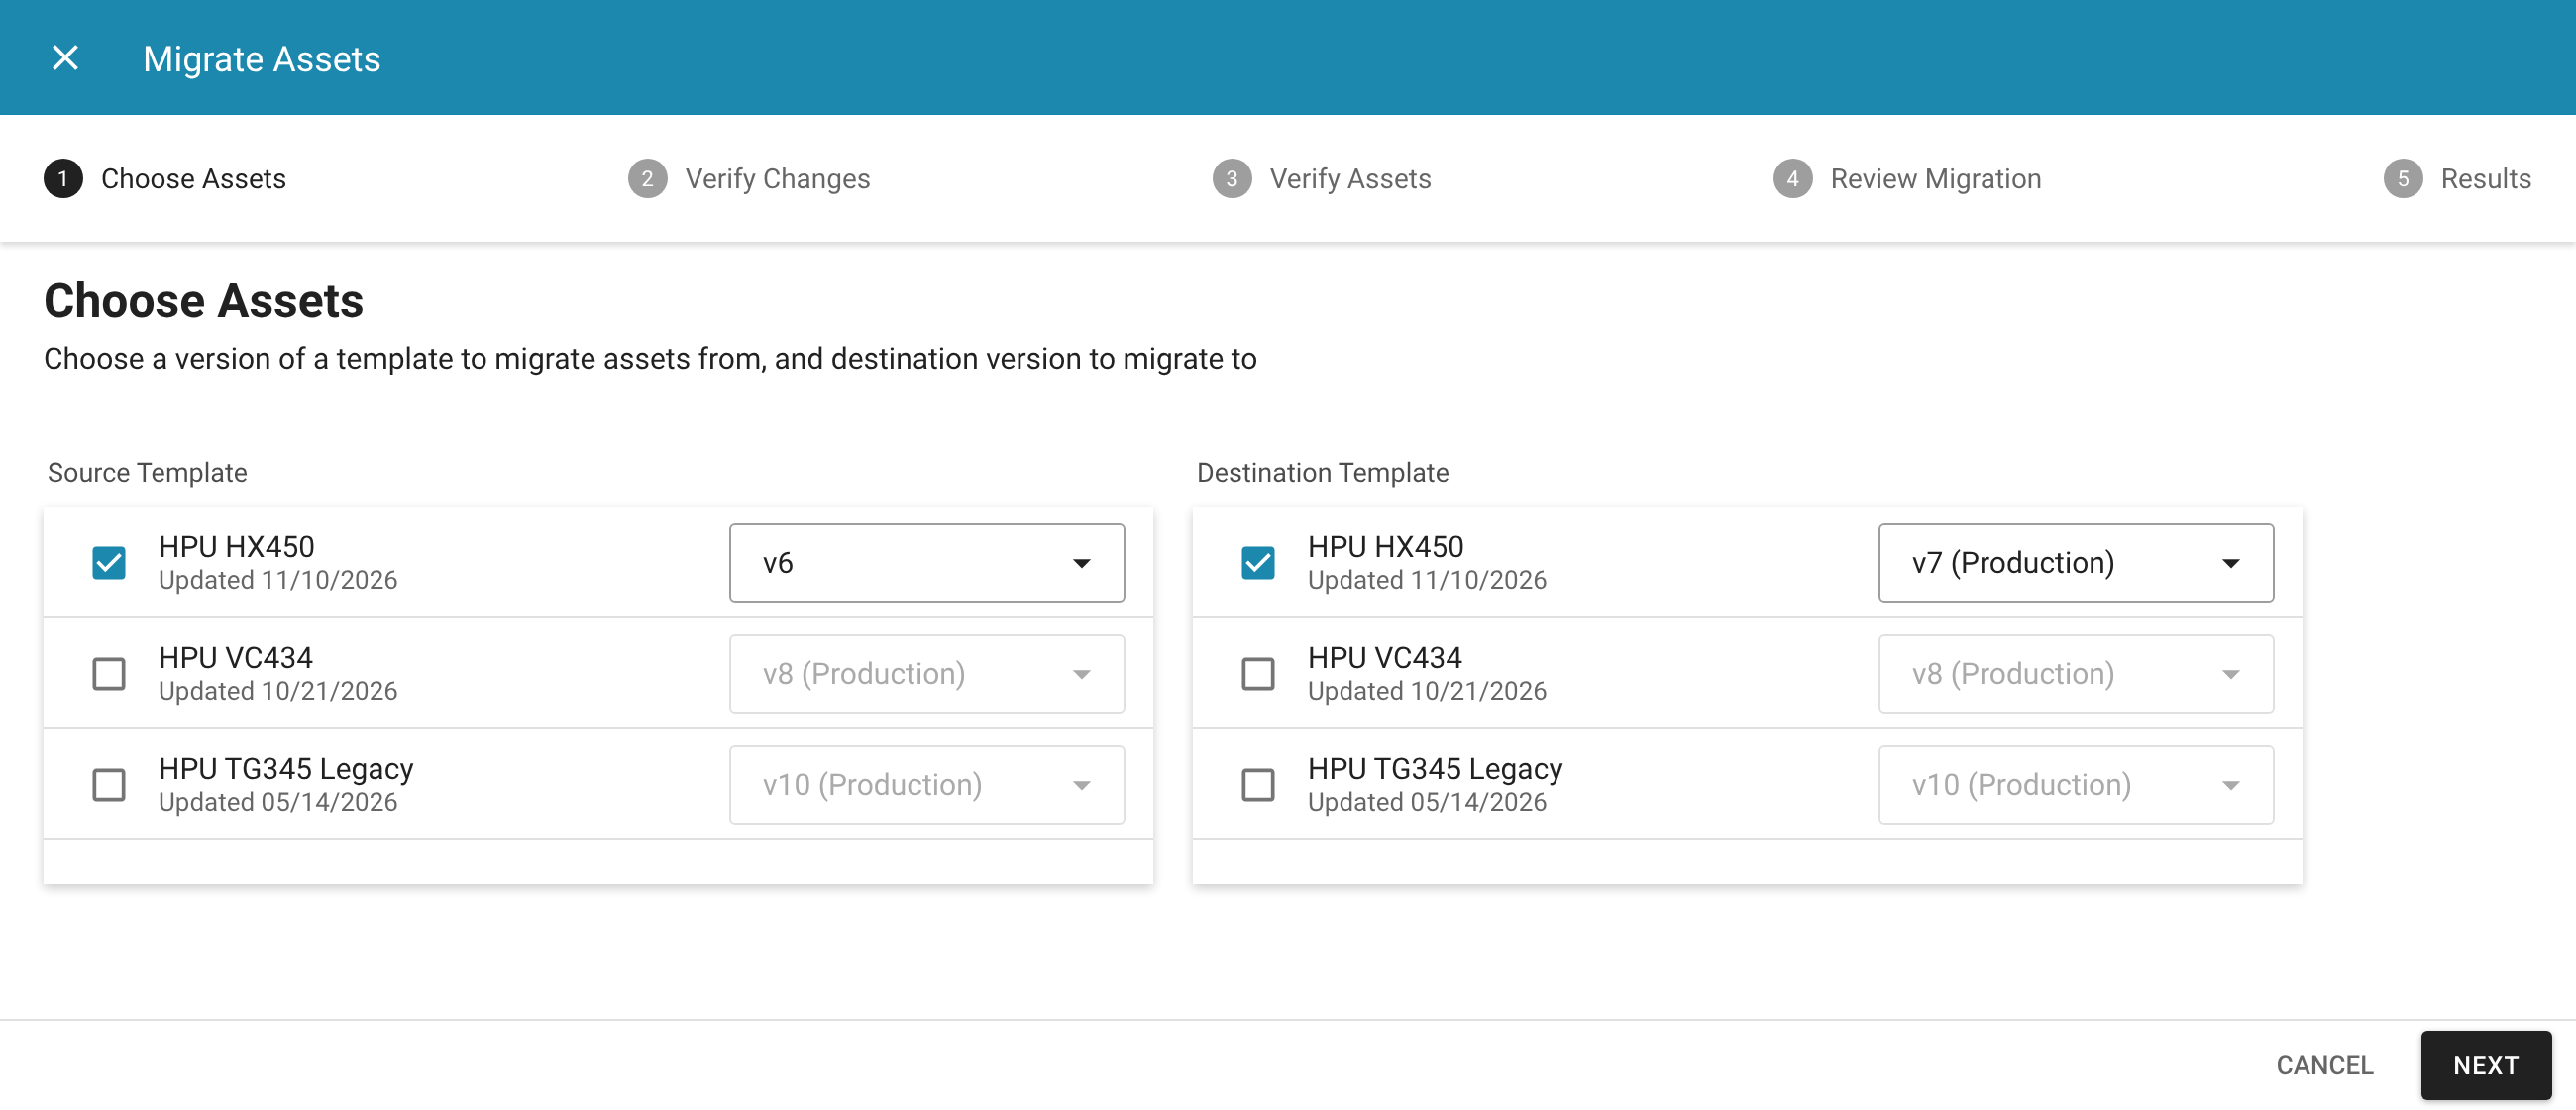
Migration steps
| Step | What you do |
|---|---|
| Choose Assets | Choose the source template and version, and the destination version. |
| Verify Changes | Review the differences between the two versions. Maintain existing asset dashboards (on by default) keeps dashboards that were added on individual assets. |
| Verify Assets | Select or deselect the assets to migrate. Only assets within your access can be selected. |
| Review Migration | Confirm the changes and the list of assets, then select Start Migration. |
| Results | Follow the progress of the migration. |
Overrides made on linked assets (see Modifications of Linked Assets) carry over to the new version.
Migrations run in the background
A migration runs as a background job. You can close the dialog once it starts; progress continues on the template's Migrations tab.
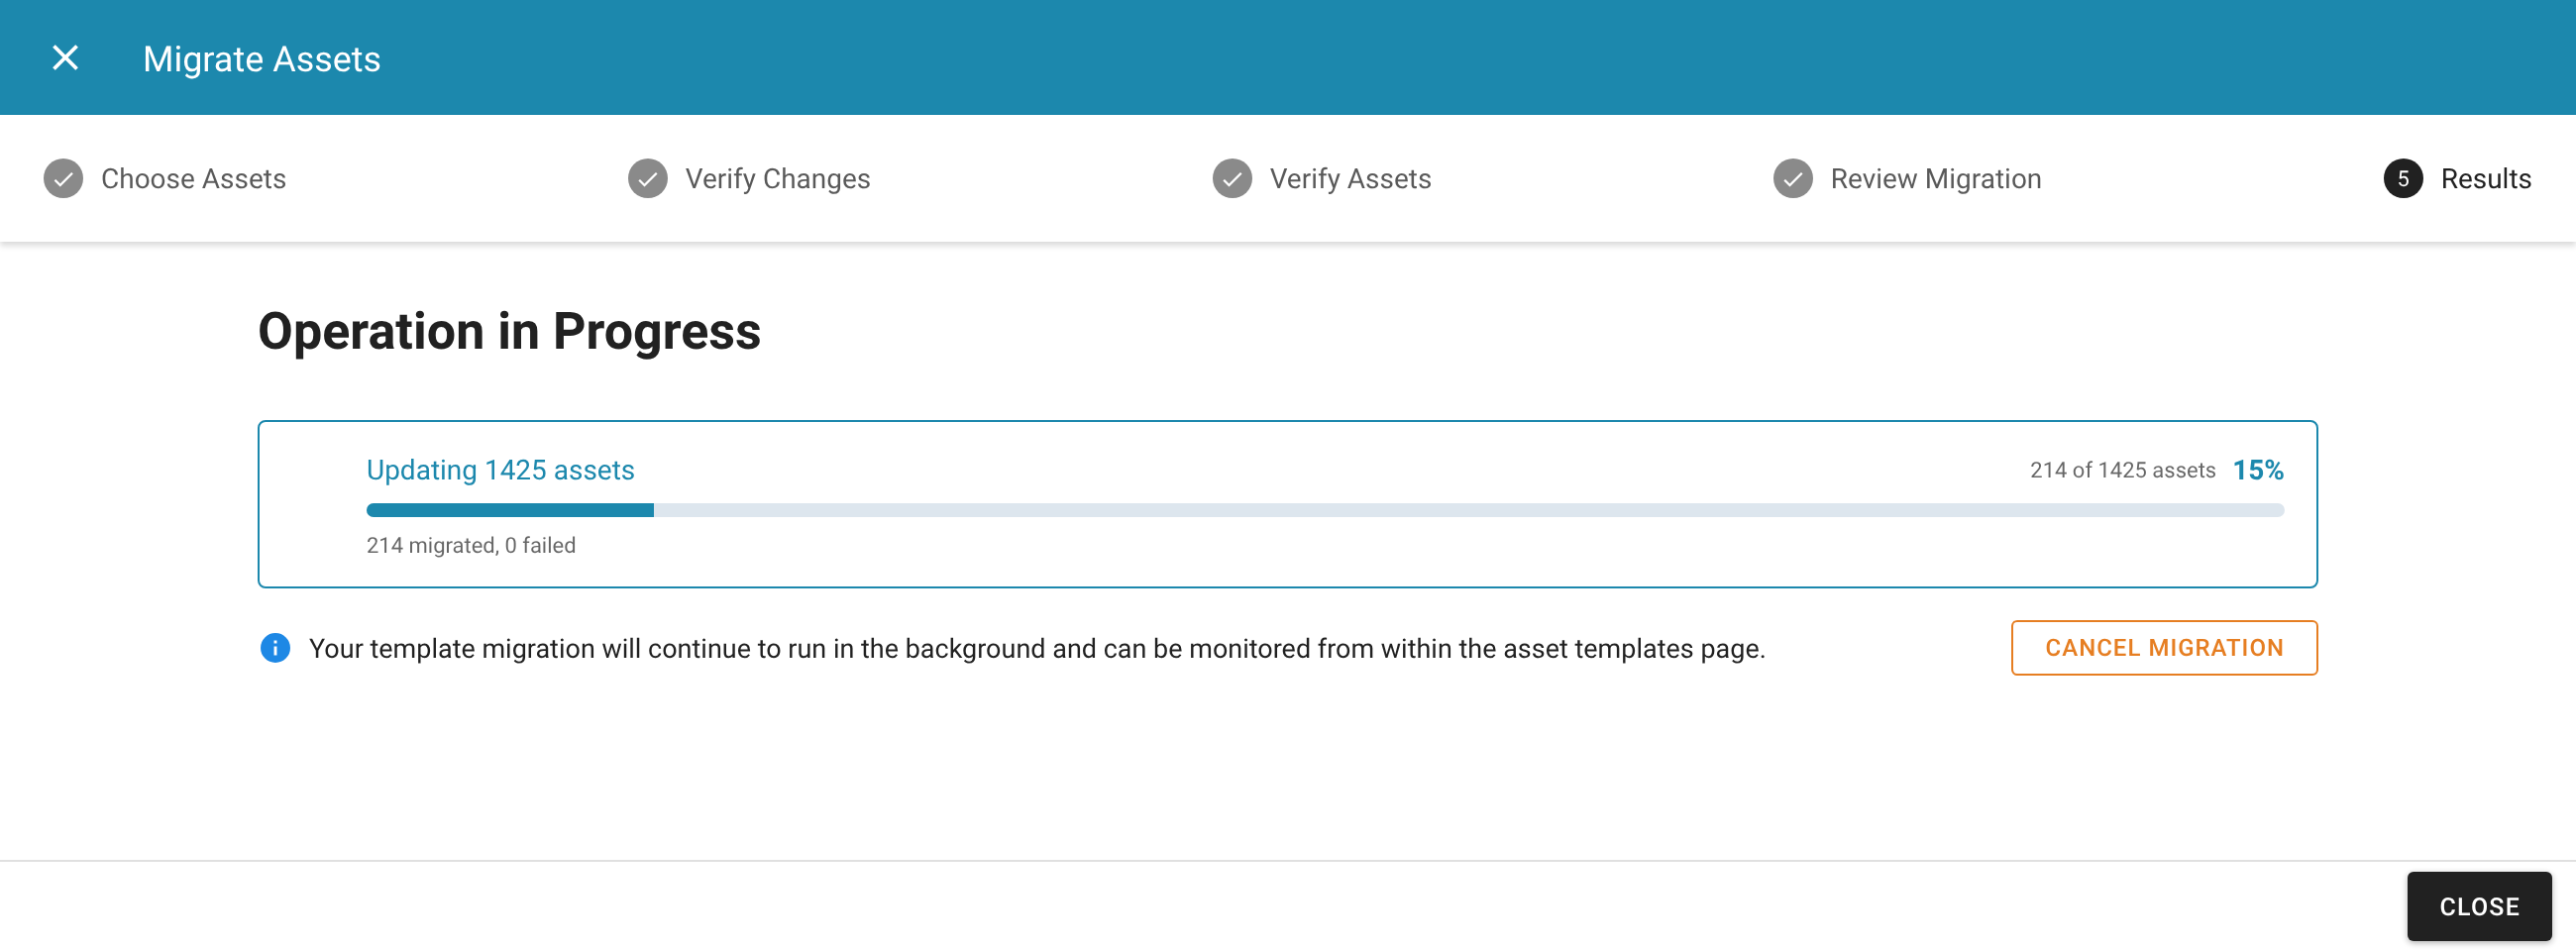
- One migration can run per template at a time. While it runs, the template shows Migrating in the template list and the migrate and production version options are disabled.
- Cancel Migration stops the job. Assets already processed stay migrated; the rest are left unchanged on the source version.
- Assets that fail to migrate are left in their original state.
Migration history
The Migrations tab lists every migration run for the template, newest first, with a progress bar for any migration in progress.
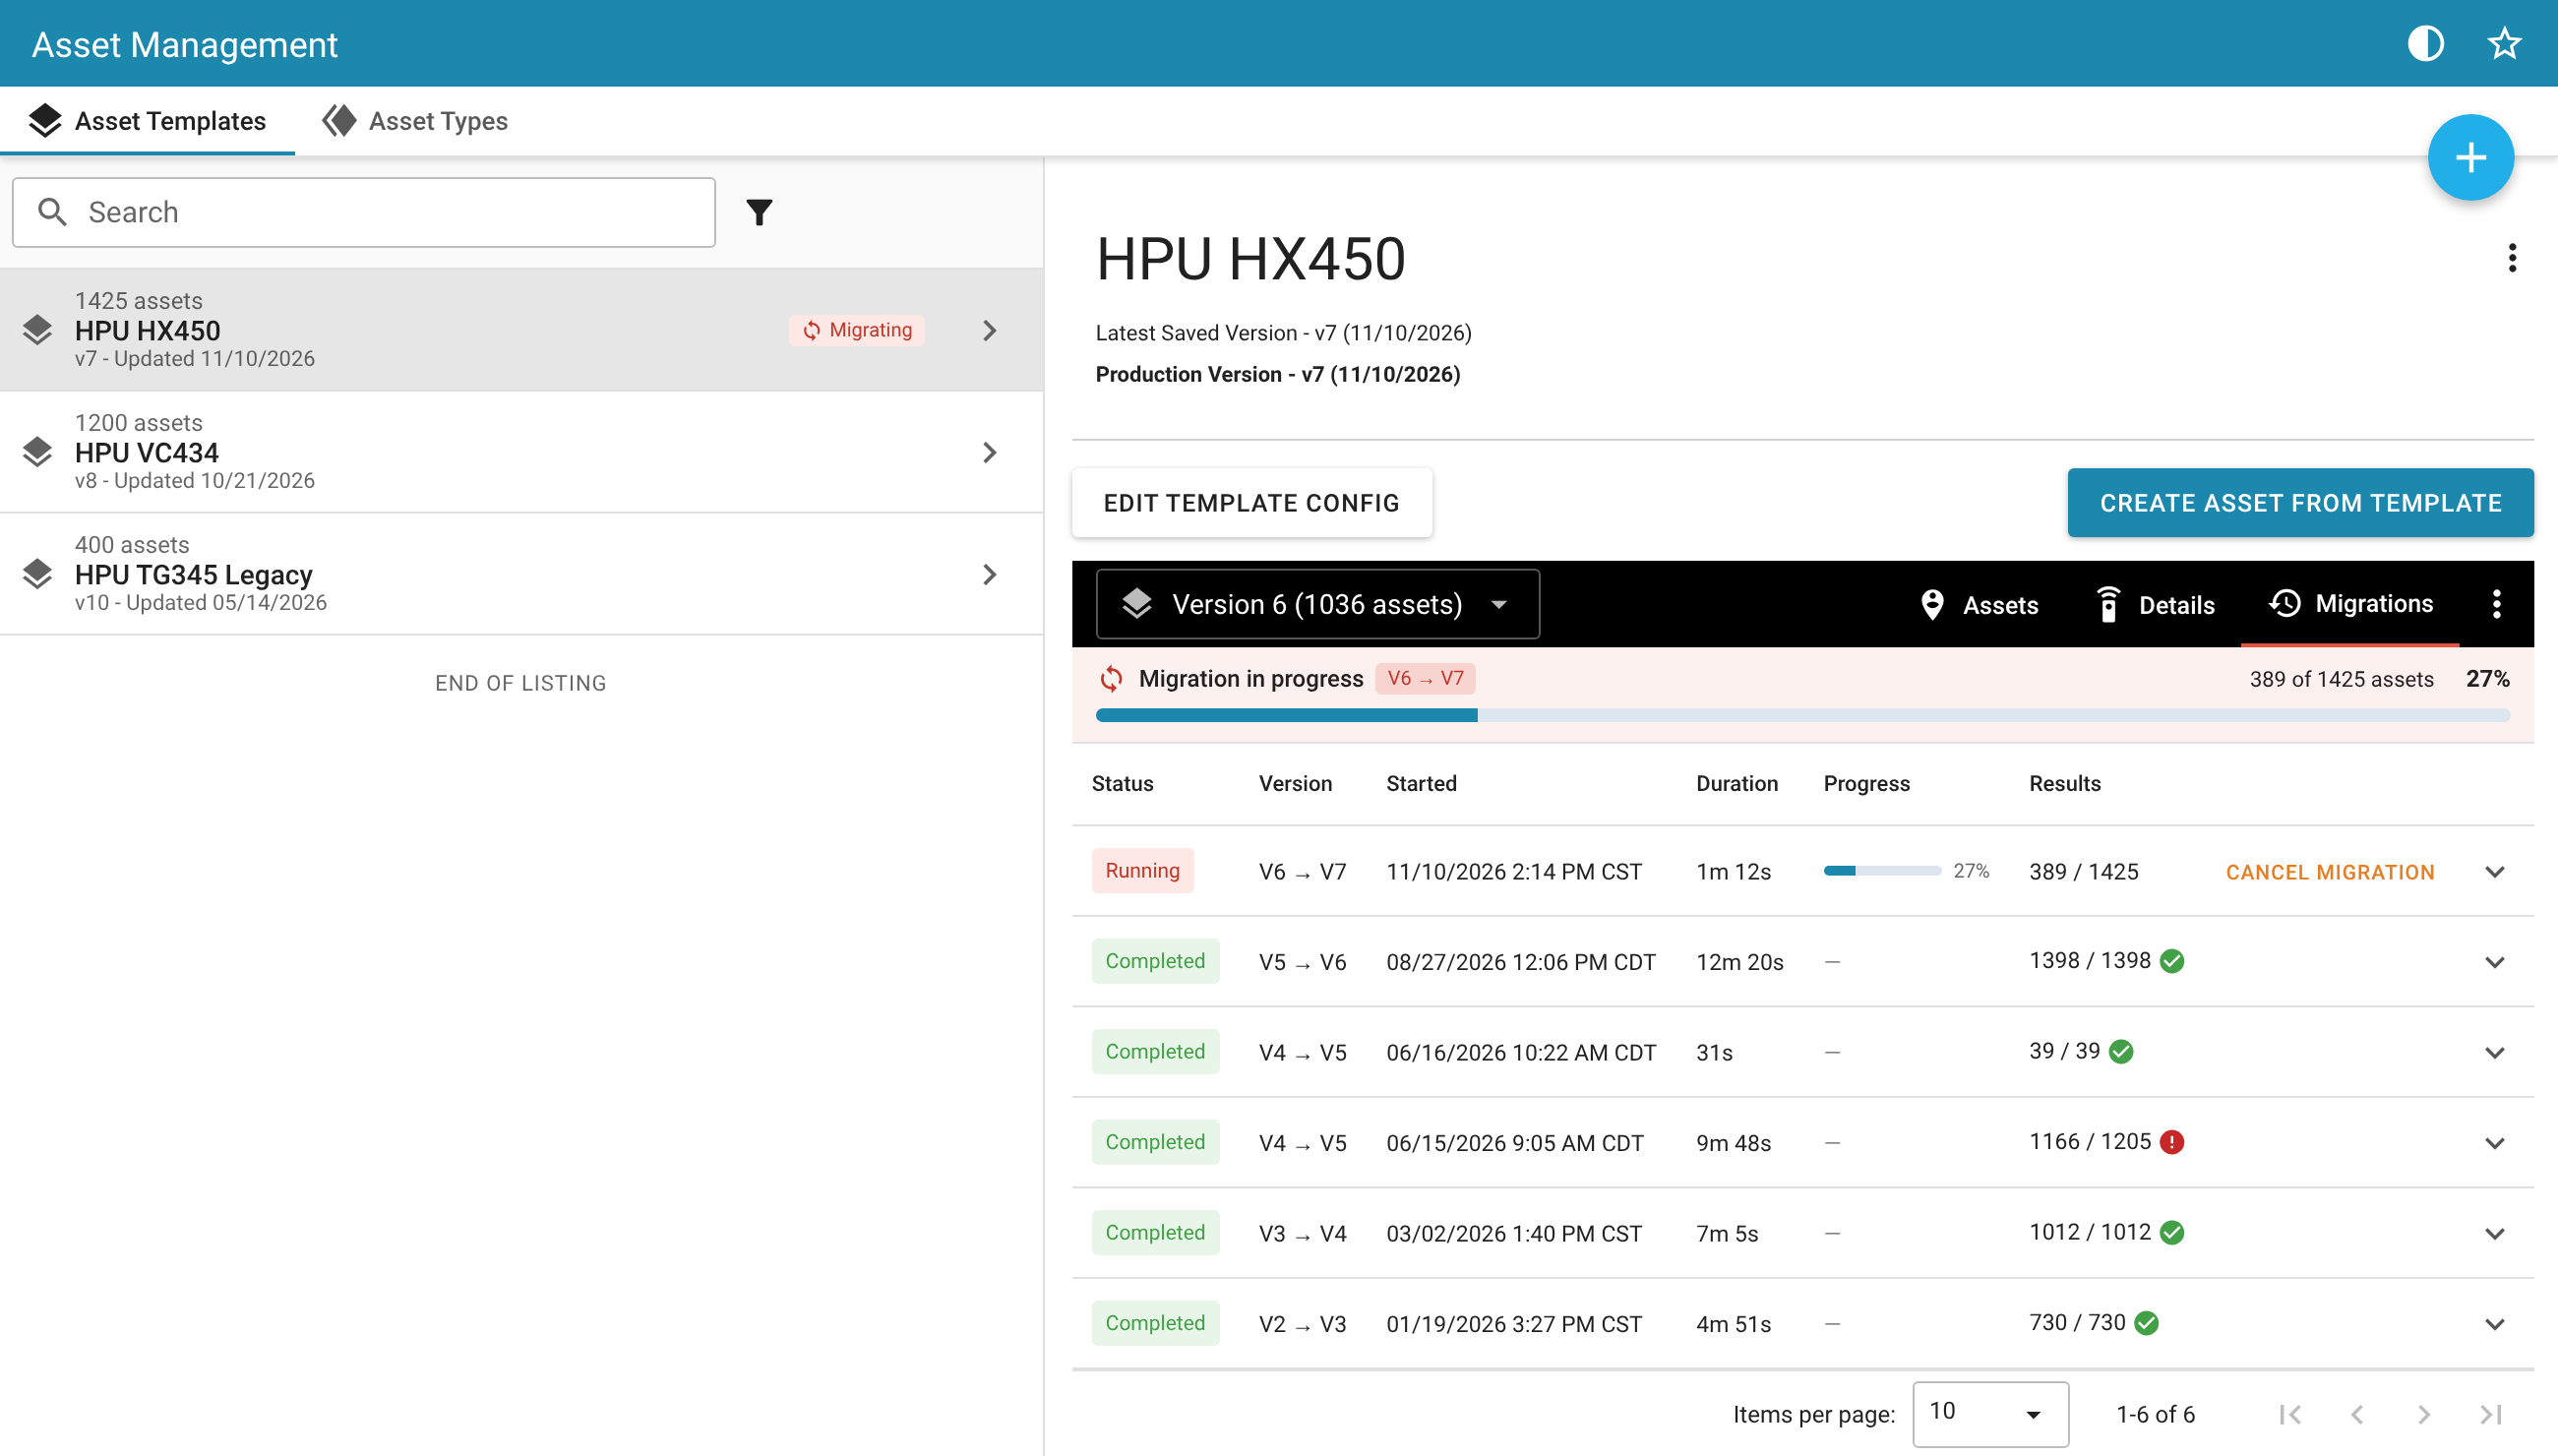
| Column | Description |
|---|---|
| Status | Queued, Running, Completed, Failed, or Cancelled |
| Version | Source and destination version, for example V6 → V7. A migration from another template includes that template's name. |
| Started | Date and time the migration started |
| Duration | How long the migration ran |
| Progress | Percent complete while the migration is running |
| Results | Assets migrated out of the total. all assets migrated, some assets failed, cancelled before all assets were reached. |
Expand a row to see each asset that did not migrate and the reason. After fixing the issue, run the migration again from the same source version to move the remaining assets.
Dashboards in templates 
The dashboards in the asset template version will be available and locked for all assets using that version of the template.
Assets created from a template with dashboards can also add/edit their own custom dashboards.
Metadata in templates 
Metadata fields and optional values (metadata is a key/value pair) can be set in your asset template. These will apply to all assets using that version of the template.
| Meta Field | Value | How it applies to the assets |
|---|---|---|
| Specified | Specified | The assets using this template version will have both metadata field and value locked |
| Specified | Not Specified | The assets using this template version will have the metadata field, but the value can be edited per asset |
Assets created from a template with metadata fields can also add their own custom metadata fields and values.
Subsystems in templates 
If the template version contains subsystems, the subsystems (name, tag color, icon, dashboard) will also be applied to all assets tied to that version of the template.
Assets created from a template with Subsystems can not add their own custom subsystems.
Asset Template Parameter Overrides
Early Access
Asset Template Parameter Overrides is an early access feature and may be subject to change. This Early Access functionality is by request, please contact your Exosite contact for more information.
Asset Template Parameter Overrides allow Asset Template managers to expose specific pipeline parameters — on signals, transforms, and rules — that users without the Asset Manager permission can view and edit. This enables controlled customization of linked assets without granting full Asset Manager access.

Required Permission
To view and edit Parameter Overrides on an asset without the Asset Manager permission, a user's role must include the Asset Parameters permission. Without this permission, the Parameters tab will not be visible.
The Asset Parameters permission is typically assigned to users instead of the Asset Manager permission. Asset Managers have full editing access to an asset's configuration, while users with only Asset Parameters can edit exclusively the properties the template manager has exposed — keeping the rest of the asset locked to the template.
Configuring Override Permissions
Override Permissions can be set at two levels:
- Template level — applies as the default for all versions of the template
- Version level — overrides the template-level setting for a specific version

At either level, the Asset Template manager can choose to allow:
- All properties on signals, transforms, and rules to be overridden
- Specific properties, selected individually per signal, transform, or rule

The override configuration for each version can be viewed and adjusted from the template version management view.

Version-level overrides exist because each new template version may introduce different signals, transforms, or rules — making the set of available override properties version-specific. The template-level default override configuration can be copied to a version as a starting point when setting up version-level overrides.
Editing Parameters
Users with the Asset Parameters permission will see a Parameters tab on linked assets. This tab displays only the properties that the Asset Template manager has exposed as overrides. Changes made here follow the same override behavior as other linked asset modifications — they persist across template version migrations.
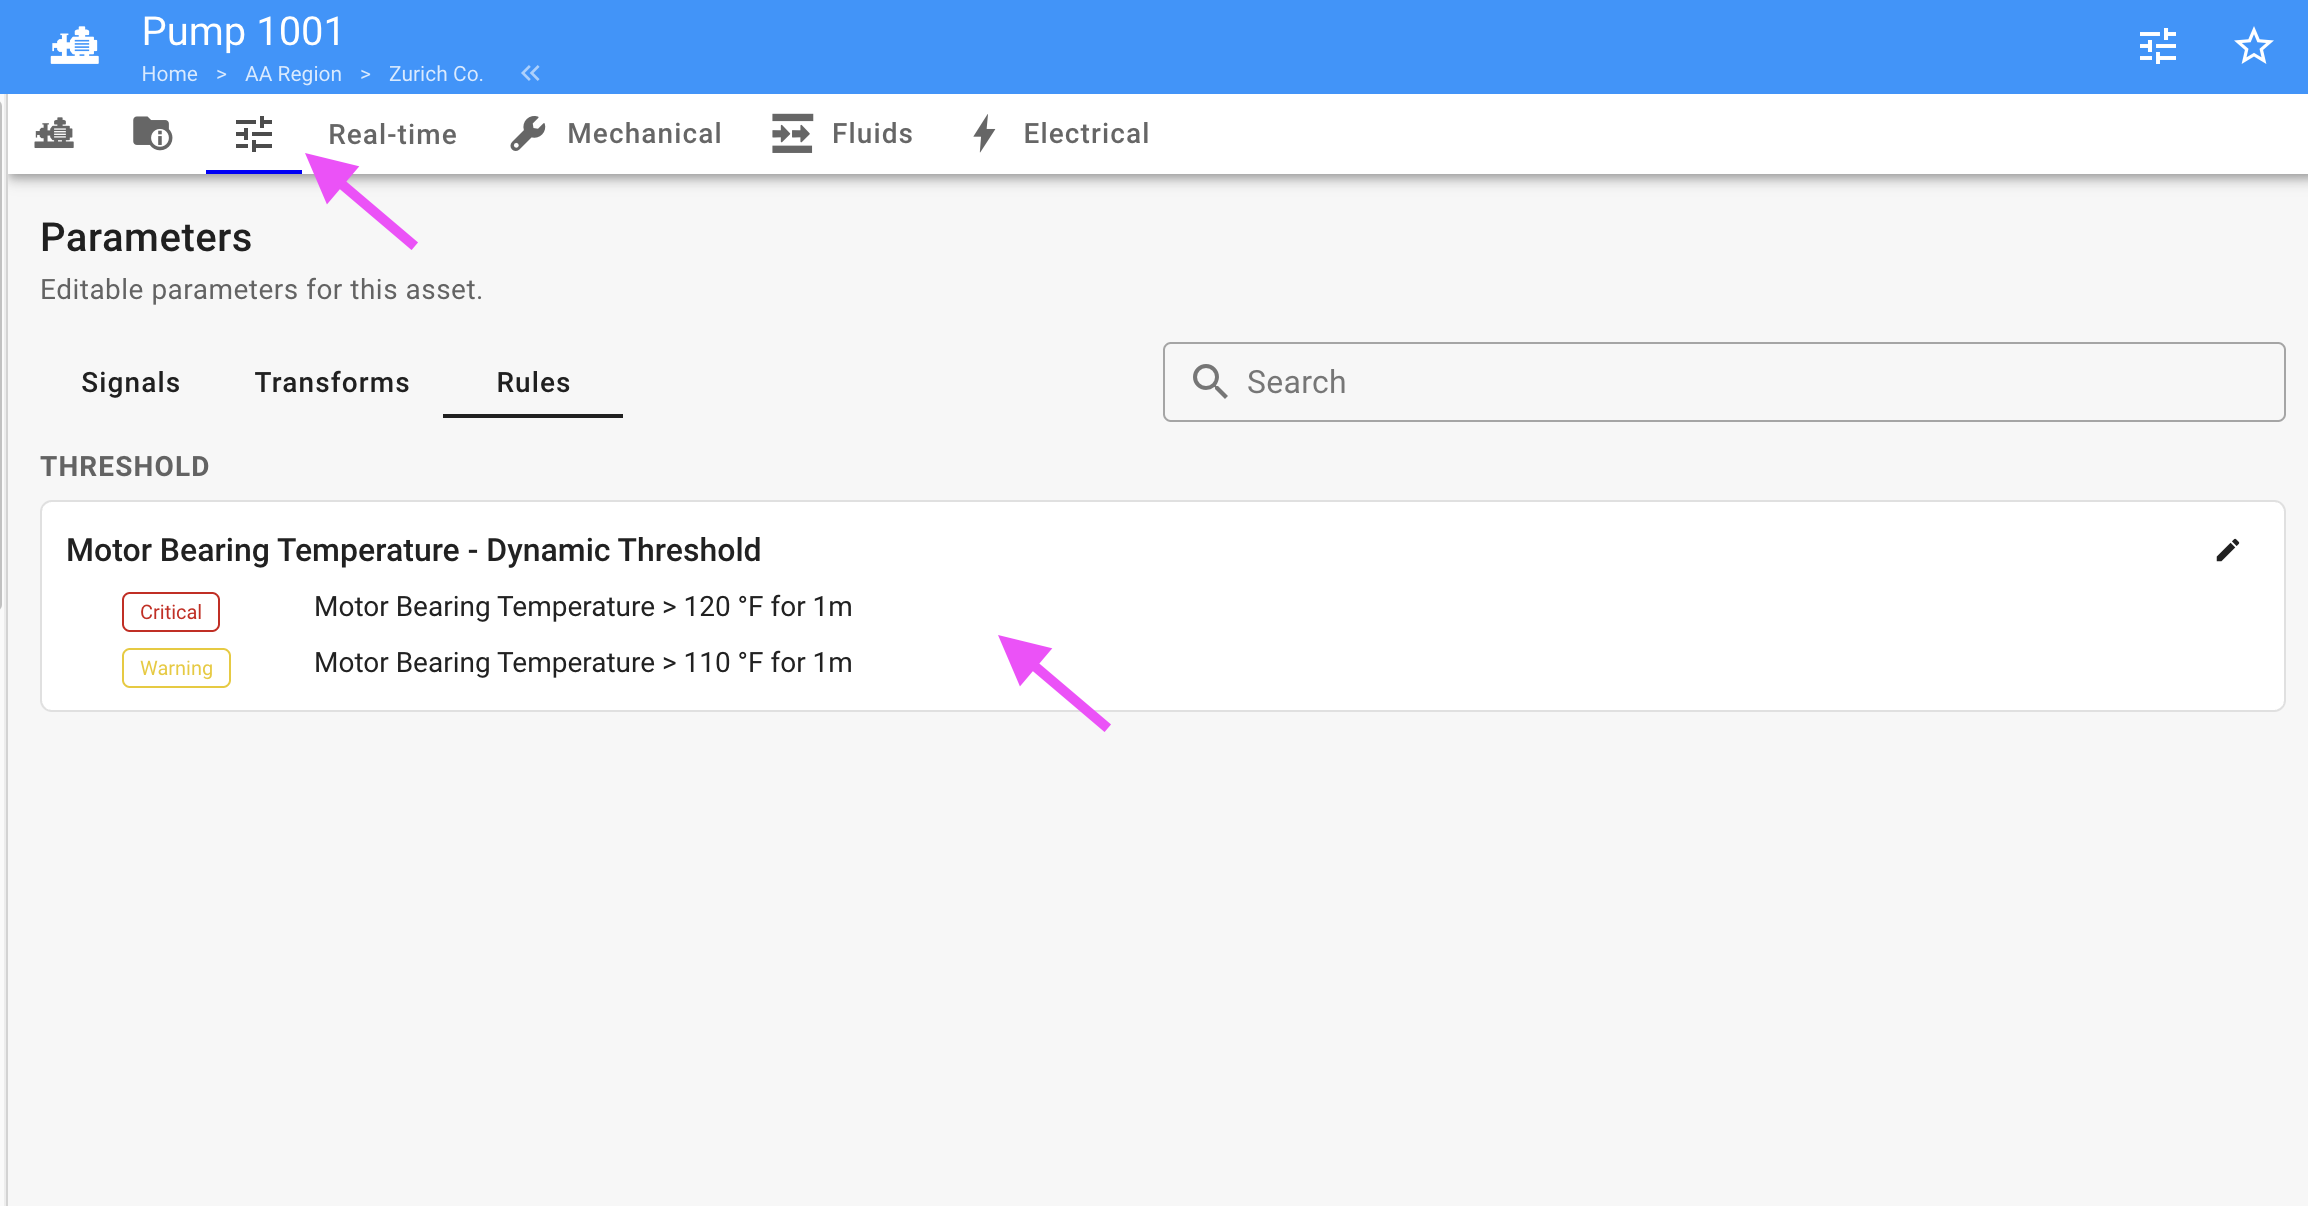
Parameter overrides are a lightweight alternative to Stop Template Tracking when only a small number of values need to differ per asset, such as threshold values or transform constants.
When configured specific properties for a transform or rule are available, the available options are scoped to the parameters defined in that transform or rule.
