Eurotech - Exosite Quick Start Guide
A walkthrough to connect your Eurotech gateway to the Exosite remote monitoring software platform.
Introduction
By following this quick start guide, you will be able to connect your Eurotech gateway to the Exosite remote monitoring software platform and visualize diagnostic data published by the gateway. Three simple steps allow a new customer to complete the hardware and software configuration and have data flowing to a dashboard within ExoSense:
- Setup ExoSense Application Deployment and IoT Connector
- Configure the Eurotech Gateway
- Create an asset and visualize data on a dashboard
Setup ExoSense Application Deployment / IoT Connector
There are two paths to getting ExoSense set up and prepared for data from your Eurotech gateway:
- New ExoSense Application Deployment
- Existing ExoSense - add Eurotech IoT Connector
You will only need to follow one set of instructions depending on whether you are starting with a new ExoSense deployment or adding to an existing ExoSense application. See the following sections for step-by-step instructions.
1.1 New ExoSense Application Deployment
This section assumes you do not have an Exosite Business Account or ExoSense application. These steps are perfect for someone that is new to Exosite and is looking to get started fresh.
- The first step is to navigate to www.exosite.io/start, where you will be presented with options to deploy ExoSense
- Next, click the "CHANGE" button
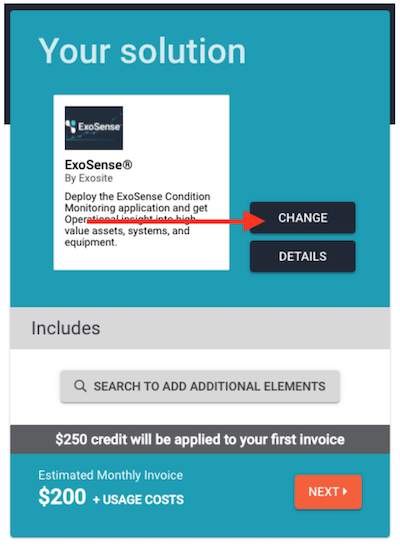
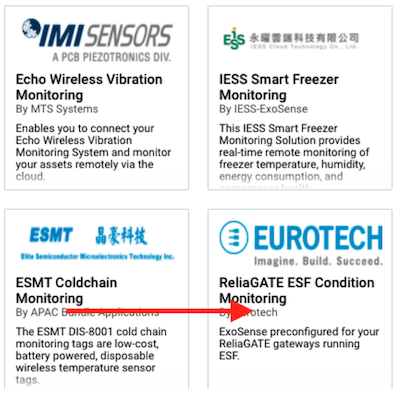
- Select the Eurotech solution
- Click the "NEXT" button
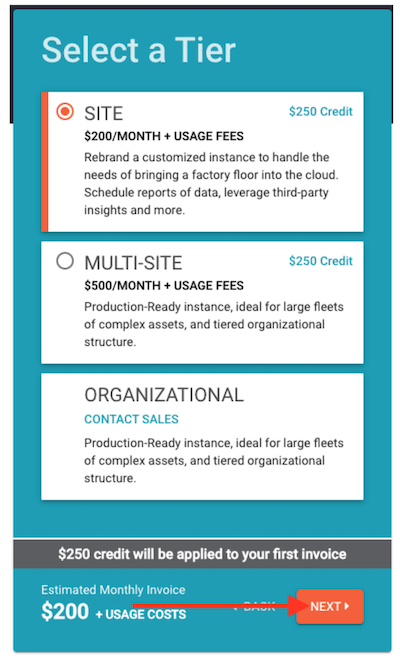
- Select the desired ExoSense Tier. In many cases, the Site Tier will be suffucient to get started. Select "SITE"
- Click "NEXT" again
- On the next screen, enter the required contact information and click "NEXT"
- On the next screen, enter your Billing Info and click "NEXT" again
- The next screen will provide details on your first invoice, including any credit being applied. Check the "I accept" checkbox and click the "START" button
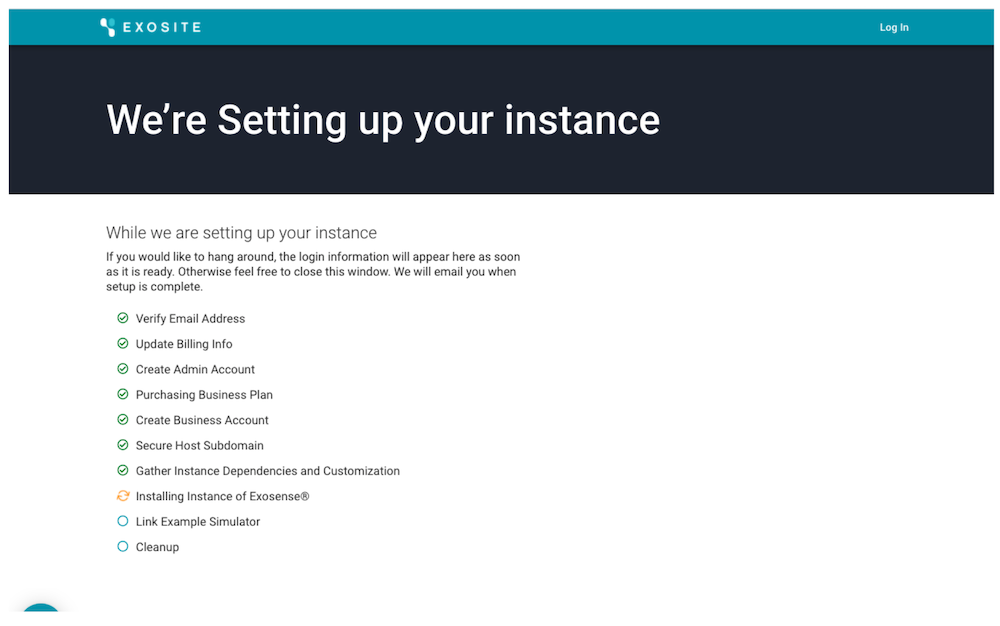
- You should now see the following screen as things are configured:
- Once the deployment is complete, you will have the following confirmation that provides links to the newly deployed ExoSense application and the admin console for your Exosite Business Account
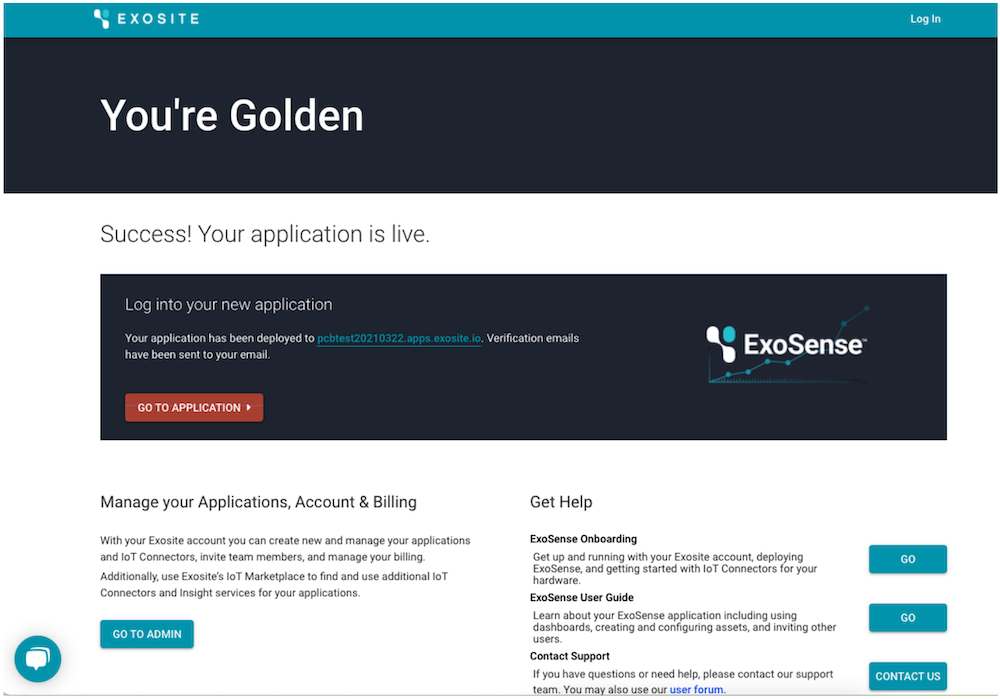
- To access ExoSense, click the "GO TO APPLICATION" button and you should navigate to the following screen:
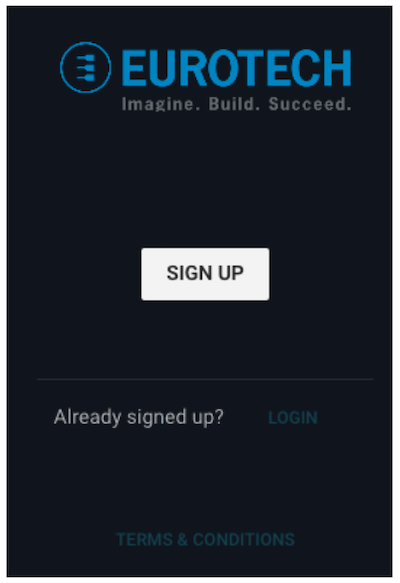
- Since this is your first time here, you will need to click the "SIGN UP" button and you will be presented with the following screen where you will either choose to use Google autho or enter an email address and password. You will need to enter the same credentials you used during the registration process (Step #7 above)
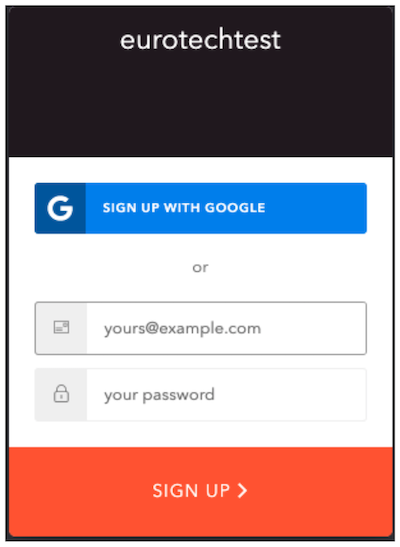
- After entering your credentials, you will accept terms for the application, and then you have access to ExoSense
At this point, you have deployed ExoSense and you are ready to configure your Eurotech gateway to send data to ExoSense. In preparation for those steps, you will need the Product URL for your IoT Connector.
1.1.1 Getting your Product URL
You will need the Product URL to enter into the ESF configuration page for your gateway to connect to the correct IoT Connector in Murano.
- Go back to the success page and click on the "GO TO ADMIN" button

- This will bring you to your Exosite Business Account, where you will want to click on the "3 dot" menu for the "ExoSense Standard Connector Template" and click "Manage IoT Connector"
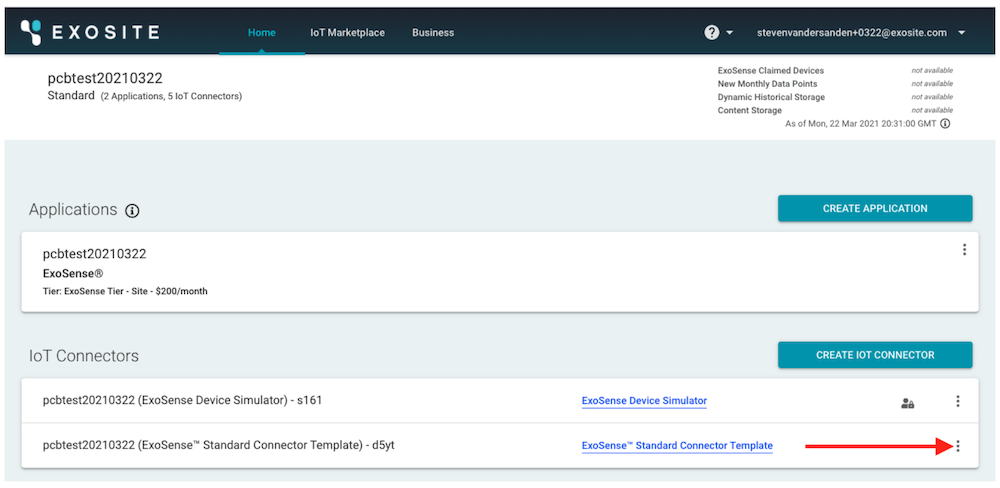
- You can copy the Product URL to your computer's clipboard by selecting the "Link" icon in the upper-left of the screen
You can now go to Section 2 to configure your Eurotech gateway to report data.
1.2 Existing ExoSense - Add Eurotech IoT Connector
This section assumes you already have an ExoSense application deployed and you just need to add the Eurotech IoT Connector in order to gather data from your Eurotech gateway. You will need your Exosite Business Account credentials to execute these steps.
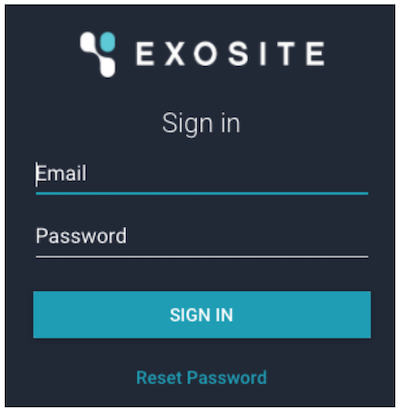
- Login to your Exosite Business Account by navigating to www.exosite.io and entering your credentials
- From your list of Applications, select the "3 dot" menu for the ExoSense application that you would like to add the Eurotech IoT Connector to and select "Manage Application"

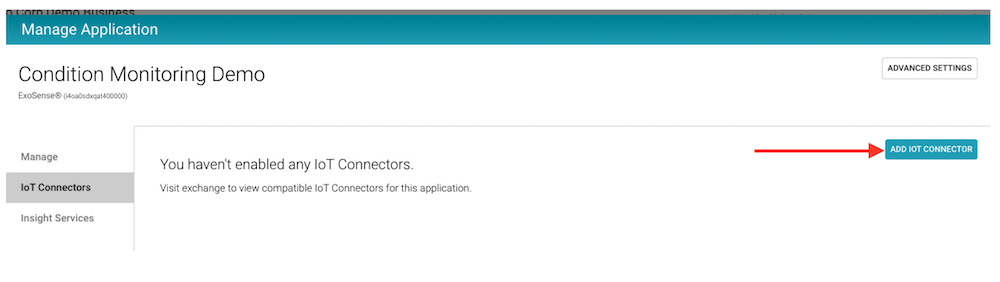
- Select "IoT Connectors" from the left-hand options and click the "ADD IOT CONNECTOR" button. This will open the Exchange Marketplace
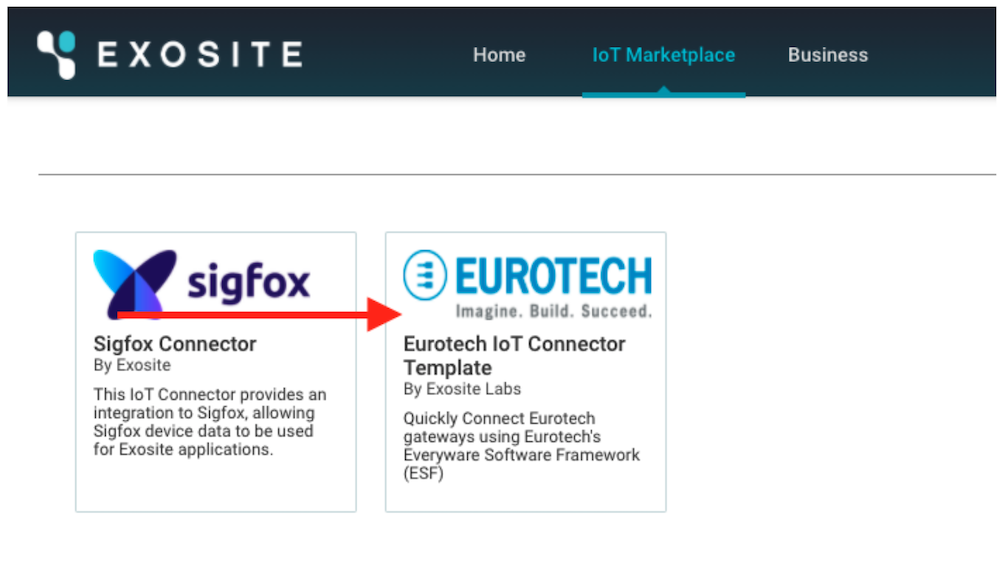
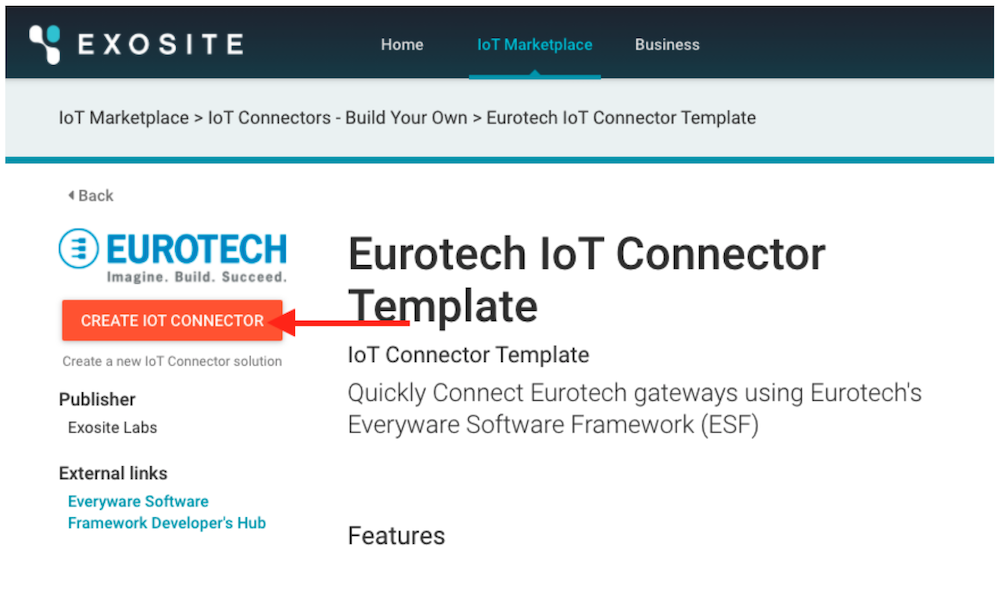
- Scroll down until you see the Eurotech IoT Connector Template and click this card
- Click "CREATE IOT CONNECTOR" on the next screen, agree to the terms, and click "CONTINUE"
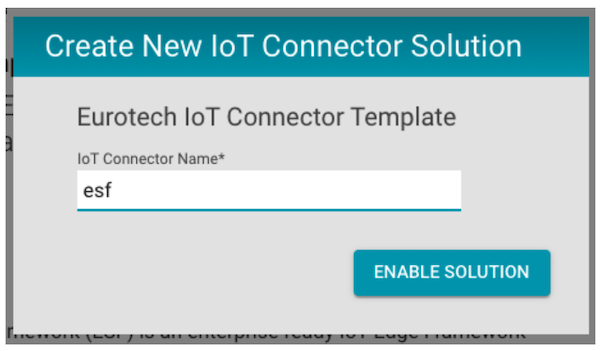
- Enter a name for the IoT Connector and click "ENABLE SOLUTION"
At this point, you will be returned to your Home screen with the Application and IoT Connector lists. You should see the newly created IoT Connector in the list and you are ready to go to the next step to configure your Eurotech gateway to send data to ExoSense. In preparation for those steps, you will need the Product ID for your IoT Connector.
1.2.1 Getting your Product URL
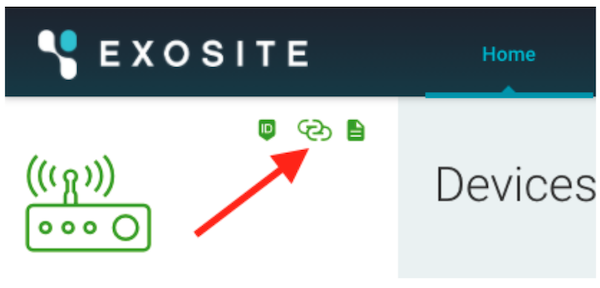
- You will want to click on the "3 dot" menu for the "ExoSense Standard Connector Template" and click "Manage IoT Connector"
- You can copy the Product URL to your computer's clipboard by selecting the "Link" icon in the upper-left of the screen
You can now go to Section 2 to configure your Eurotech gateway to report data.
Configure the Eurotech Gateway
Every Eurotech multi-service IoT edge gateway comes with Eurotech's Everyware™ Software framework (ESF) preinstalled. ESF is an edge integration framework that provides connectivity and integration with field devices, a complete environment to develop and integrate edge applications, and connectivity with the cloud.
The picture shows a ReliaGATE 10-14, but you can use this Quick Start example with any Eurotech multi-service IoT Edge gateway that features ESF: https://www.eurotech.com/en/products/iot#multi-service-iot-edge-gateways
Now that you have ExoSense deployed, you are ready to configure your Eurotech gateway to transmit data to ExoSense.
2.1 Install the ESF Cloud Connector for Exosite
ESF is a modular framework that offers a large set of plug-ins for field protocol support and cloud connectivity. To connect to Exosite, you first to install the ESF Cloud Connector for Exosite from the Eclipse Marketplace, following these steps:
- Power on your Eurotech gateway
- Open the ESF Administration Console: https://esf.eurotech.com/docs/gateway-administration-console
- Select the "Packages" menu
- In a separate browser window, open the ESF Cloud Connector for Exosite from the Eclipse Marketplace: https://marketplace.eclipse.org/content/esf-cloud-connector-exosite#group-details
- Drag and drop the connecto from the Eclipse window into the ESF Packages
2.2 Store the Server Certificate
Complete the following steps to configure ESF to connect to Exosite:
- Download this file: https://cacerts.digicert.com/DigiCertGlobalRootCA.crt.pem
- In ESF, go to Settings > Server SSL Certificate
- Enter any value for alias (for example: digicert-global-root-ca)
- Paste the contents of the DigiCertGlobalRootCA.crt.pem file into the Certificate section
- Click Apply
- Restart ESF (to apply the certificates). This can be done by either rebooting the gateway or running the following command on the gateway's command line:
systemctl stop kura && systemctl restart kura
2.3 Create a Cloud Connection to Exosite
- Go to Cloud Connections and select "New Connection"
- For the Factory PID select: "com.eurotech.framework.exosite.mqtt.cloud connection.ExositeCloudEndpoint"
- For the Service PID select: "com.eurotech.framework.exosite.mqtt.cloudconnection.ExositeCloudEndpoint"
- Click "Apply"
- Select the Cloud Connection just created. Select the "ExositeCloudEndpoint" tab and paste the following into the "Channel Configuration":
{ "channels": { "diag_cpu_util": { "description": "CPU Utilization", "display_name": "diag_cpu_util", "properties": { "data_type": "PERCENTAGE", "primitive_type": "NUMERIC", "data_unit": "PERCENT" } }, "diag_cpu_util_kura": { "decription": "ESF CPU Utilization", "display_name": "diag_cpu_util_kura", "properties": { "data_type": "PERCENTAGE", "primitive_type": "NUMERIC", "data_unit": "PERCENT" } }, "diag_mem_usg": { "description": "Memory Usage", "display_name": "diag_mem_usg", "properties": { "data_type": "PERCENTAGE", "primitive_unit": "NUMERIC", "data_unit": "PERCENT" } }, "diag_sys_uptime": { "description": "System Uptime (s)", "display_name": "diag_sys_uptime", "properties": { "data_type": "TIME", "primitive_unit": "NUMERIC", "data_unit": "SECONDS" } }, "mqtt_round_trip_time": { "description": "MQTT Round Trip Time (ms)", "display_name": "mqtt_round_trip_time", "properties": { "data_type": "TIME", "primitive_unit": "NUMERIC", "data_unit": "MILLISECOND" } }, "temperature_temperature_internal": { "description": "Internal Gateway Temperature (milliC)", "display_name": "temperature_temperature_internal", "properties": { "data_type": "NUMBER", "primitive_type": "NUMERIC" } } } } - Click "Apply"
- Go to the "MqttDataTransport" tab and enter the following information:
- Broker-url: this is you Exosite Product URL, as specified in section 1.1.1 or 1.2.1. You need t edit the original URL to match the following example: mqtts://xxxxxxxxxxxxxx.m2.exosite.io:8883
- Device ID: Enter a unique identifier for the gateway or leave blank to use the gateway's MAC address
- Leave all other settings at their default values
- Click "Apply"
- Click the "Connect/Disconnect" button (near the top of the page)
- Optional: To enable connect-on-startup, go to the "ExositeDataService" tab and toggle "Connect Auto-on-startup" to True. Click "Apply"
At this point, your gateway is connected to Exosite and you are ready to configure a new Exosite Publisher to begin sending data.
2.4 Publishing Diagnostic Information
For the purposes of this Quick Start guide, you will publish diagnostic data (e.g., CPU utilization, memory usage, etc.) from the gateway. This is the easiest way to get data flowing without sensors or other hardware connected to the gateway. (Note: Some diagnostics may not be available on every gateway).
- Click the "+ New Pub/Sub" button and create a new ExositePublisher. Use a descriptive name, for example "Exosite.publisher". Click "Apply"
- Go to the "DiagnosticsService" menu in ESF (on the left in the "Services" section)
- For the CloudDiagnosticPublisher.target click the "Select available targets" link and choose the Publisher you created above
- Change the health.monitor.poll.rate to the desired frequency in seconds for the diagnostic data to be sent to Exosite. (For demonstration purposes, you may want to set to a 10 second poll rate, so you can see data updated more frequently)
- Change the diagnostics.publish.rate.multiplier to 1
- Change the diag.messages.enabled to true
- Click "Apply" (at top of page) and "Yes"
2.5 Reset Diagnostic Information Publish Rate
When you are finished with the demonstration, reset the diagnostic information publishing rate to the default rate:
- Go to the "DiagnosticsService" menu in ESF (on the left in the "Services" section)
- For the CloudDiagnosticPublisher.target click the "Select available targets" link, and choose the default.diagnostic.publisher Publisher
- Change the health.monitor.poll.rate back to 600
- Change the diagnostics.publish.rate.multiplier back to 2
- Click "Apply" (at top of page) and "Yes"
Create asset and visualize data on a dashboard
Now that you have the connection established, you are ready to create an asset in ExoSense to visualize your data. This section will outline the steps to claim a device, create an asset, and view data on a dashboard.
You will need to be logged into your ExoSense application that was set up in Section 1 to follow the steps in this section.
3.1 Claiming Device in ExoSense
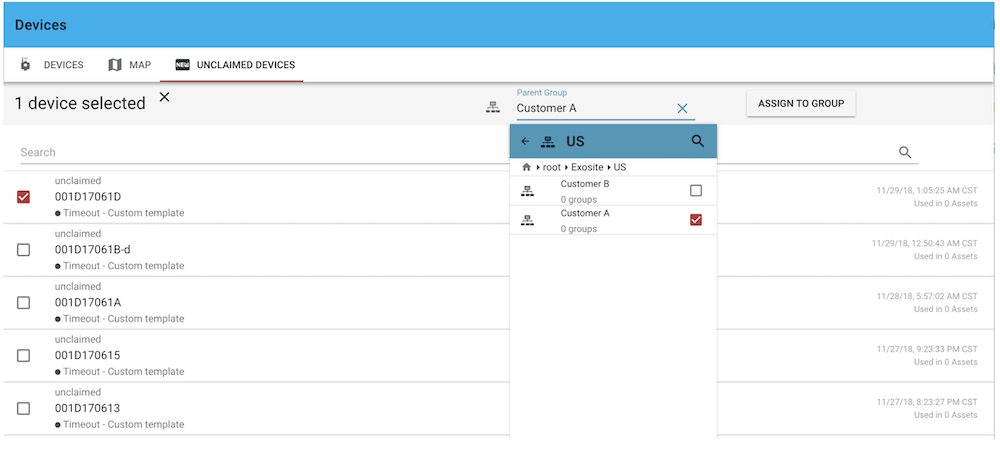
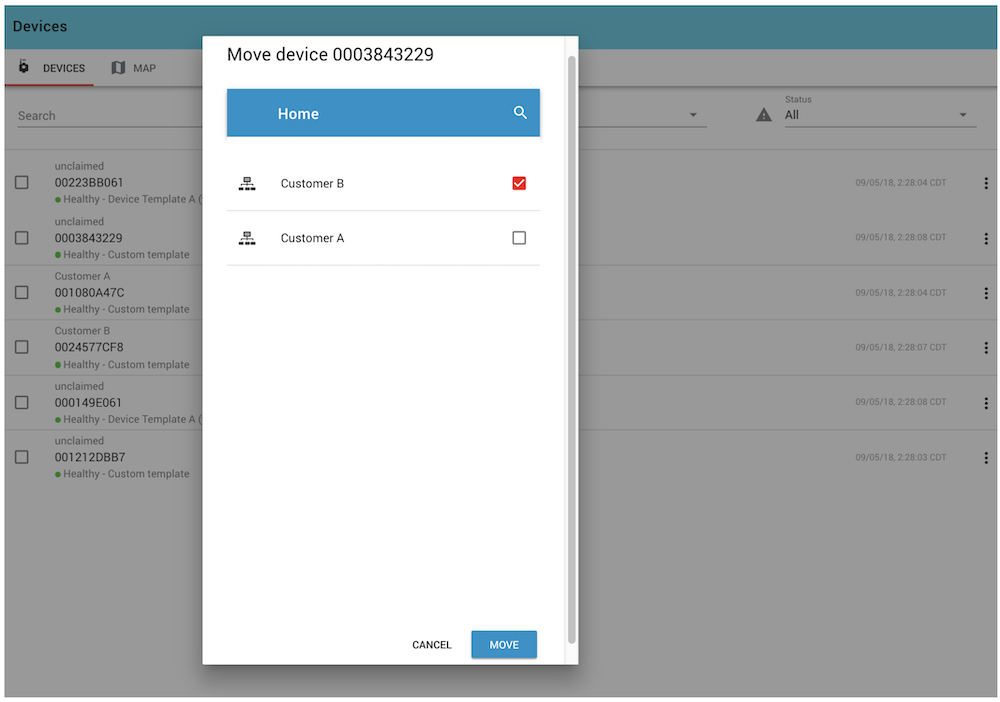
As your gateway is reporting data to Exosite, they will be represented as Devices within ExoSense. In order to view those devices, you will need to assign ownership of those devices to a specific group in ExoSense.
To assign ownership of a device, click the "Devices" option in the left-hand navigation menu and browser to the "UNUSED DEVICES" tab and select one or more devices to assign. Next, choose the "Parent Group" to which these devices will be assigned, and click "Assign to Group".
More details are provided here https://docs.exosite.io/exosense/devices/device-management
3.2 Create an asset
Now that you have claimed a device, you are ready to create an asset to manage and view the data. The easiest way to create a new asset is to find the device you want to view and create a new asset using a template. The following steps walk you through that process, but you can also follow the steps at https://docs.exosite.io/exosense/digital-assets/assets/#creating-assets to find alternative methods to create an asset.
- To create a new asset from a device, begin by clicking the "Devices" option in the left-hand navigation menu
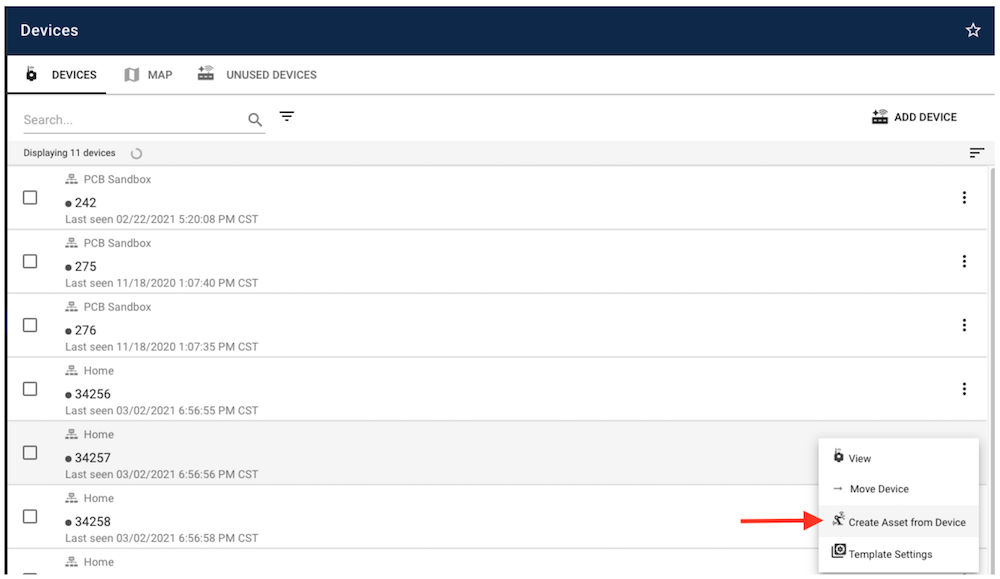
- Next, click the "3 dot" menu option to the right of the device you want to create an asset from and select "Create Asset from Device" as shown in the following image:
- This will open a "Create New Asset" screen, where you can set the following:
- Asset Name - a unique name is required for each asset created
- Description - option description for your asset (e.g. vib sensor placed on fan motor)
- Place Asset in Group - allows you to choose what group to place the asset. Users invited into that group will be able to view/manage the asset depending on their role permissions
- Template - this will be used to choose the template for the Eurotech gateway
- Device - pre-selected to the device used in previous step
- Icon - allows you to select an icon that will be used wherever the asset is listed in the rest of the application
- Once you have filled in a name and optional description, you should select the "Eurotech Gateway Example" from the template list
- After you have selected the template and made your other selections, click the "CREATE" button to initialize the asset
- When complete, you will be transitioned to the dashboard for the newly created asset
At this point, you have successfully connected your Eurotech gateway and can begin to view your data remotely. In addition, you can take advantage of the other features within ExoSense. You can find details on ExoSense and how to configure the application to your desires here: https://docs.exosite.io/exosense
Terminology
4.1 Common ExoSense Terms
| Term | Definition |
|---|---|
| Asset | Digital Twin virtual representation of a physical system or machine. Signals are associated with an Asset. Signals under an Asset can include data from one or many connected devices. |
| Device | Electronic hardware with ability to send data. The connected thing that is measuring a sensor or asking for data (e.g., fieldbus) for a physical data. |
| Channel | Stream of data from an IoT connected device (e.g., sensor data, status codes, event data), that will be consumed by Assets (Digital Twins) |
| Signal | Individual piece of data for an Asset (Digital Twin) that has a real time and historical (time series) component associated with it in addition to data unit, data type, and other properties. Typically sourced from IoT connected device channels. |
| Rule | Signal pipeline workflow logic that has the ability to detect states of a signal. Output is a state event, which affects the state of a signal and the asset. Rule events (state changes) are written to the asset log. |
| Signal Transform | Signal pipeline workflow logic that has the ability to perform operations or other functions on Asset signal data. Output of a transformation is a secondary signal that has its own properties. |
You can see a full list of Exosite Terminology here: https://docs.exosite.io/exosense/overview#terminology
Additional Information
Additional Information from Eurotech:
ESF Product documentation: https://esf.eurotech.com
Contact us with any questions https://www.eurotech.com/en/contact-us