HMS Ewon Flexy Direct Connect Installation Tutorial
The Ewon Flexy Direct Connect tutorial was created as a guide to help you through the process of configuring your Exosite Business, installing the Direct Connect Application onto you hardware, and begin streaming device data directly to Exosite. This approach will bypass the Ewon Talk2M cloud.
Prerequisites
- Exosite Business Account
- Deployed Exosense Instance
- Access to the Ewon Flexy via eCatcher
- Optional: The Ewon Flexy Direct Connect is a simple application which enables a user to quickly stream data to ExoSense. If you are interested in further development of the code base, you can download a zipped file containing the repository in the "Version History" Section.
Configure Your Exosite Business
Business Setup: Click to show first time setup
Deploy Ewon Flexy Direct Connector Template
-
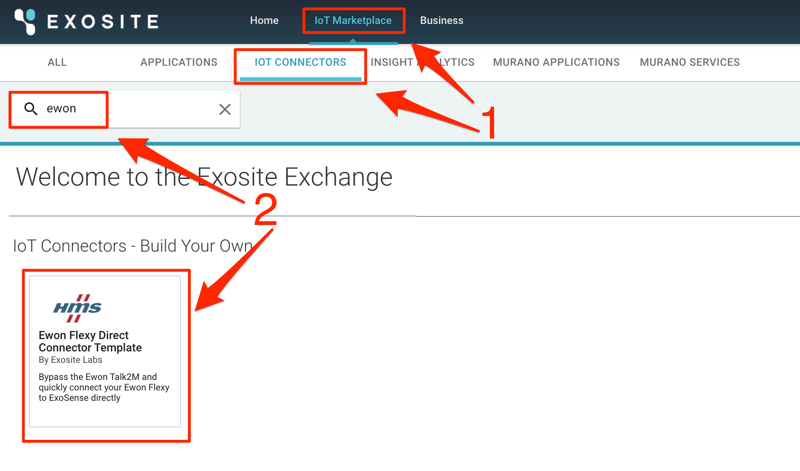
Click on IoT Marketplace and select IoT Connectors.
-
In the SEARCH field, type "ewon". This should bring up a few options under the "IoT Connectors - Build Your Own" section. Make sure to select Ewon Flexy Direct Connector Template.
-
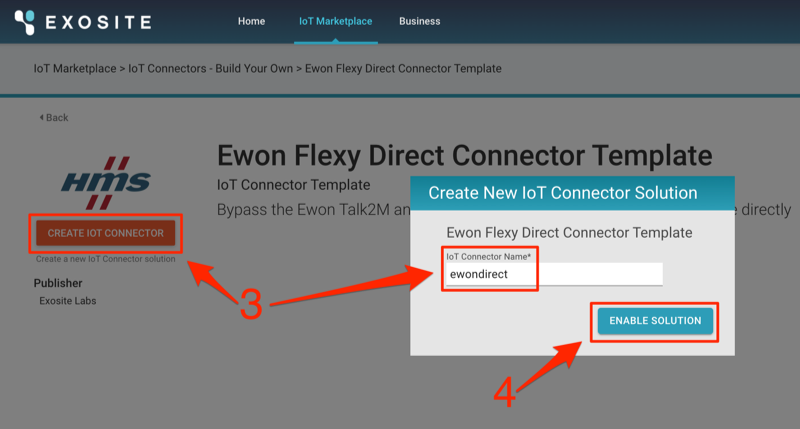
Select CREATE IOT CONNECTOR and choose a name for your new connector.
-
Select Enable Solution to create the Connector.
Link Your IoT Connector with ExoSense
-
Navigate back to your HOME tab and find your ExoSense Instance under the Applications section.
-
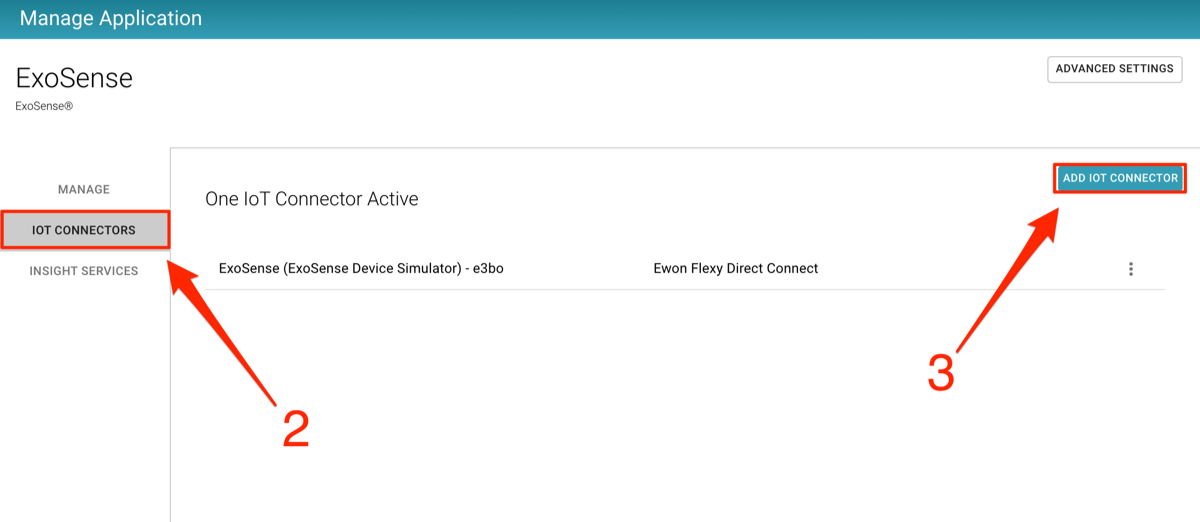
Click on IoT Connectors on the left menu.
-
Click the Add IoT Connector button on the right side.
-
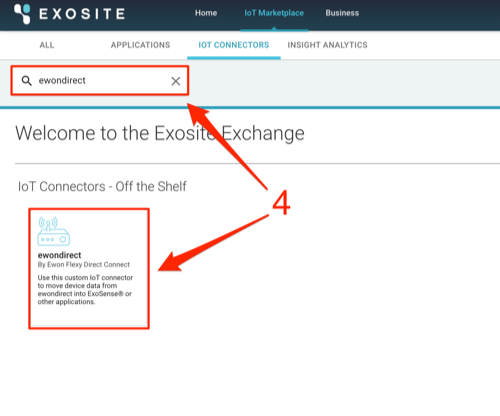
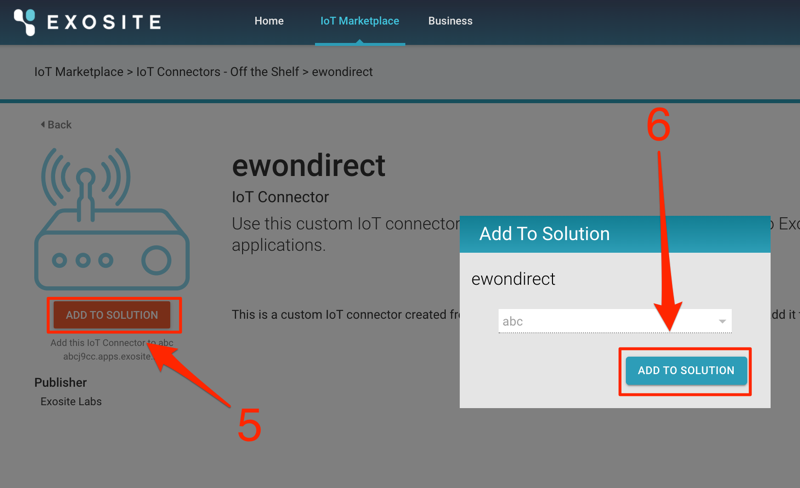
In the SEARCH field, enter the name of your new IoT Connector you created in the previous section. Click on the Exchange Element under "IoT Connectors - Off The Shelf".
-
Click the ADD TO SOLUTION button to bring up the list of your ExoSense Applications. Select the ExoSense Application that will be linked with the Connector.
-
Click on the orange ADD TO SOLUTION button to complete the link.
Your Exosite Business is now set up to handle incoming data from the Flexy. The next section will guide you through the process of installing the Exosite Direct Connect Application, as well as getting your Ewon Flexy configured to communicate with the Exosite platform.
Ewon Flexy Configuration
Download and Configure Application Files
The Ewon Direct Connect Application requires 4 files in order to run. You can download a .zip folder containing these files in the Version History
Zip File Contents
-
ewonclass.jar and ewondirect.jar: JAVA Application files.
-
jvmrun: Responsible for starting the application when the Flexy boots up.
-
config.txt: Configuration file which informs the Flexy of the following parameters:
- Exosite IoT Connector Device Endpoint
- Device Polling rate
You will need to make 2 edits to config.txt. The config file allows you to manually specify your IoT Connector Host URL and the desired polling rate. Open the file and you should see the following:
"url" = "<SOLUTION ID>.m2.exosite.io",
"polling_rate" = "600",
"device_control" : "false",
"quality_filter" : "false",
-
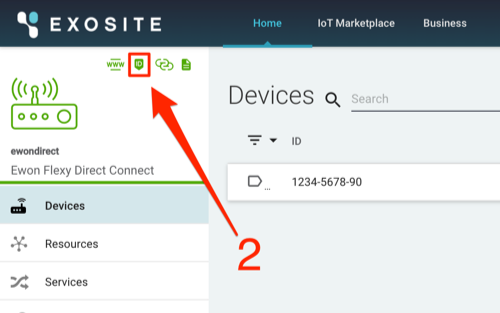
The Exosite Solution ID can be found within your IoT Connector. Navigate to your Exosite Business HOME page and find your new IoT Connector listed under the IoT Connectors section.
-
Click on your IoT Connector. Find the Copy Solution ID button located near the top left of the screen and click on it. This will copy the Solution ID to your clipboard.
-
Now that you have your Solution ID, return to the config.txt file. Paste the Solution ID over SOLUTION ID, and change the polling rate if desired. An example file after the Solution ID has been pasted will look like this:
"url" = "a4pequ1xai4sk70000.m2.exosite.io",
"polling_rate" = "600",
"device_control" : "false",
"quality_filter" : "false",
Polling Rate
It is recommended that you start with a polling rate no faster than 120 seconds, especially if you are logging a large number of tags.
Application Installation
The following steps are required to install the Direct Connect Application onto your Flexy:
-
Connect to the eWON Flexy via the eCatcher Application.
-
Establish an FTP connection to the Flexy.
- FileZilla is one of many available free applications you can use to connect via FTP.
- The Host field should be the IP Address of the Flexy. You can find this by looking at your eCatcher after connecting to the Flexy. The IP Address will be located near the top left of the eCatcher interface.
- Username/Password are the same credentials used to login to the Ewon Flexy itself.
FTP on Firmware 15.0+
Starting on firmware 15.0 on Ewon Flexys, FTP is disabled by default.
To Re-enable FTP:
1.) Log into your Ewon Flexy’s web interface. 2.) Navigate to Setup → System → Storage → Tabular edition → COM cfg. 3.) Adjust the ClosedDevice parameter to the appropriate value: *0 – FTP (and HTTP) server open on both LAN and VPN* 21 – FTP server closed on all interfaces (factory default) 1 – FTP closed on LAN, open on VPN 16 – FTP closed on VPN, open on LAN 4.) Reboot your device to apply changes. -
Copy all 4 files into the Flexy's /usr/ directory.
Flexy Tag Configuration
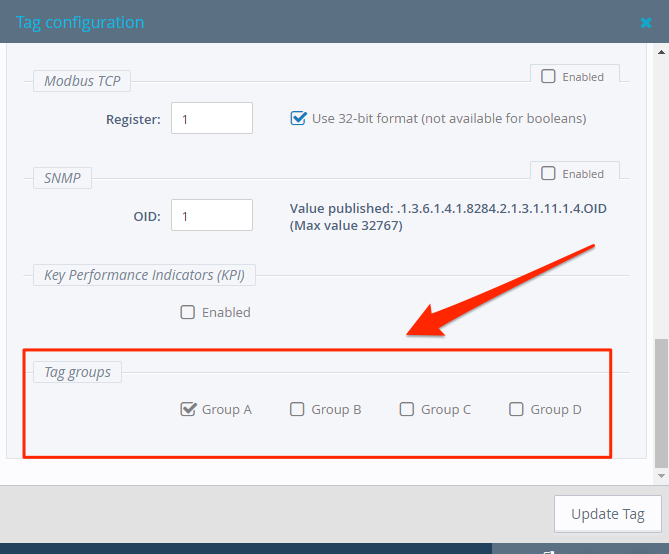
The Direct Connect application takes advantage of the Flexy’s built in Grouping feature. If desired, the user is able to configure tags to report at a consistent rate or to report only on change. To configure your tags on the Flexy, complete the following steps:
-
Tags that will be reporting at a regular interval (e.g. report every 2 minutes) should be subscribed to Group A or Group B.
-
Tags that are reporting only on change should be subscribed to Group C or Group D.
Assigning Tags to Groups
To assign a tag to a group, navigate to Tags >> Values, verify you are in SETUP mode and double-click the tag. Scroll to the very bottom of the Tag configuration page and check the box next to the group you wish to assign the tag to.
Enable Historical Logging
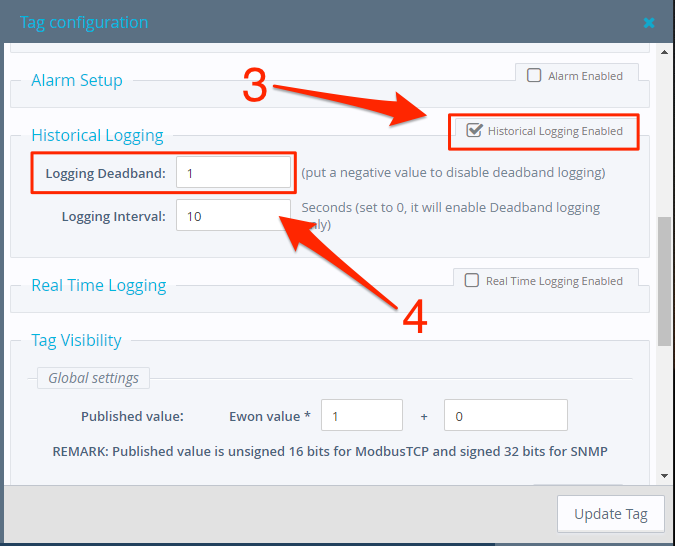
Tags that are subscribed to Group C or Group D must also have Historical logging enabled. To enable historical logging on a tag:
-
Connect to the Ewon Flexy via the eCatcher Application.
-
Make sure you are on SETUP mode and double click on the tag you wish to assign.
-
Scroll down to the Historical Logging section and make sure to check the box next to Historical Logging Enabled.
-
Set Logging Deadband to a non-negative number (We recommend setting it to 0). The Tag value will only be reported if the value changes ± the Logging Deadband.
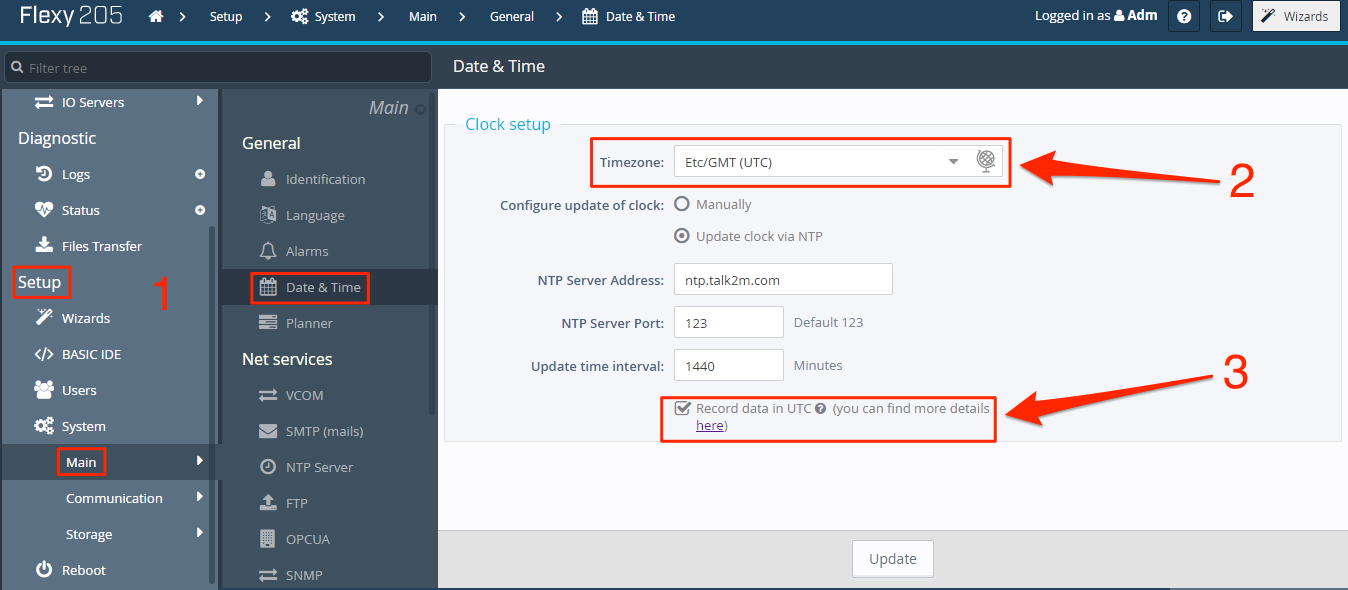
Configure timezone
In order to ensure that tags with Historical Logging enabled are reported in real time, the Flexy's timezone needs to be set to UTC.
-
Navigate to Setup >> Main >> Date & Time.
-
In the Timezone drop down menu, find and select Etc/GMT (UTC).
-
Check the box next to "Record data in UTC".
Now that you have you Ewon Flexy fully configured, you can begin the process of streaming data to your ExoSense Instance! Go ahead and reboot your Flexy to initiate the Direct Connect Application. Once the Flexy establishes a network connection, it will provision with the Exosite Platform. At this point, you will see it listed within your IoT Connector.
Data will also begin streaming to the platform at this time, assuming the tags have been placed in one of the 4 groups. However, before we can use this data in the ExoSense application, we will need to build a config_io. The next section will guide you through the process of building the config_io for your device.
ExoSense Configuration File
The final step is to create a config_io. You can learn more about this by taking a look at our Channel Configuration Documentation. The config_io will need to contain configuration information for each Flexy tag your wish to report. We recommend starting with a config_io consisting of only a single tag defined until a consistent data connection is established. Once you have data flowing, you can build the rest of the config_io.
Required Parameters
Tag_Name: Tag name as defined on the Flexy. The Tag name is defined by the user upon the initial configuration of the device. You can find these in the var_lst.csv file located on the Flexy, or in the Flexy UI when monitoring the tags.
Tag_Data_Type: Data type of the Tag. This needs to follow the Exosense data schema. To find the list of supported data types, check out our Exosense Data Type Documentation.
Tag_Data_Unit: Data unit of the Tag. This needs to follow the Exosense data schema. To find the list of supported Data units, check out our Exosense Data Type Documentation.
Tag_Description: User-defined description of the Tag which will be exposed at the Signal level in Exosense.
Tag_Display_Name: User-defined display name of the Tag which will be exposed in Exosense Dashboards.
Create a config_io for your Flexy
Once you have the required information for your tag/s, you are ready to build the config_io.
-
As the Flexy only requires 5 parameters, the config_io is generally very simple. Here is an example of a config_io containing a single Channel:
{ "last_edited": "1670524007", "channels": { <Tag_Name>: { "display_name": <Tag_Display_Name>, "description": <Tag_Description>, "properties": { "data_unit": <Tag_Data_Unit>, "data_type": <Tag_Data_Type> } } } } -
Here is another example using generic parameters:
{ "last_edited": "1670524007", "channels": { "temperature": { "display_name": "Engine Temperature", "description": "Temperature for Engine 1 in C", "properties": { "data_unit": "DEG_CELSIUS", "data_type": "TEMPERATURE" } } } } -
From here, create a new Channel entry for each of the Flexy tags you want reported to ExoSense. Check out our Exosense Data Types Documentation for a full list of ExoSense supported Data Types/Units.
{ "last_edited": "1670524007", "channels": { "temperature": { "display_name": "Engine Temperature", "description": "Temperature for Engine 1 in C", "properties": { "data_unit": "DEG_CELSIUS", "data_type": "TEMPERATURE" } }, "diff_pressure": { "display_name": "Differential Pressure", "description": "Differential Pressure", "properties": { "data_unit": "PSI", "data_type": "PRESSURE" } }, "system_mode": { "display_name": "System Mode", "description": "Mode: 0-Not Running, 1-Running", "properties": { "data_unit": null, "data_type": "NUMBER" } } } } -
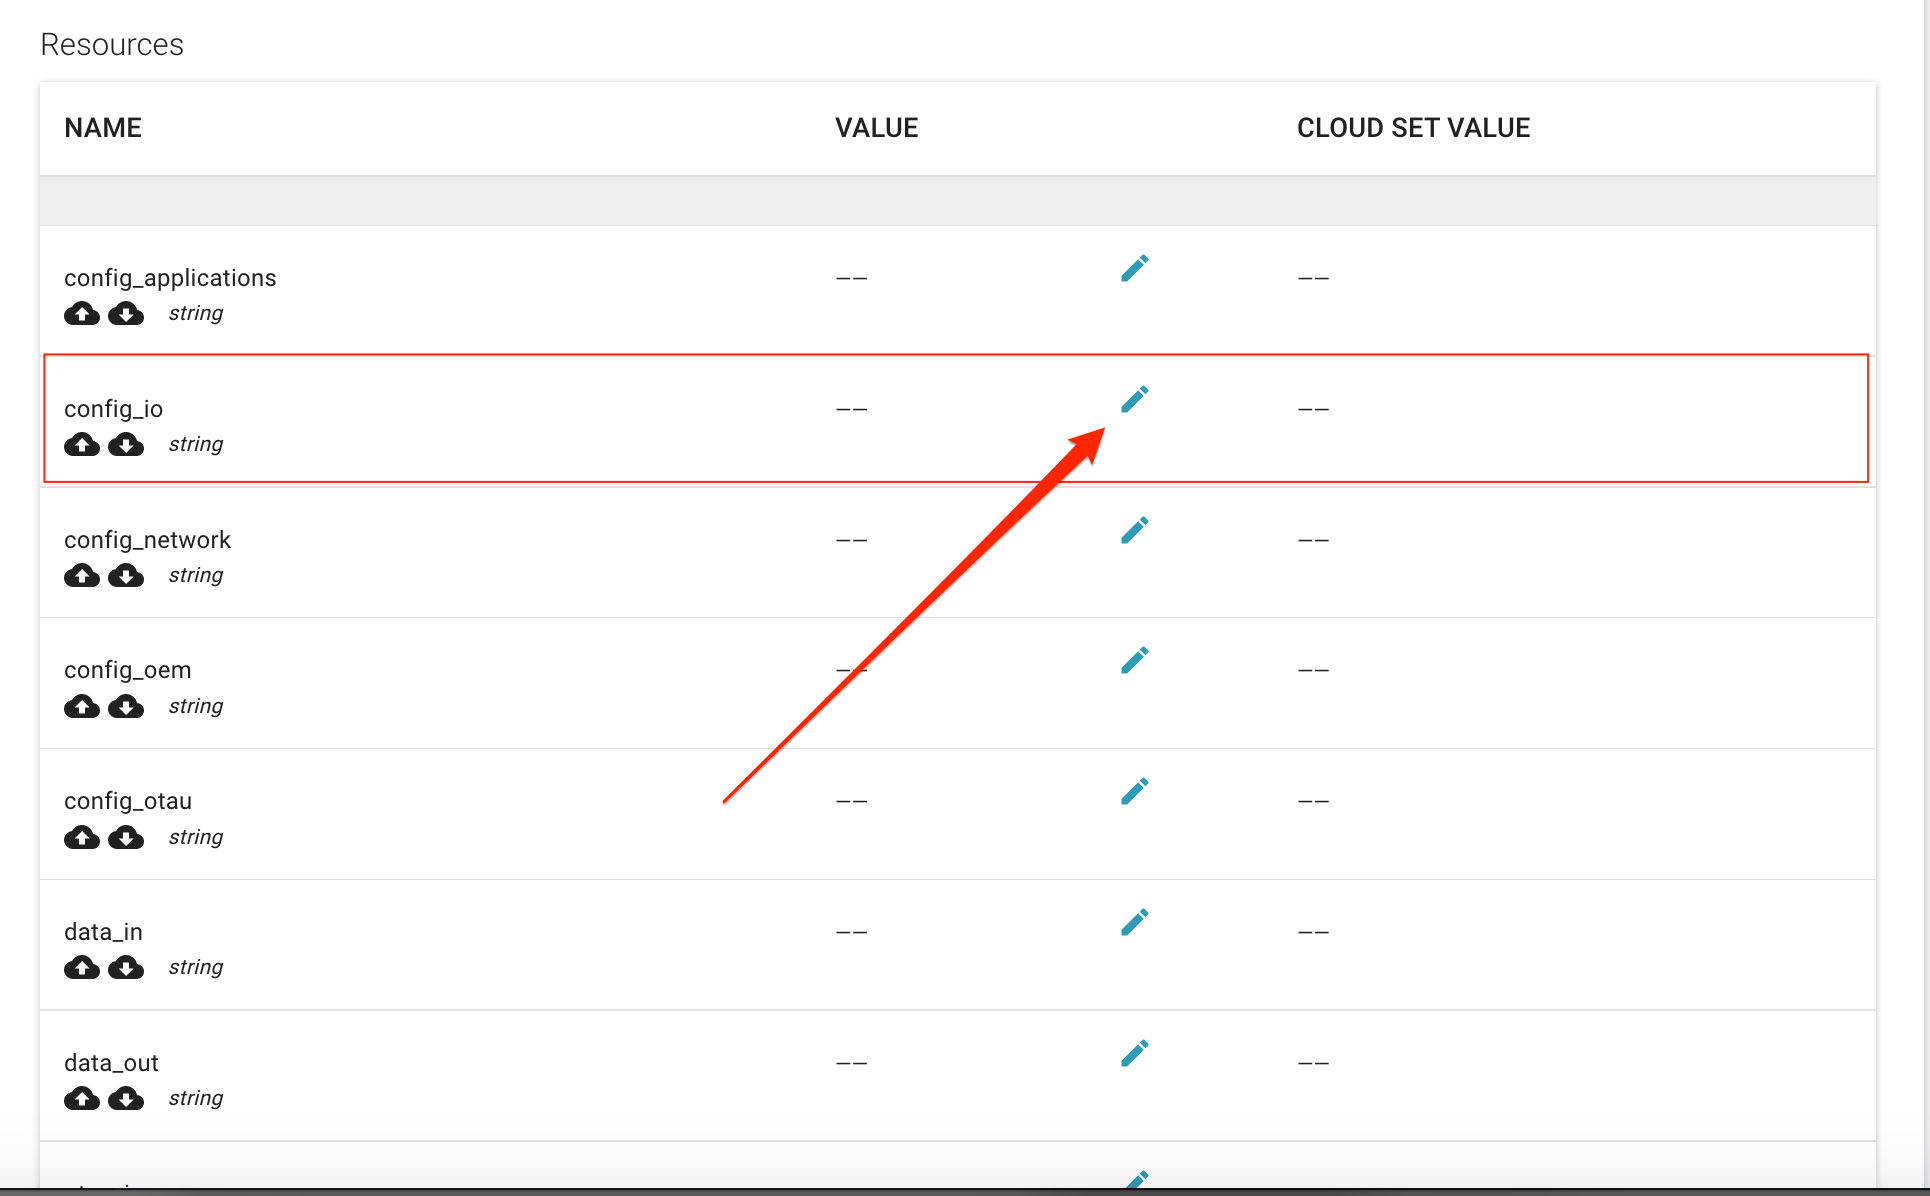
Once your config is fully built out, copy the entire object and navigate back to your IoT Connector. Click on your newly provisioned device. You will see a list of resources on the left side of the screen. If data is streaming from the Flexy, you will see the payload next to the data_in resource. Above this, find the config_io resource and click on the small pencil icon located to right of the resource name.
-
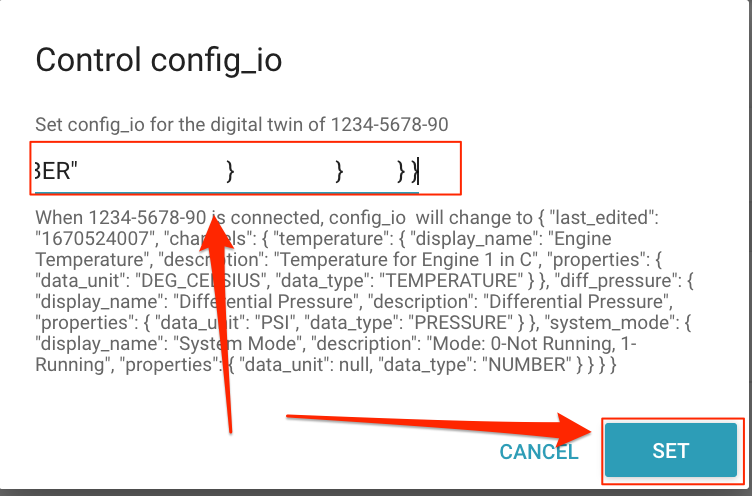
Click on the empty field near the top of the "Set Config" pop up window, and paste your config_io. Click the "Set" button.
-
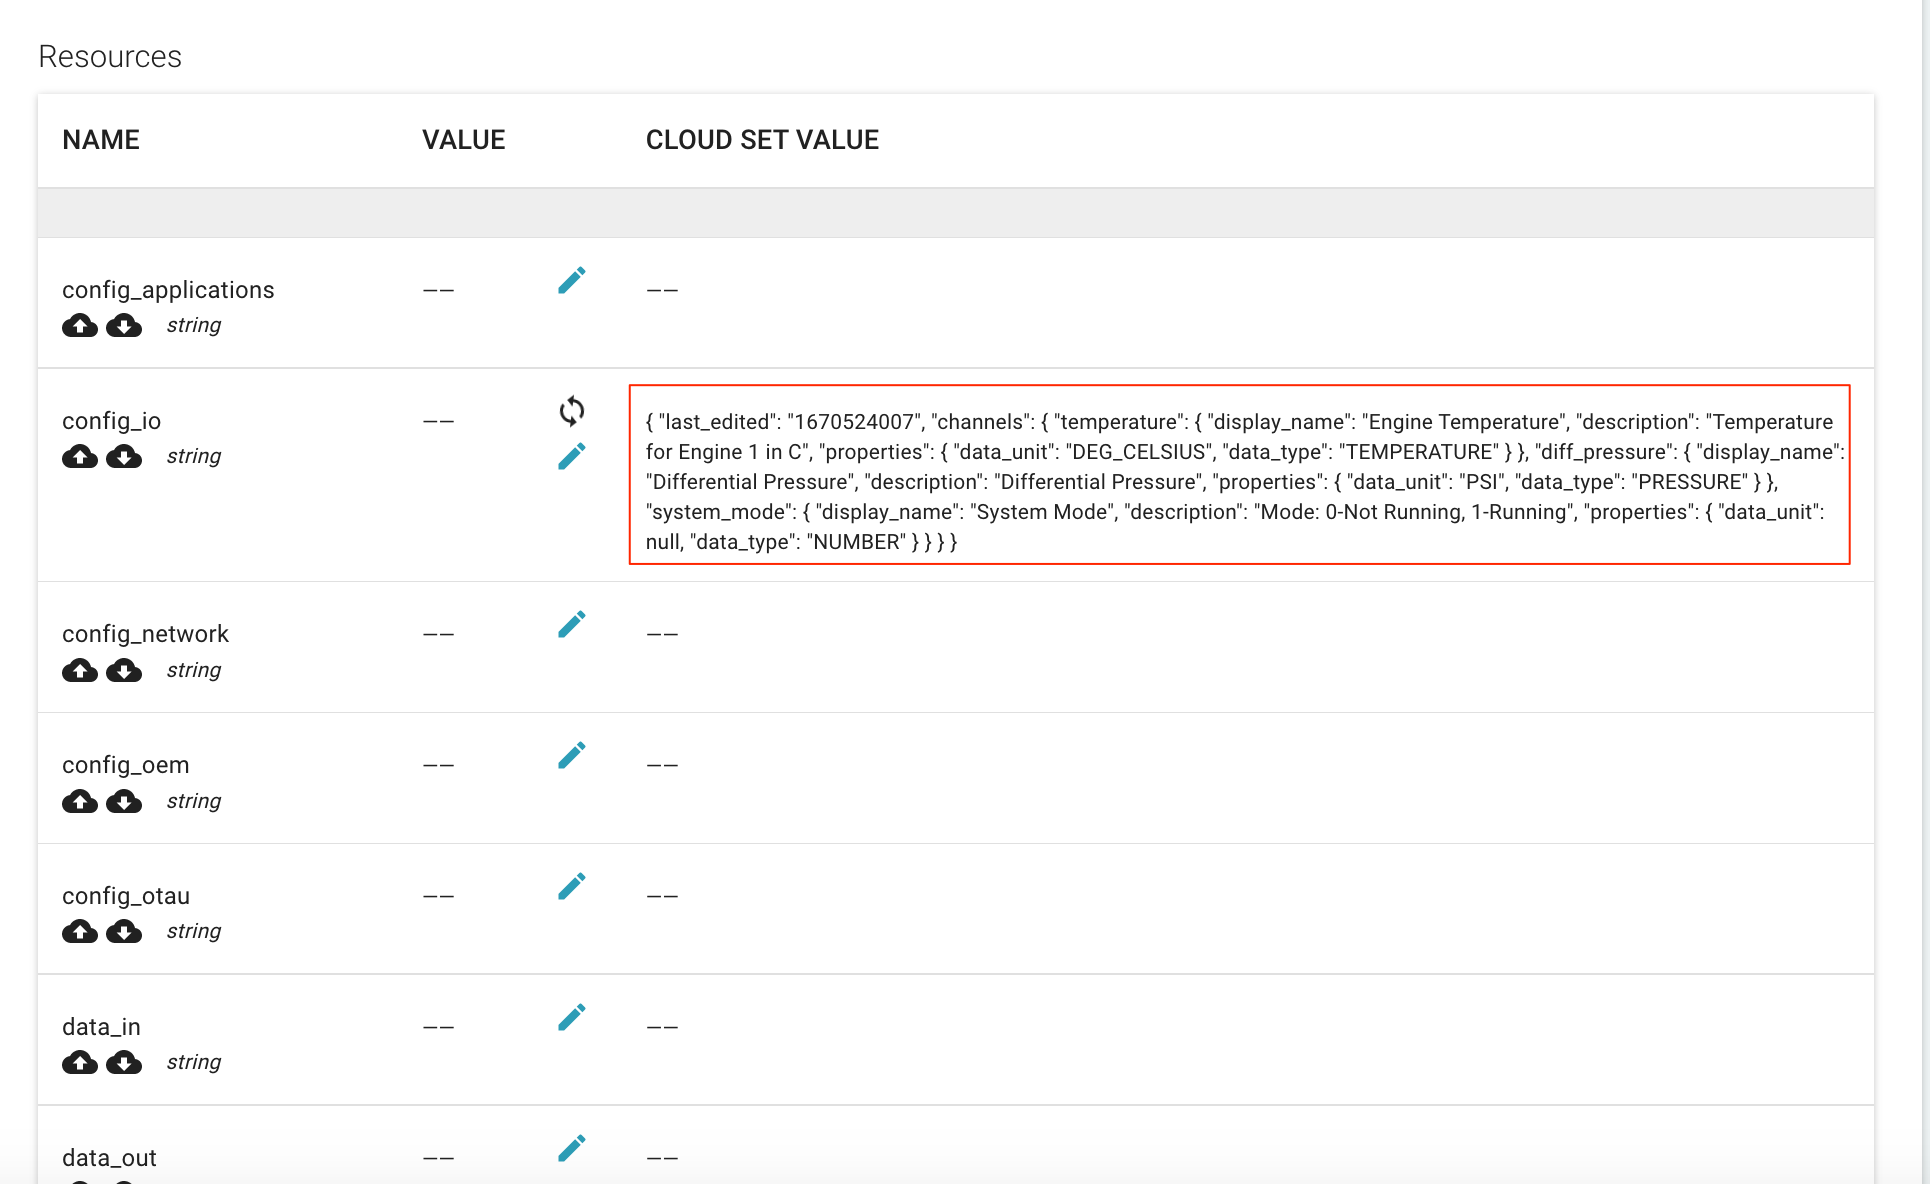
You will see the full config under the "Cloud Set Value" column. At this point, reboot your Flexy device once again. When it comes back online, the Flexy will read the config_io and write it back to the platform..
-
That's it! Your Flexy has now been configured to stream data directly to ExoSense! Note that anytime you need to make a change to the config_io, you will go through the same process listed above. Make sure you remember to reboot the device once you set a new config_io
Optional Features
Device Control
Beta Feature
Ewon Direct Connect Device Control is currently in beta. At this time, the only control action supported by Exosite is "Write Value to Ewon Tag"."
Through the use of Exosite's data_out resource, which can be utilized via an ExoSense Dashboard, users are now able to establish a 2-way communication between ExoSense and the Ewon Flexy. At this time, we support the following actions:
- Write Value to Tag
Enable Device Control on the Flexy
Device Control is configured within the config file that is included with the Direct Connect package. To enable Device Control, set the "device_control" parameter to "true".
"url" = "<SOLUTION ID>.m2.exosite.io",
"polling_rate" = "600",
"device_control" : "true",
"quality_filter" : "false",
Control Configuration
Recommended Reading
It is recommended to read the documentation on Device Control we currently have available before proceeding to set up an ExoSense Control Channel.
Before we can set up a Dashboard, we must first make sure that the Channel we wish to control is configured correctly. This is accomplished by editing the config_io. Let's take an example of a SETPOINT channel. This channel will generally report a previously user-defined value until it is changed on the Flexy itself. However, we now have the ability to change this value via ExoSense.
To enable Device Control on a channel, we need to set the "control" parameter in the config_io to true.
{
        "last_edited": "1670524007",
        "channels": {
                "setpoint": {
                        "display_name": "Setpoint - Temperature",
                        "description": "Setpoint for System Temperature",
                        "properties": {
                                "data_unit": "DEG_CELSIUS",
                                "data_type": "TEMPERATURE",
                "control": true
                        }
                }
    }
}
NOTE: See Documentation for more details regarding Device Control options
Create Device Control Panel
Once you have a signal created for the Setpoint control Channel, you can add a "Device Control" Panel to your Dashboard. If you haven't yet, make sure your Control Signal has been created in the "Modify Asset Config" page.
-
Navigate to your Asset's Dashboard
-
Click on the orange plus (+) button located at the top right of the window
-
Click on the "Add New Panel" button
-
Select "Control Panel" and hit the "NEXT" button
-
Find and select the signal which has been previously configured for Control capabilities
-
There are two modes available for defining the message you want sent to the Flexy. "Freeform" allows the user to enter ANY value into the Panel itself. Otherwise, you can add custom "commands" which gives the ability to pre-define which values will be available to the User.
-
Un-click the "freeform" option and instead click "ADD COMMAND". As an example, use the gif below to set up 2 separate commands.
Using the Control Panel
At this point, your Dashboard is set up to initiate basic 2-way communication between ExoSense and the Flexy. To use the Control Panel, click on the dropdown menu located on the Panel itself. You will see the 2 commands you previously configured in the Panel Configuration. Choose one of these commands and click the "SEND" button. This will then set the "data_out" resource to be the Control message. If Device control is enabled on the Flexy, The unit will read this value from the cloud and initiate the action.
Supported Actions
Write Value To Tag
Writing a new value to an exisitng Flexy tag will require the tag to have both read and write access. Attempting to write a value to a tag which has been configured as "read only" will not be successful. Common use cases for this action include defining the value for a specific Setpoint, or giving the user ability to change the Operating mode of the machine (IE turning the machine on/off).
Quality Filter
Configuring Quality Filter on the Flexy
Each datapoint that is evaluated by the Direct Connect Application has a "Quality" rating associated with it. The rating is a number (0, 1, or 3) with 3 representing "Good Quality". By default, the Application will report every datapoint regardless of the Quality. However, if the user only wants to see data tagged as "Good Qualtiy", the quality filter can be leveraged. The Quality Filter is enabled by setting the "quality_filter" parameter in the config file to "true".
"url" = "<SOLUTION ID>.m2.exosite.io",
"polling_rate" = "600",
"device_control" : "false",
"quality_filter" : "true",
Conclusion
Your Flexy should now be reporting data to Exosite! The next step will be to create an Asset and start building out your Dashboards using the previously configured data channels. To continue building your Asset, follow the Create an Asset ExoSense documentation to begin the next steps.
Version History
| Version | Date | Download | Notes |
|---|---|---|---|
| 0.3.0 | Oct 23 2023 | Link | Latest Production Release :: Changelog |
| 0.2.3 | Jul 17 2023 | Link | Official Device Control Support, minor bug fixes |
| 0.2.2 | Jan 10 2023 | Link | Beta Release for Device Control and Quality Filter |
| 0.2.0 | Dec 08 2022 | Link | Improvement: Update to newest HMS java libraries |
| 0.1.1 | Oct 20 2022 | Link | Fix: Application runs once Nework Connection is established |
| 0.1.0 | May 09 2022 | Link | Initial Release |
| ## Support |
For support, email support@exosite.com